Blog
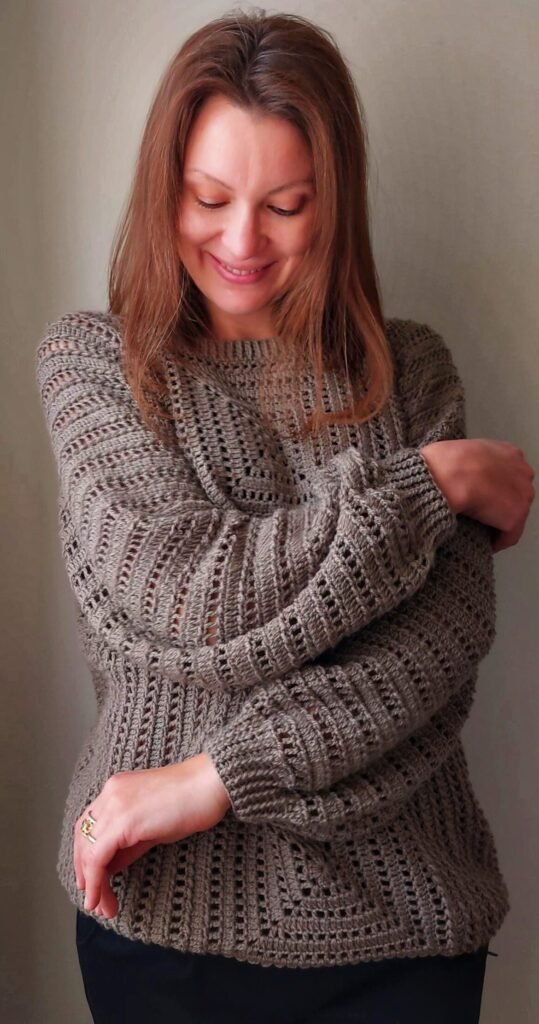
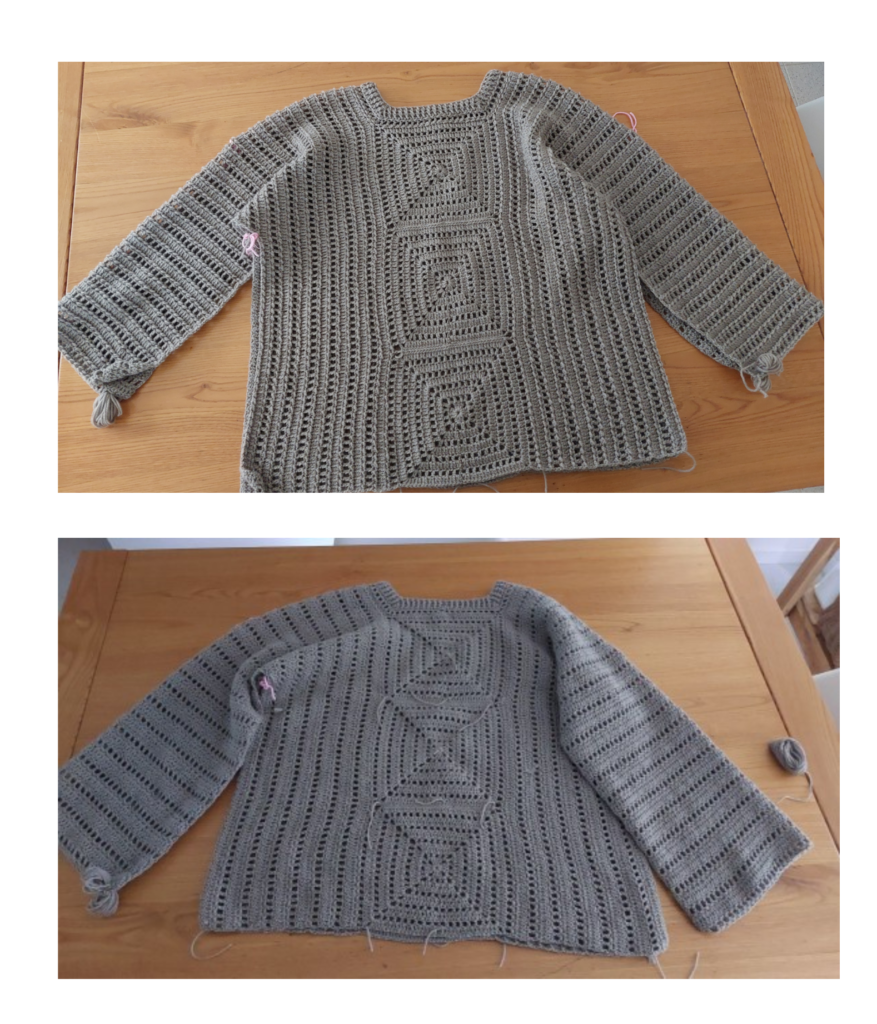
Althea Sweater
Skill Level:Beginners
This crochet project is perfect for anyone who wants to create a cozy, oversized sweater tailored to
their size.
The design is simple and intuitive, making it suitable for beginners familiar with basic crochet stitches.
Following the pattern, you’ll achieve a unique and versatile garment ideal for any occasion.
The sweater is made in an oversized Medium size, but the pattern is also available in the following
sizes: XS, S, L, XL, 2X.
Its comfortable and versatile fit makes it suitable for various styles and preferences.
Sizes Available:
XS, S, M, L, XL, 2X
Final Measurements:
Neckline Circumference: 51cm, 54cm, 57cm, 59cm, 61cm, 62cm
Bust Circumference: 98cm, 104cm, 112cm, 122cm, 128cm, 136cm
Sleeve Circumference: 38cm, 39cm, 40cm, 41cm, 42cm, 44cm
Sleeve Length: 43cm, 44.5cm, 46cm, 47.5cm, 47.5cm, 49cm
Length: 64cm, 65cm, 66cm, 67cm, 68cm, 70cm
Materials Needed:
Yarn: Luxury VIP by Lana Gatto (50g = 200m / 218 yds).
For size M, 500g (10 skeins), equivalent to 2000 meters, were used.
Yarn Estimates for Other Sizes:
XS: approx. 1600 meters (8 skeins)
S: approx. 1800 meters (9 skeins)
L: approx. 2400 meters (12 skeins)
XL: approx. 2800 meters (14 skeins)
2X: approx. 3000 meters (16 skeins)
Crochet Hooks:
3.5 mm for the body and sleeves
3.0 mm for finishing edges (neckline, sleeves, hem)
Other Tools: Scissors, stitch markers, measuring tape.
Stitches Used (US Terminology):
ch: chain
sl st: slip stitch
hdc: half double crochet
dc: double crochet
fpdc: front post double crochet
bpdc: back post double crochet
R: row
rep: repeat * *
sk: skip
tog: together
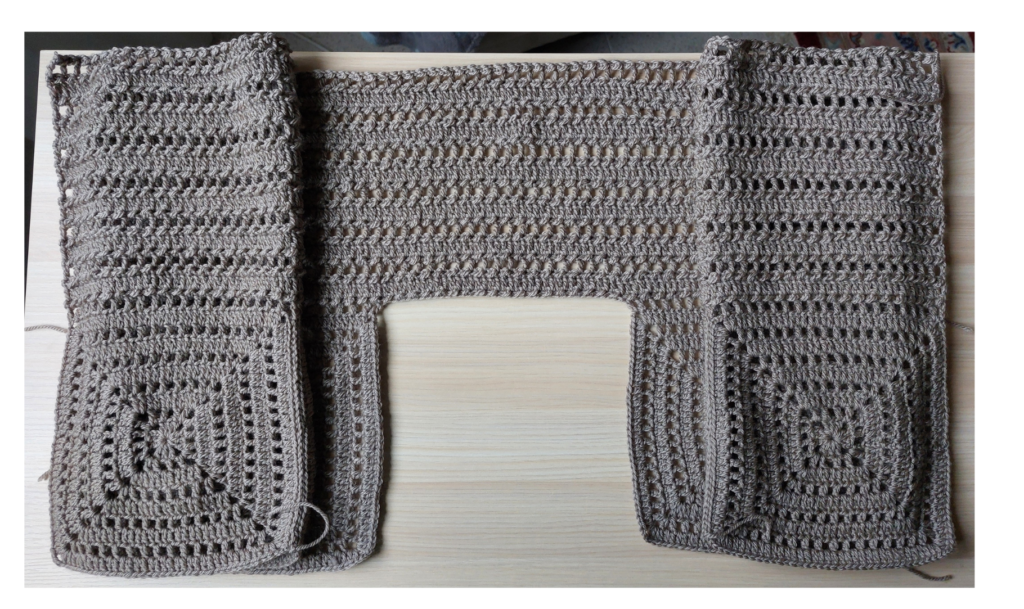
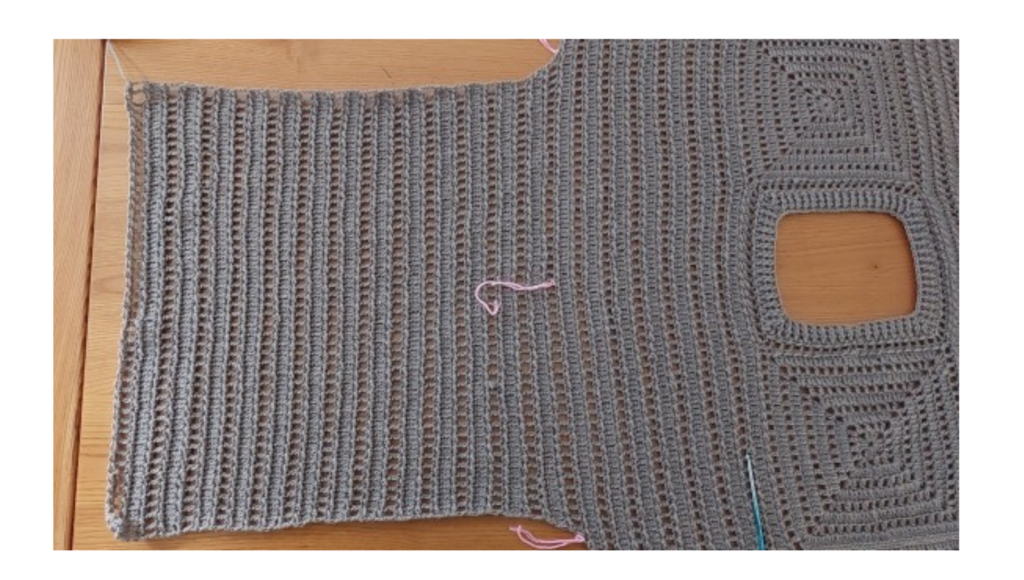
Sweater Structure:
Create 6 squares.
Divide the squares into two groups of 3 and join them into rows. These rows form the central
panels for the front and back.
Side Panels:
Starting from a corner of the first group of 3 joined squares, work dc (or a mesh pattern of 1dc-1ch) along the length of the squares.
Add the required number of chains for your chosen size.
Continue with dc (or mesh pattern), joining with the second group of squares, and work along their
length to the opposite corner.
Follow this row sequence for the sides:
Row 1: ch1, sl st-hdc
Row 2: ch3, dc
Row 3: ch1, sl st-hdc
Row 4: ch4, dc-1ch
Repeat rows until the desired length is reached for each side.
Body Shape:
After completing both sides, you’ll have a large rectangle with a square opening in the center for the neckline.
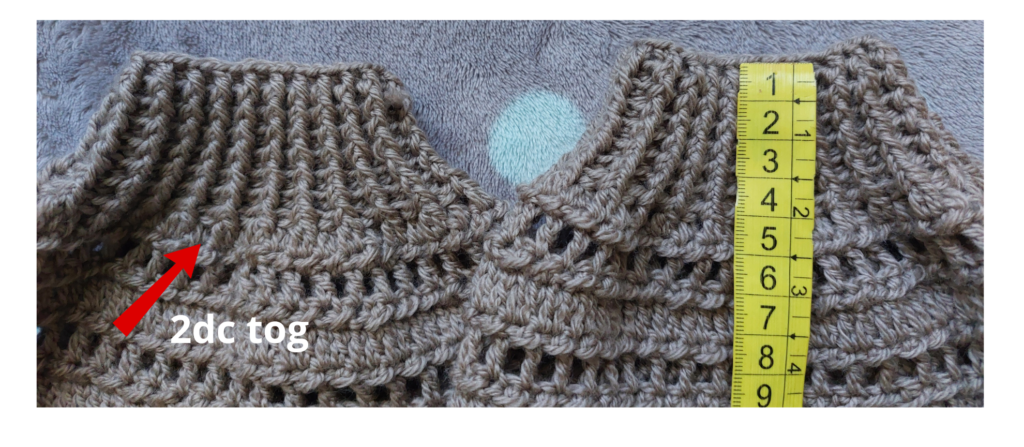
Neckline:
Use a 3.0 mm hook.
Work a ribbed border alternating fpdc and bpdc.
Decreases: At the 4 inner corners of the square, join 3 stitches into 1, maintaining the fpdc-bpdc
alternation. Repeat decreases in each row to create a snugger neckline.
Sleeves:
Mark the center stitch separating the front and back panels, ensuring symmetry on both sides.
1.Count the required number of stitches (varies by size) to the right and left of the center stitch.
2.Work the first row from the panel edge, right to left, following the established pattern.
3.Decreases: To taper the sleeves, reduce stitches in the 1st and 3rd rows. For a tighter fit, continue decreasing in subsequent rows of dc or mesh pattern.
4.Once the required sleeve length is reached, close the sides of the sleeves and panels.
Cuffs and Finishing:
Cuffs: Use the same technique as the neckline ribbing.
Row 1: Decrease by working 2dc together.
Subsequent Rows: Alternate fpdc and bpdc.
Let’s finish the bottom edge of the sweater using the same stitch alternation as for the cuffs: Front
Post Double Crochet (FPDC) and Back Post Double Crochet (BPDC). This will create a consistent
look.
Starting the project
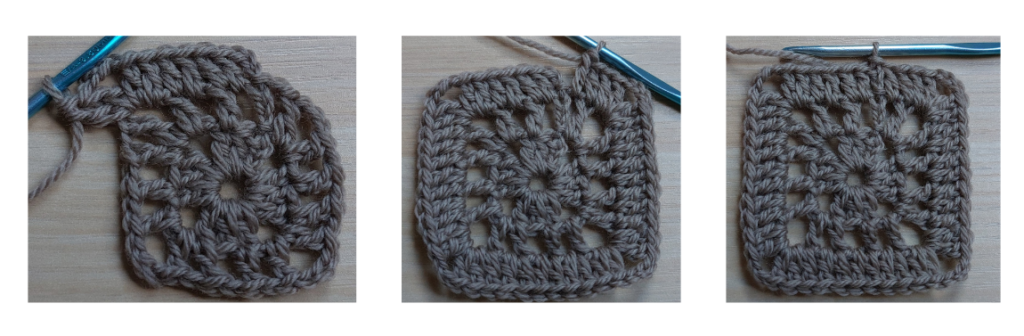
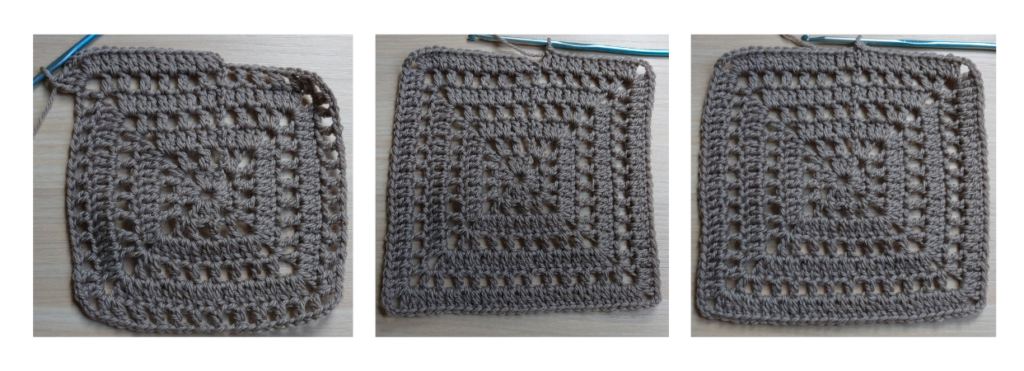
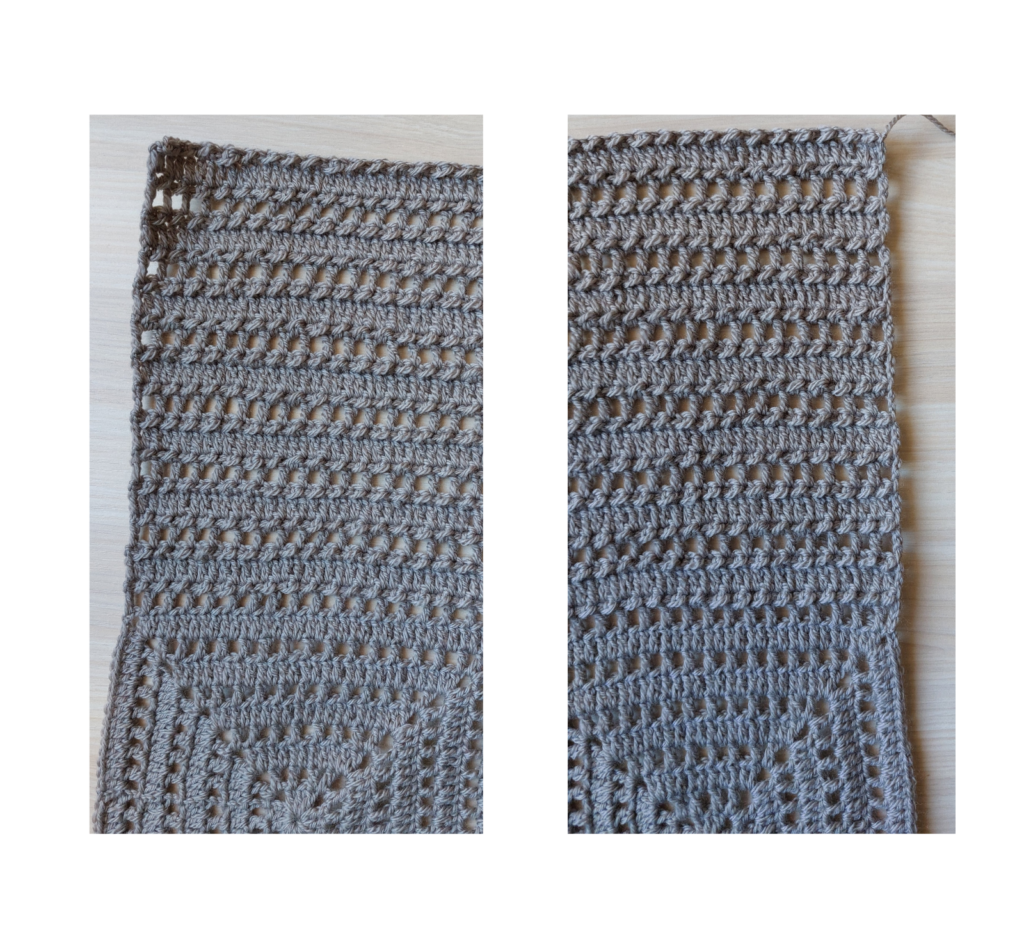
Squares:
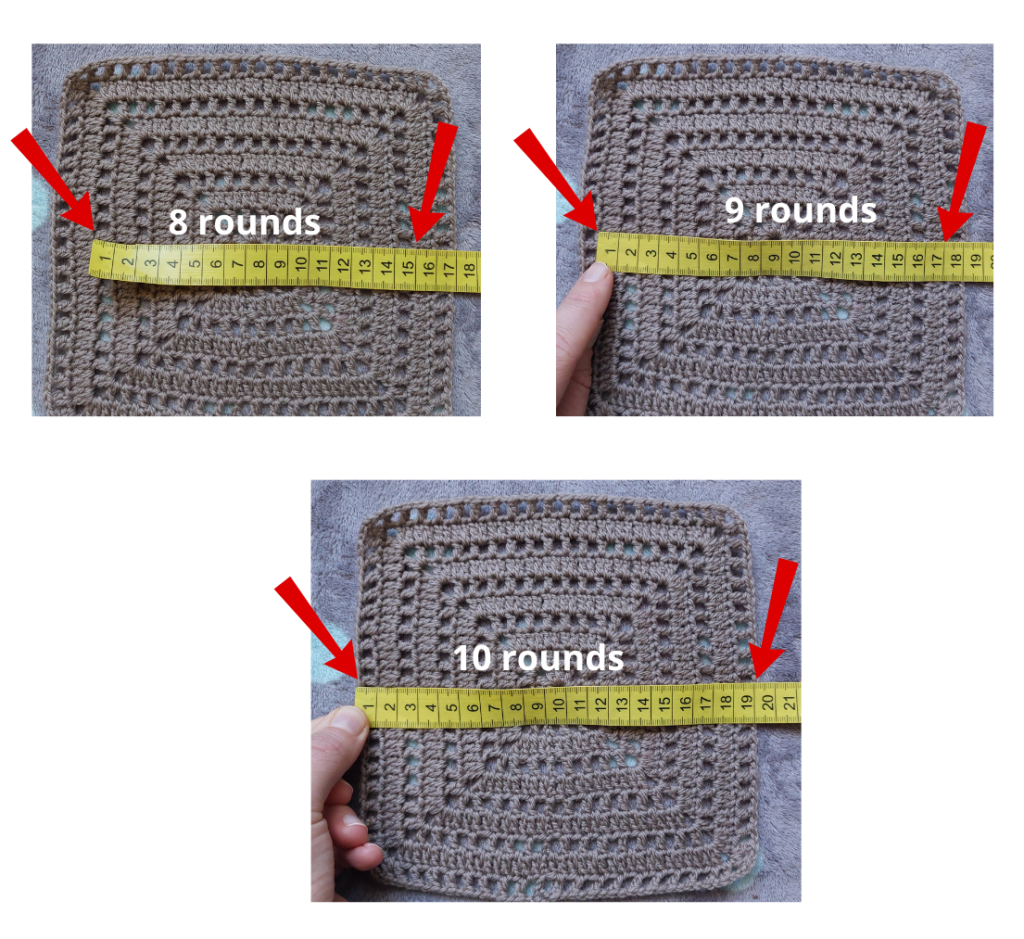
Start by making the 6 squares. For sizes:
XS, S: 8 rounds, 15cm x 15cm
M, L: 9 rounds, 17cm x 17cm
XL, 2X: 10 rounds, 19cm x 19cm8
Square Instructions:
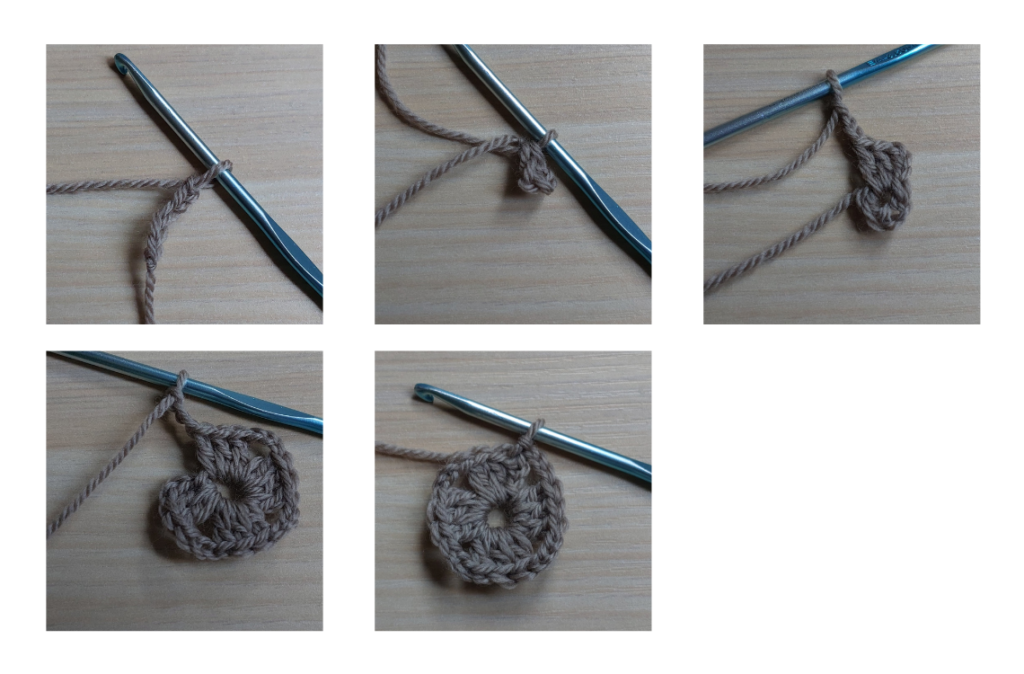
Foundation: Chain 5 and join with a sl st to form a ring.
Round 1:Ch3 (counts as 1dc), work 2dc, *ch3, 3dc*. Repeat * * 3 more times.
End with ch2 and join with a sl st to the third ch of the starting chain.
Round 2:Ch4 (counts as 1dc + 1ch), skip a stitch, work 1dc.At corners: ch1, 1dc, ch3, 1dc, ch1.Work 1dc, ch1, skip a stitch, and repeat. Finish with a sl st.
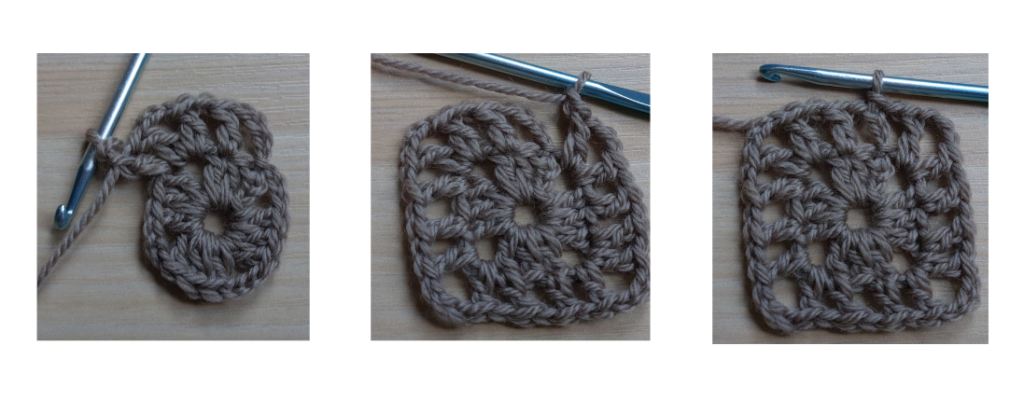
Round 3:Ch3 (counts as 1dc), work 4dc.
First corner: 2dc, ch3, 2dc.
Work 7dc along the side.
Second corner: 2dc, ch3, 2dc.
Repeat the sequence for the third and fourth corners.
End with a sl st in the third ch of the starting chain.
Round 4:Ch4 (counts as 1dc + 1ch), skip a stitch, 1dc, ch1 (repeat 2 times), skip a stitch, 1dc.First corner: Ch1, 1dc, ch3, 1dc, ch1.Work 1dc, ch1 (repeat 5 times), then 1dc.Repeat the sequence for the second, third, and fourth corners.End with a sl st in the third ch of the starting chain.
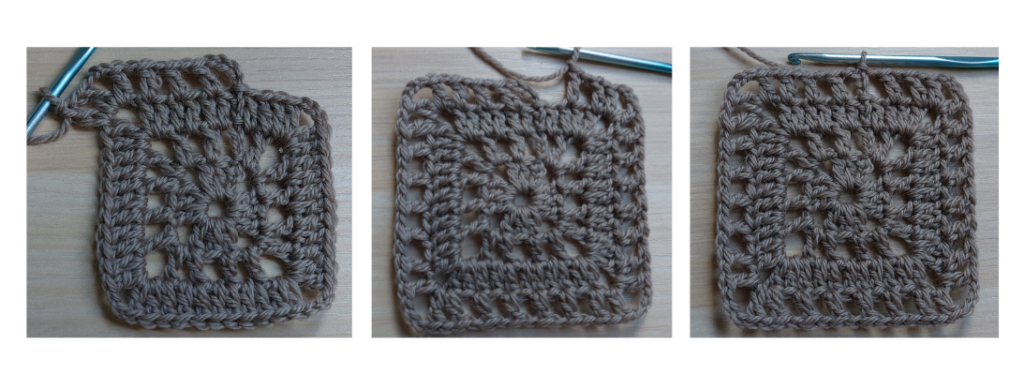
Round 5:Ch3 (counts as 1dc), work 8dc.First corner: 2dc, ch3, 2dc.Work 15dc along the side.Second corner: 2dc, ch3, 2dc.Repeat the sequence for the third and fourth corners.End with a sl st in the third ch of the starting chain.
Round 6:Ch4 (counts as 1dc + 1ch), skip a stitch, 1dc, ch1 (repeat 4 times), then 1dc.
First corner: Ch1, 1dc, ch3, 1dc, ch1.
Work 1dc, ch1, skip a stitch (repeat 9 times), then 1dc.
Repeat the sequence for the second, third, and fourth corners.
End with a sl st in the third ch of the starting chain.
Round 7:Ch3 (counts as 1dc), work 12dc.First corner: 2dc, ch3, 2dc.Work 23dc along the side.Second corner: 2dc, ch3, 2dc.Repeat the sequence for the third and fourth corners.End with a sl st in the third ch of the starting chain.
Round 8:Ch4 (counts as 1dc + 1ch), skip a stitch, 1dc, ch1 (repeat 6 times), then 1dc.
First corner: Ch1, 1dc, ch3, 1dc, ch1.
Work 1dc, ch1, skip a stitch (repeat 13 times), then 1dc.
Repeat the sequence for the second, third, and fourth corners.
End with a sl st in the third ch of the starting chain.
Round 9:Ch3 (counts as 1dc), work 16dc.
First corner: 2dc, ch3, 2dc.
Work 30dc along the side.
Second corner: 2dc, ch3, 2dc.
Repeat the sequence for the third and fourth corners.
End with a sl st in the third ch of the starting chain.
Round 10:Ch4 (counts as 1dc + 1ch), skip a stitch, 1dc, ch1 (repeat 8 times), then 1dc.First corner: Ch1, 1dc, ch3, 1dc, ch1.Work 1dc, ch1, skip a stitch (repeat 17 times), then 1dc.Repeat the sequence for the second, third, and fourth corners.End with a sl st in the third ch of the starting chain.
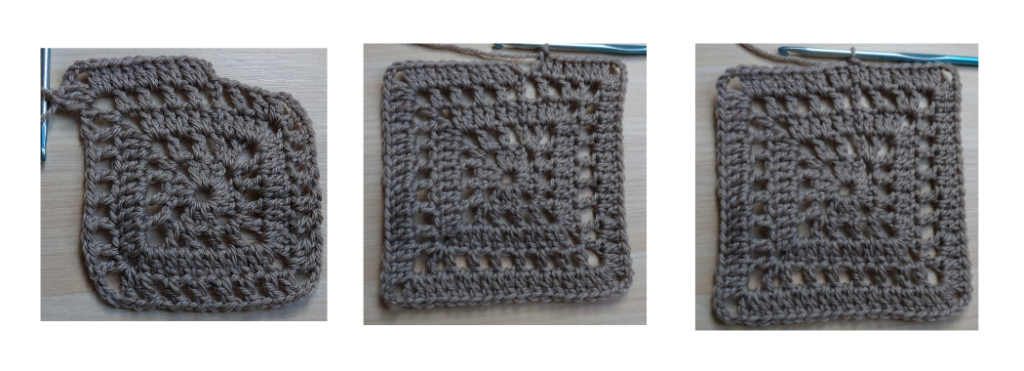
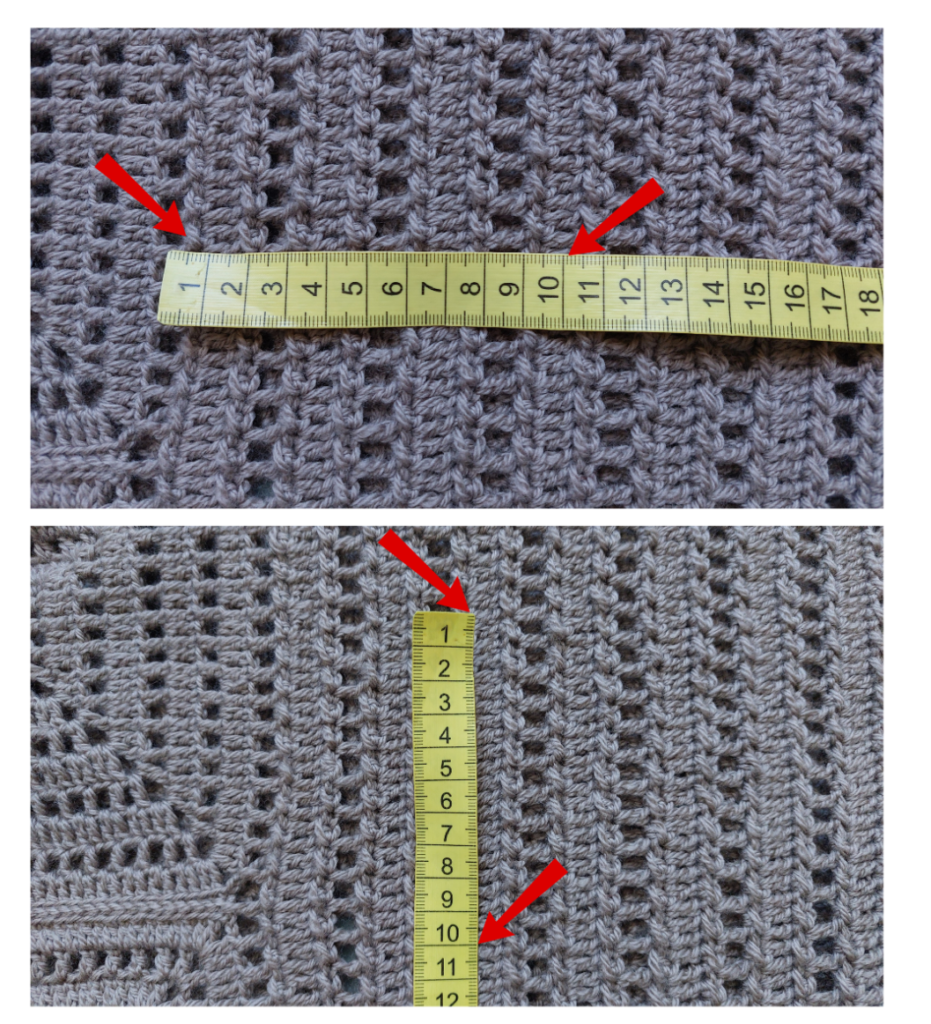
Before starting the project, I recommend making a complete square. Work the necessary number of
rows and add the lateral rows that will be worked on the sides of the squares to check if you
approximately achieve the following measurements:
Height: about 10 cm (approximately 13 rows + half a row, following the pattern).
Width: about 10 cm (approximately 21 stitches).
If these measurements don’t match, adjust your tension or switch to a larger or smaller hook size.
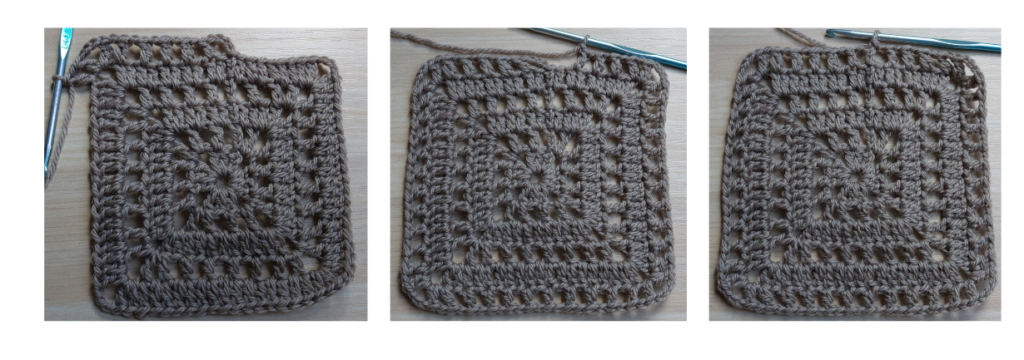
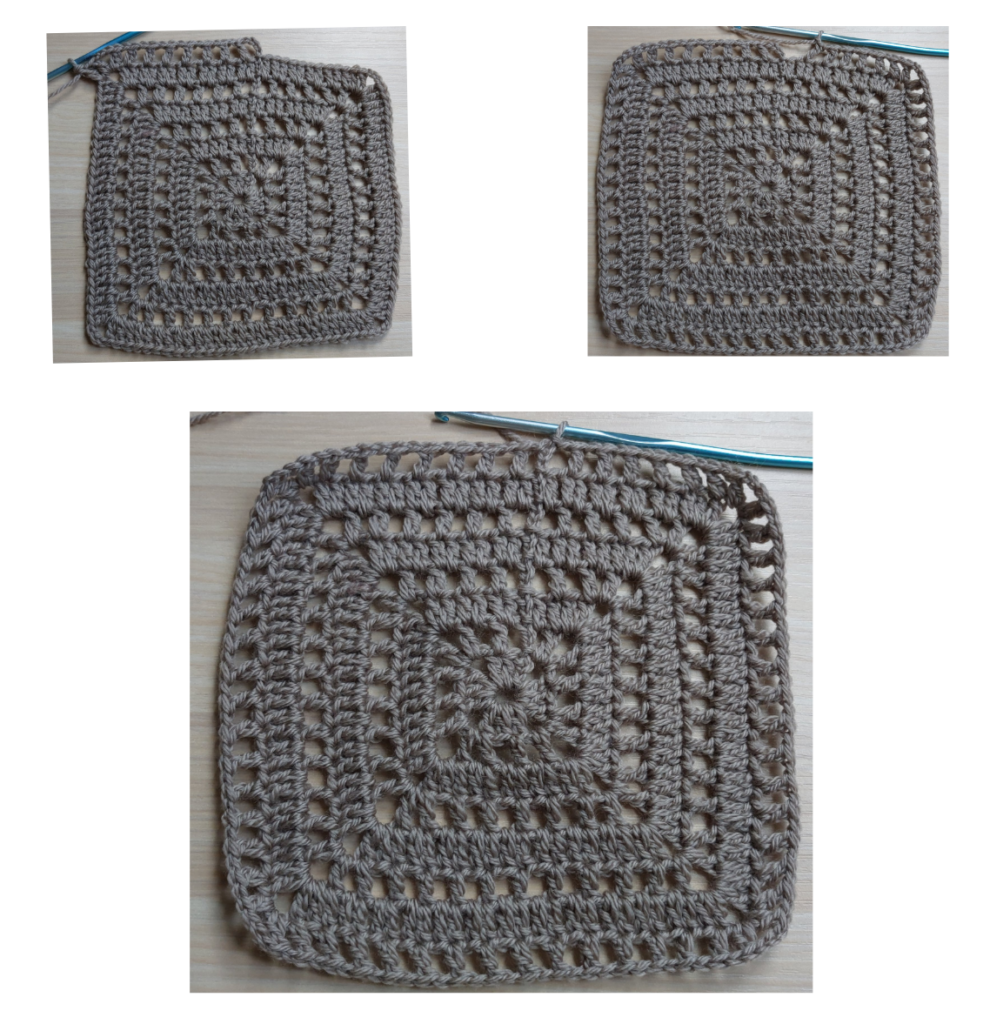
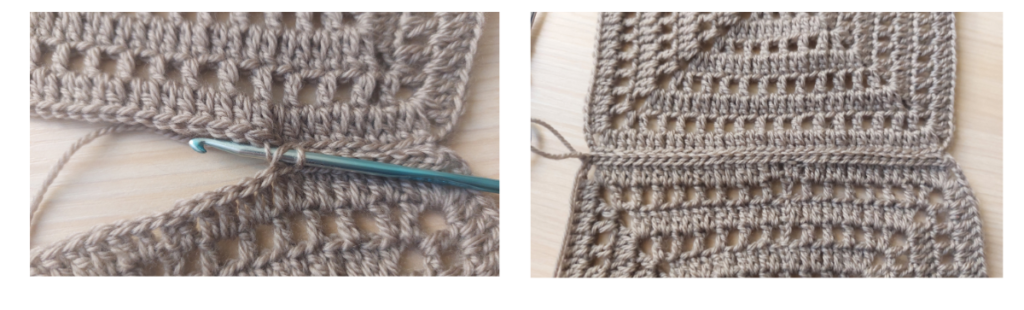
Joining Crochet Squares
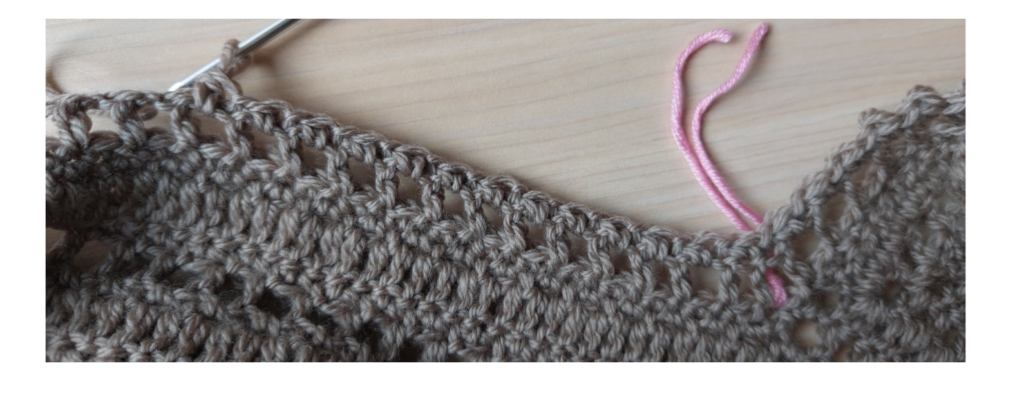
Join 3 squares in a row using slip stitches (slst) or single crochet (sc), depending on your preference.
To join the squares:
Work a slip stitch through the back loops of the two squares:
Insert the hook into the back loop of the first square.
Then, insert it into the back loop of the second square.
Pull the yarn on the hook and pass through the 3 loops
Repeat for every stitch along the edge to fully join the two
squares.
Continue in the same way for the third square, creating a row of three joined squares. This technique
results in a clean and subtle seam, ideal for joining sweater panels.
😊
Starting: Number of Squares and Sizes
XS-S: 6 squares – 8 rounds
M-L: 6 squares – 9 rounds
XL-2X: 6 squares – 10 rounds
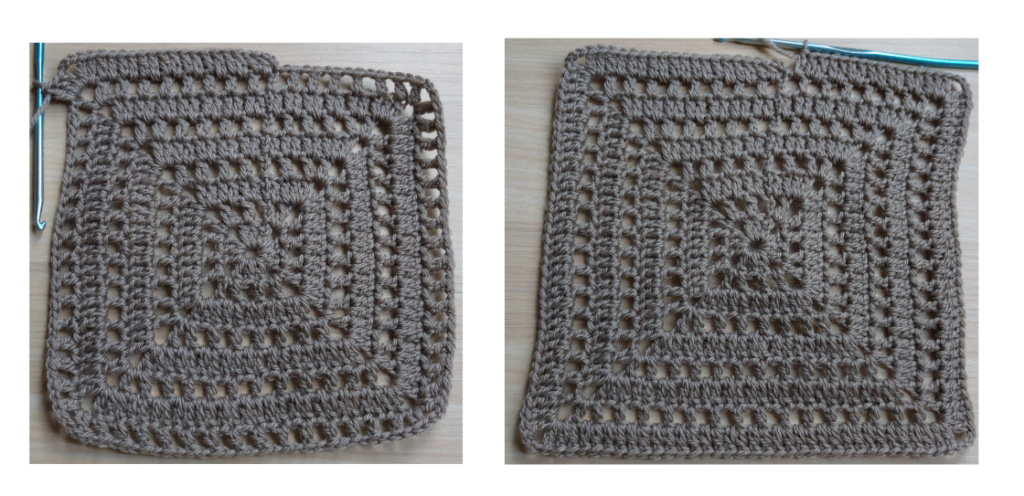
Preparazione
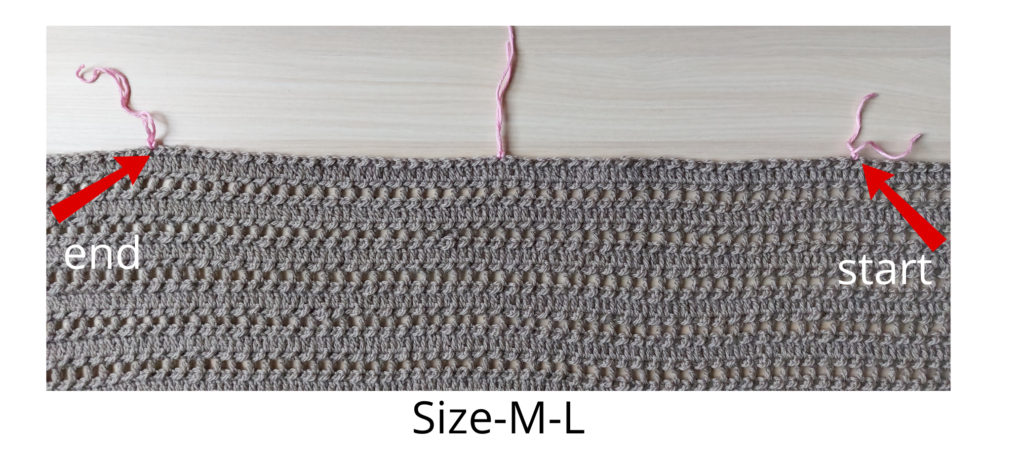
We will begin by working the first row to join the two groups. Position the squares in front of you (right side facing up), starting from the top-right corner.
Tips: We will work back and forth rows. The rows with the “sl st-hdc” pattern will always be worked on the back of the panels. Continue following the instructions for your size from this point onward in the pattern.
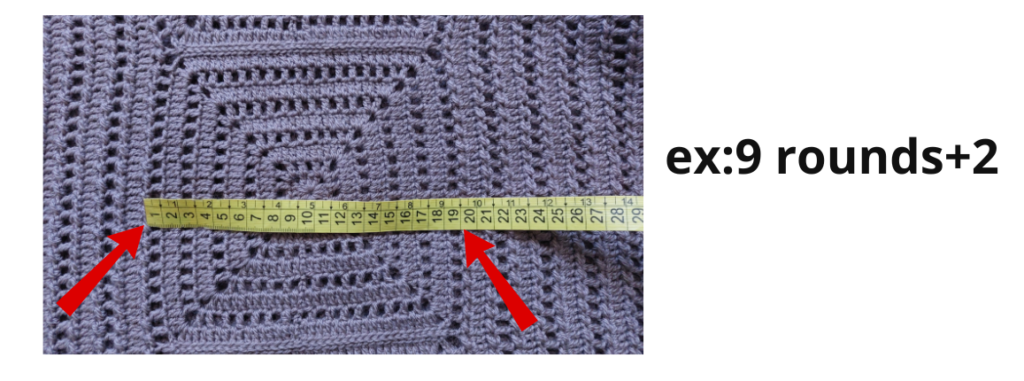
The connecting row will be considered as part of the last row of our square rounds. It will be worked along the length of 3 squares, and the centimeters will be accounted for in the neckline opening.
Therefore, we will add these 2 connecting rows to our 8, 9, or 10 rounds, which will be worked laterally on both sides.As a result, we will obtain the following measurements:
XS-S: 8 rounds + 2 connecting rows = 15 cm + 2 cm = 17 cm
M-L: 9 rounds + 2 connecting rows = 17 cm + 2 cm = 19 cm
XL-2L: 10 rounds + 2 connecting rows = 19 cm + 2 cm = 21 cm
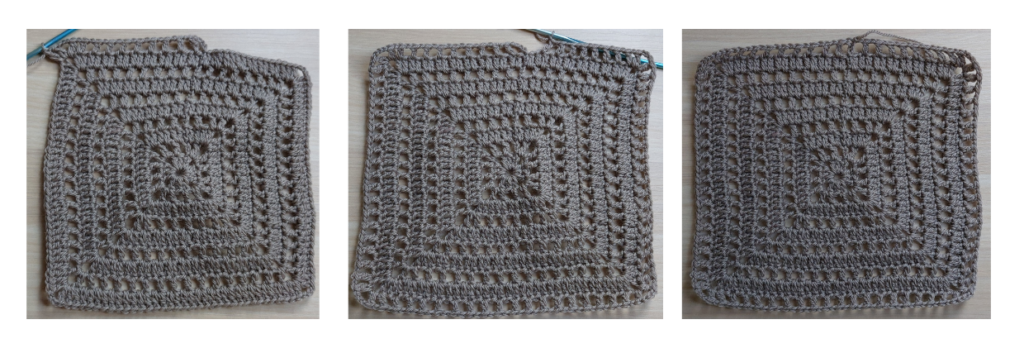
Basic Pattern: Connecting Groups of Squares
Sizes XS-S, XL-2X:Chain 3 (ch3), which counts as the first double crochet (dc).Work double crochets (dc) across the length of the first 3 squares:Work 3ch+1dc in the first corner.After 31 dc, at the first connection between squares, work 1dc into the first square’s corner,1dc over the line joining the two squares, 1dc into the second square’s corner. Continue this pattern until reaching the final corner of the third square, where you will work 2dc.
Totals:
XS/S: ch3-1dc, 31dc, 3dc (explained above), 31dc, 3dc (explained above), 31dc, 2dc (final corner)— Total: 103 stitches.
XL/2X: ch3-1dc, 39dc, 3dc (explained above), 39dc, 3dc (explained above), 39dc, 2dc (final corner) — Total: 127 stitches.Add joining chains between the two groups of squares based on size:
XS: 29 chains (ch29)
S: 31 chains (ch31)
XL: 37 chains (ch37)
2X: 39 chains (ch39)
Continue with double crochets (dc) along the second group of 3 squares, working 2dc in the first and last corner.
XS, S: total 103 stitches.
XL, 2X: total 127 stitches.
Work the necessary rows
Row 1 (R1):Chain 1 (ch1).
Alternate: slip stitch (sl st) – half double crochet (hdc) across the row.
End with a slip stitch (sl st).
Total stitches per row:
XS: 235
S: 237
XL: 291
2X: 293
Row 2 (R2):Chain 4 (ch4), skip one stitch.
Alternate: 1 double crochet (dc) – 1 chain (ch) across the row.
End with a double crochet (dc).
Row 3 (R3):Repeat Row 1 (R1).
Row 4 (R4):Chain 3 (ch3), counting as the first double crochet.
Work double crochets (dc) across the row.
Repeat Pattern:
From Row 5 onward, repeat Rows 1 to 4 until the total number of rows is achieved based on the size:
XS: 23 rows (16 cm)
S: 25 rows (17.5 cm)
XL: 31 rows (22 cm)
2X: 33 rows (23.5 cm)
We work the same number of rows for the other part of the square groups as well.
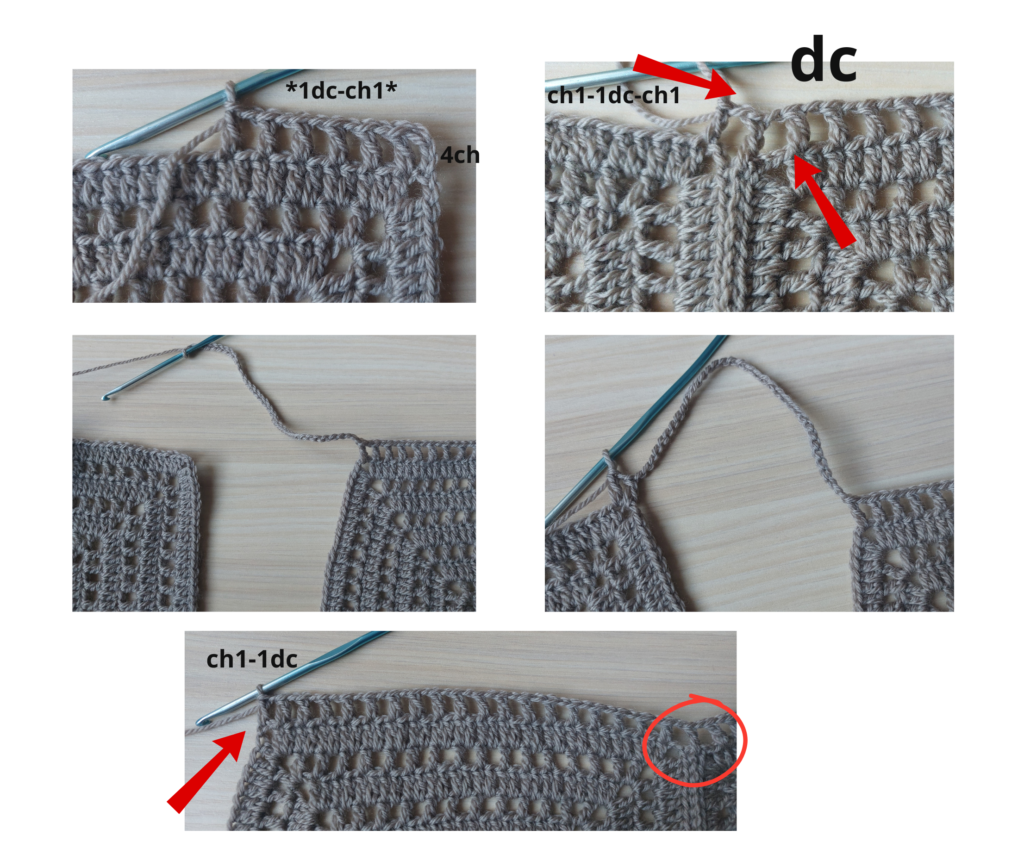
Sizes M-L
Connecting row for square groups:
Start with chain 4 (ch4), counting as the first double crochet + 1 chain.Work:*1dc-1ch*finishing the
repetition on the first square with dc.
At the corner where the first square joins the second, work: ch1 – 1dc (in the seam connecting the squares) – ch1.
Repeat the same process when moving from the second to the third square.
Stitch count:
A total of 18 repetitions (including the initial 4ch) + 1dc at the last stitch of the row before the
corner. At the final corner of the third square, work: ch1-1dc
Total repetitions of *dc-ch1*- 57, plus a final dc at the last corner of the third square.
Work: 1 double crochet (dc) – 1 chain (ch), skipping one stitch.
Total stitches per size:
M: 115sts
L: 115sts
Add connecting chains between the two groups, based on size:
M: ch33
L: ch35
Continue with the dc-ch pattern on the second group of squares.
End the row with a double crochet (dc) in the final corner of the third square.
Total stitches:
M: 115sts
L: 115sts
Work the necessary rows
Row 1 (R1):Chain 1 (ch1).
Alternate: slip stitch (sl st) – half double crochet (hdc) across the row.
End with a slip stitch (sl st).
Total stitches per row:
M:263sts
L: 265sts
Row 2 (R2):Chain 3 (ch3), counting as the first double crochet.
Work double crochets (dc) across the row.
Row 3 (R3):Repeat Row 1 (R1).
Row 4 (R4):Chain 4 (ch4), counting as a double crochet + 1 chain, skip one stitch.
Alternate: 1 double crochet (dc) – 1 chain (ch) across the row.
End with a double crochet (dc).
Repeat Pattern:
From Row 5 onward, repeat Rows 1 to 4 until the total number of rows is achieved based on the
size:
M: 27 rows (18.5 cm)
L: 29 rows (20 cm)
We work the same number of rows for the other part of the square groups as well.
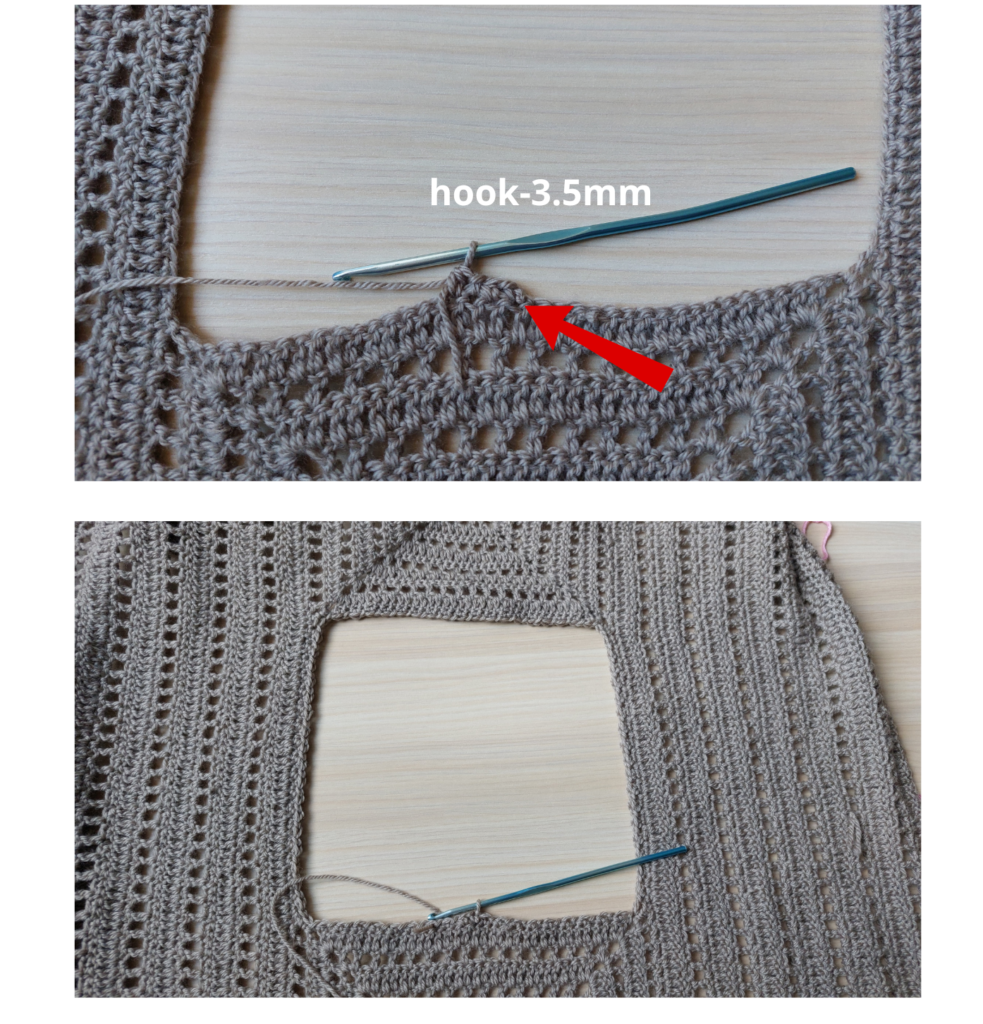
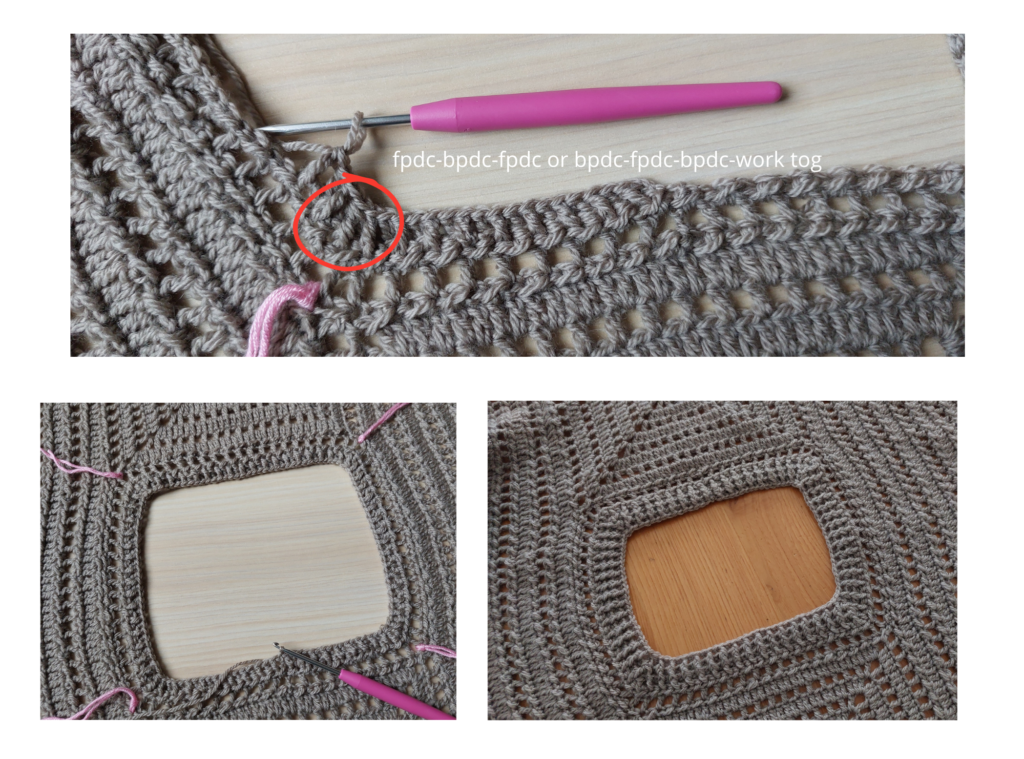
Neckline Finishing (XS, S, M, L, XL, 2X)
We will create a rectangular opening at the center, which serves as the head opening
. Next, we’ll refinethe edge to create an elastic border defining the neckline.
Neckline Pattern:Identify the starting point:Find the center of the back panel.For this row use the crochet hook 3.5mm
Begin on the wrong side of the panel.
Row 1 (R1):Chain 1 (ch1).Alternate: slip stitch (sl st), half-double crochet (hdc) along the entire neckline opening.Close the round with a slip stitch (sl st).
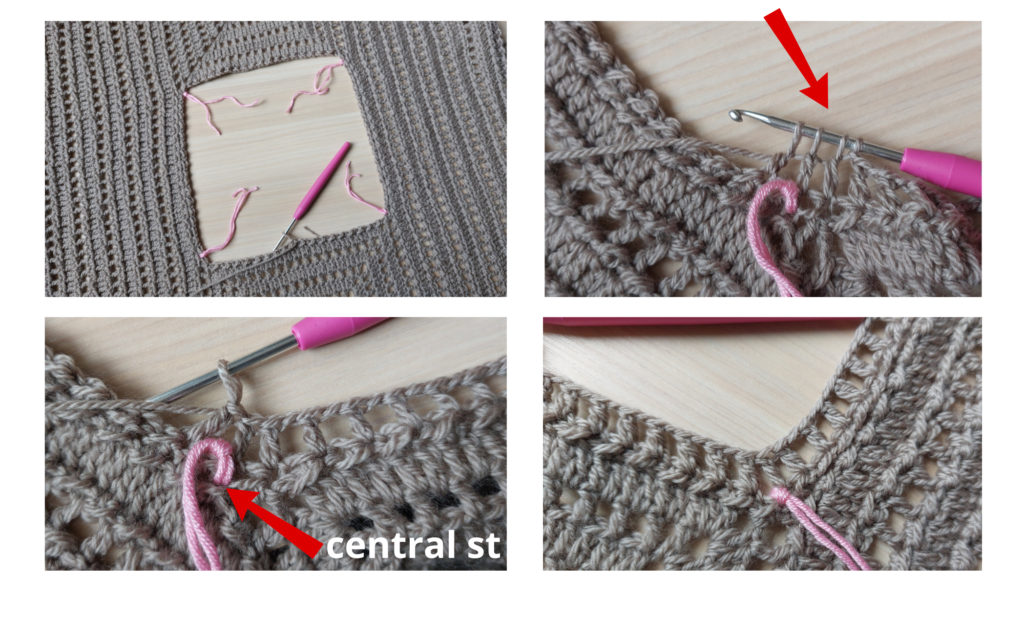
Row 2 (R2):Star this row with hook-3mm.Place the markers on the 4 corners.
Chain 4 (ch4), skip one stitch.
Alternate: 1 double crochet (dc), 1 chain (ch) until 2 stitches before the first marker.
Decrease at corners: ch1,Skip a st and work 3 double crochets (dc) together, skipping one stitch
between them.
Repeat this decrease for all 4 corners.
Close with a slip stitch (sl st) into the third chain of the starting chain-4.
Row 3 (R3):Work on the wrong side:Chain 1 (ch1).Alternate: sl st-hdc throughout.Close with a slip stitch (sl st).
Row 4(R4) – Begin Elastic Pattern:Chain 3 (ch3).Alternate: front post double crochet (fpdc), back post double crochet (bpdc) around.
Decrease at corners: Work 3 stitches together as either fpdc-bpdc-fpdc-tog or bpdc-fpdc-bpdc-tog. Repeat at all 4 corners.
Continuation:Repeat Row 4 for a total of 5 rounds or until the neckline reaches the desired width.
For a snugger fit, continue with additional rows, ensuring corner decreases in each round.
Sleeve Instructions and General Finish
Crochet Sleeve Construction Instructions
Preparing the Sleeves
Counting Side Stitches:
Count the side stitches of the main body panel of the sweater.
Divide the total stitches in half to identify the center stitch that separates the two panels.
Place a stitch marker on the central stitch and on the points marking the desired length of the
sleeve.
Stitch Distribution by Size:
Starting from the central marker, count stitches on both sides.
Mark the number of stitches required for each size:
XS: 46 stitches to the right, 1 center stitch, 46 stitches to the left.
S: 48 stitches to the right, 1 center stitch, 48 stitches to the left.
M: 50 stitches to the right, 1 center stitch, 50 stitches to the left.
L: 52 stitches to the right, 1 center stitch, 52 stitches to the left.
XL: 54 stitches to the right, 1 center stitch, 54 stitches to the left.
2X: 56 stitches to the right, 1 center stitch, 56 stitches to the left.
Starting the Work: 3.
Begin working from the stitch marked on the right, moving to the left.
End the row on the stitch marked on the left.
Instructions for Sizes XS, S, XL, 2X
Row 1 (R1):Start with 3 chains (ch3).
Work 2dc and close the 3 loops tog.
Continue with double crochet stitches (dc) until you are 3 stitches before the left stitch marker.
Close the last 3 stitches with a triple crochet decrease (3dc-tog).
Row 2 (R2):Start with 1 chain (ch1).
Alternate slip stitches (sl st) and half-double crochets (hdc) along the row.Finish with a slip stitch (sl st).
Row 3 (R3):Start with 3 chains (ch3).
Skip one stitch and work 1 double crochet (dc).Close together.
Repeat the pattern ch1-1dc along the row, skipping one stitch between each point.
In the last 4 stitches, work: ch1, skip one stitch, 2dc-tog with one stitch left free between the
two points.
Row 4 (R4):Start with 1 chain (ch1).
Alternate slip stitches (sl st) and half-double crochets (hdc) along the row.Finish with a slip stitch (sl st).
Repeating the Pattern:From Row 5 onwards, repeat the cycle from Row 1 to Row 4 without decrease.
Total Number of Rows:
XS: 50 rows (38 cm).
S: 52 rows (39.5 cm).
XL: 56 rows (42.5 cm).
2X: 58 rows (44 cm).
Instructions for Sizes M, L
Row 1 (R1):Start with 3 chains (ch3).
Skip one stitch and work 1 double crochet (dc).
Close the last two double crochet stitches of the row together.
Repeat the pattern ch1-1dc along the row, skipping one stitch between each point.
In the last 4 stitches, work: ch1, skip one stitch, 2dc-tog with one stitch left free between thetwo points.
Row 2 (R2):Start with 1 chain (ch1).
Alternate slip stitches (sl st) and half-double crochets (hdc) along the row.Finish with a slip stitch (sl st).
Row 3 (R3):Start with 3 chains (ch3).
Work 2 double crochet stitches together (2dc-tog) into the next stitch.
Continue with double crochet stitches (dc) until you are 3 stitches before the left stitch marker.
Close the last 3 stitches with a triple crochet decrease (3dc-tog).
Row 4 (R4):Start with 1 chain (ch1).
Alternate slip stitches (sl st) and half-double crochets (hdc) along the row.Finish with a slip stitch (sl st).
Repeating the Pattern:
From Row 5 onwards, repeat the cycle from Row 1 to Row 4.
Stop decreasing in rows with double crochet (dc) and mesh pattern (1dc-1ch).
Total Number of Rows:
M: 54 rows (41 cm).
L: 56 rows (42.5 cm).
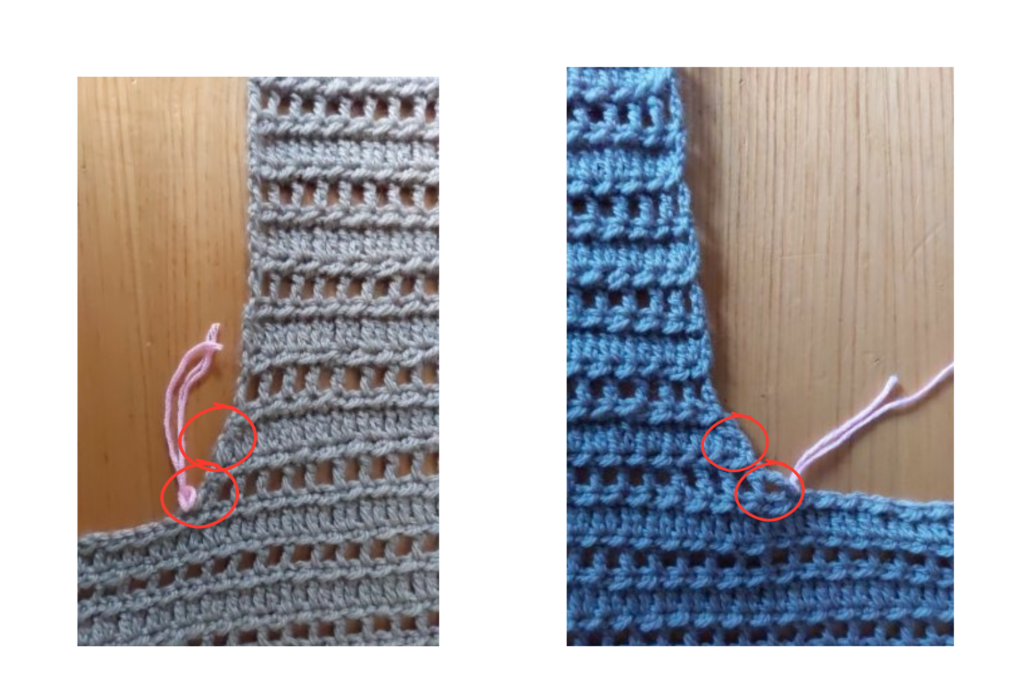
Sleeve Finishing
Closing the Sides:Join the sides of the sleeves using slip stitches or a yarn needle.
Cuff Construction:
Row 1 (R1): Start with 2 chains and work 2 double crochet stitches together (2dc-tog) along the row.Continue for approximately 7 rows (5 cm), alternating front post double crochets (fpdc) and back post double crochets (bpdc).For a longer cuff, double the number of rows.
Finishing the Bottom of the Sweater
Adding a Ribbed Hem:Work a ribbed hem along the bottom of the sweater using the same technique as the sleevecuffs.Alternate front post double crochets (fpdc) and back post double crochets (bpdc) for 7–10rows, depending on the desired length.

Final Touches:Weave in all loose ends with a yarn needle.Steam block the sweater to set the stitches and ensure a polished look.This completes your crochet sweater with elegant sleeves and a ribbed finish. Enjoy your handmade creation!