Blog

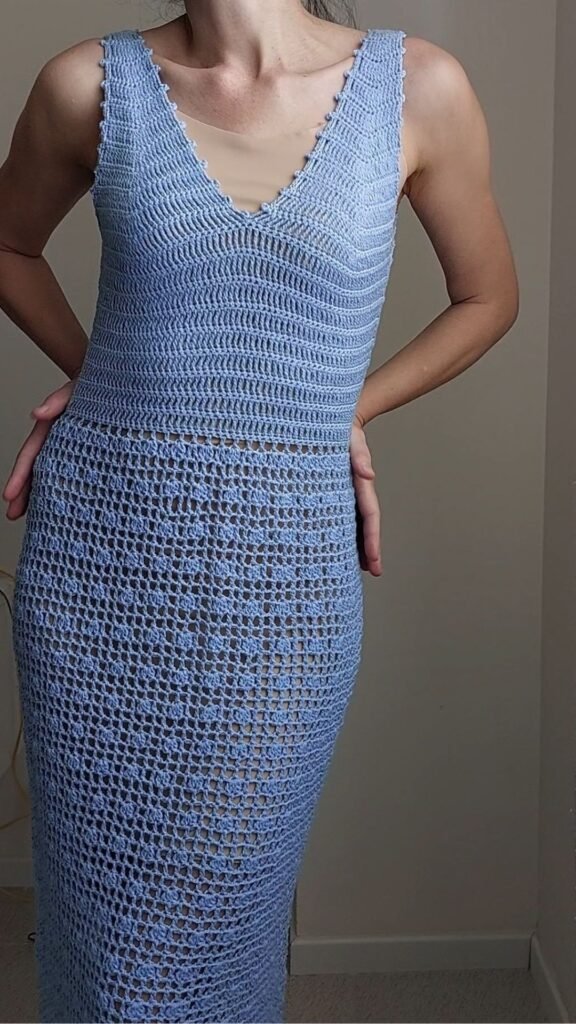
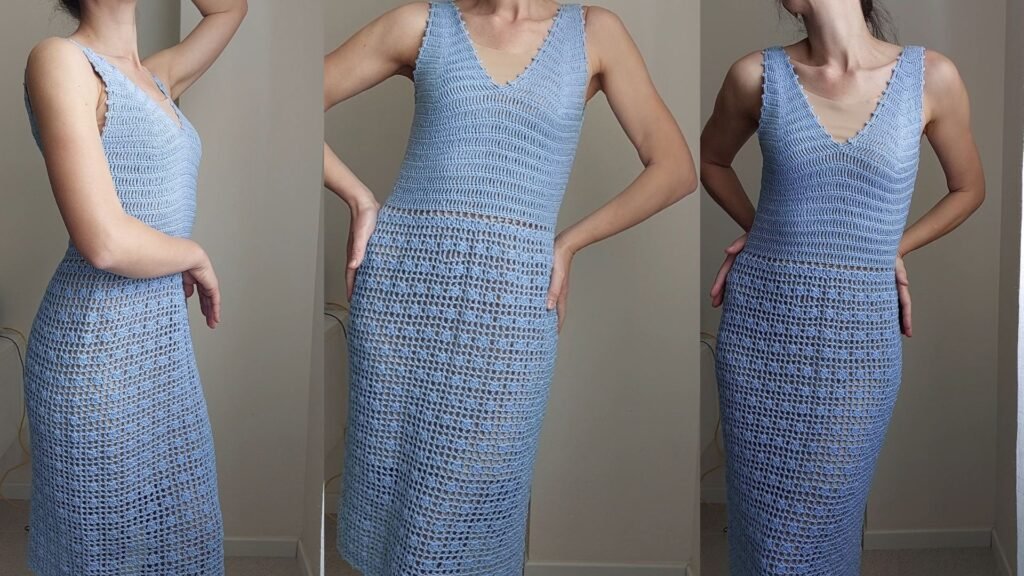
Blue Sky Dress
The beautiful season is coming! Are you ready? 🌞
It’s the perfect time to start new crochet projects and create fresh, lightweight pieces for the warm days ahead.
Today, I’m bringing you an easy-to-make dress, ideal for hot summer days. The Blue Sky dress is airy and super versatile:
✨ Perfect as a beach cover-up
✨ Great for the city with a slip dress underneath
With this step-by-step guide, you can crochet your own dress in S, M, and L sizes. But once you understand the technique, you can easily adjust it to any size!
Grab your crochet hook and get inspired! 💙✨
Blue Sky Dress
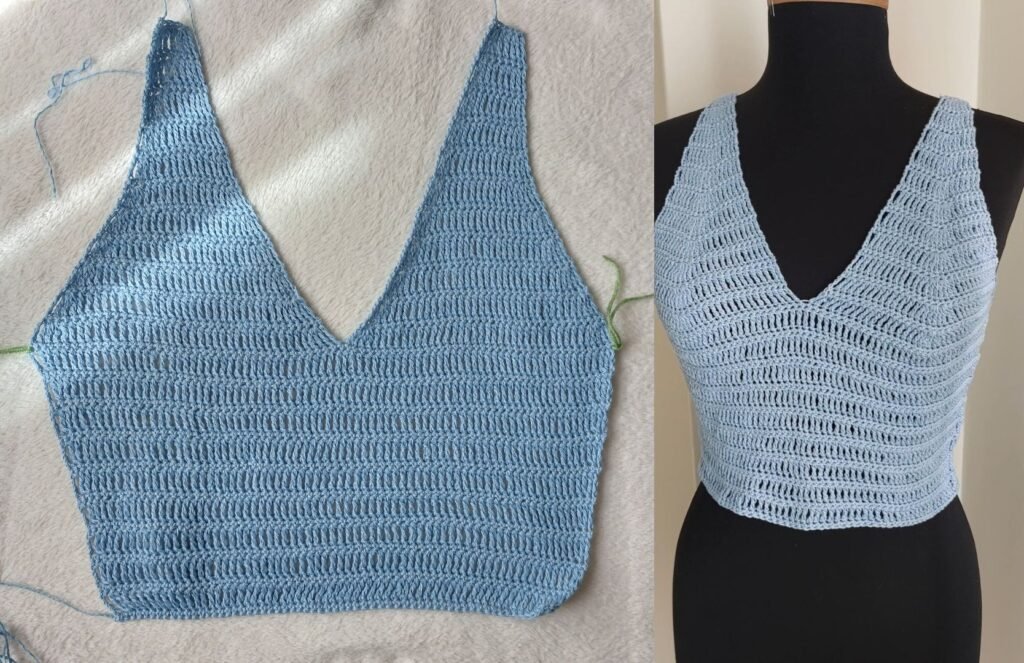
Dress Structure
🔹 Front Part: Start by making a foundation chain and work in rows of double crochet stitches. Gradually increase until reaching the widest part of the bust, then decrease at the sides to shape the waist.
🔹 Back Part: Work similarly to the front, making increases and then decreases for the waist, ensuring both pieces align perfectly.
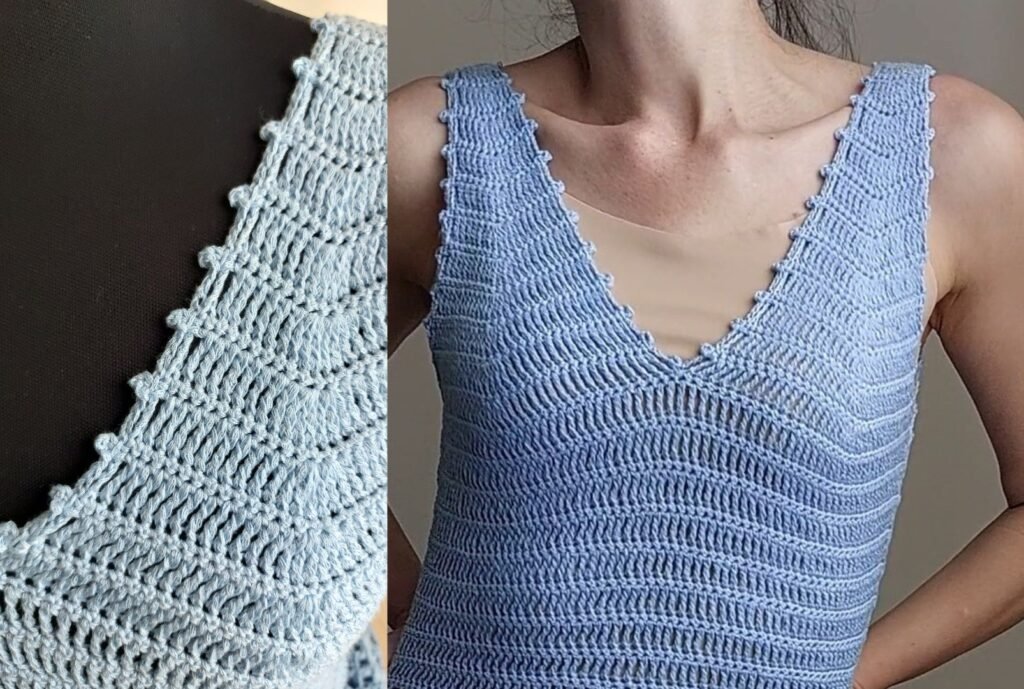
🔹 Joining and Finishing Touches: Sew the sides of the bodice and finish the neckline and armholes with a decorative border.
🔹 Skirt: Pick up stitches from the lower edge of the bodice and work in the round—the length is customizable.
🔹 Decorative Edges: The final touch is the ch3 picot border, which refines the hemline, neckline, and sleeves for an elegant and polished effect.
✨ A simple yet refined dress, perfect for any occasion! 💙
Skill Level: Intermediate
Note: This pattern requires proficiency in both basic and advanced techniques, including sc, tr, sl st, dc, ch, and ch3 picot.
It is ideal for crocheters with experience in similar projects who feel comfortable interpreting symbols and working with increases, decreases, and panel joining.
If you are a beginner, practicing on small swatches before tackling the full project may be helpful.
Stitch Symbols (U.S. Crochet Terminology)
tr: Treble crochet – equivalent to a triple crochet stitch.
sc: Single crochet – basic crochet stitch.
sl st: Slip stitch – used for joining or finishing.
dc: Double crochet – standard height stitch.
ch: Chain – the foundation of crochet work.
*In the row: Work one stitch in each stitch of the previous row.
*In the same stitch: Work two stitches in the same stitch from the previous round.
ch3 picot: Picot chain (3 chains) – a small decorative element made with three chain stitches.
Final Dress Measurements: S, M, L
Bust (cm): 80, 84, 90
Waist (cm): 70, 74, 80
Hips (cm): 94, 100, 112
Armhole (cm): 40, 46, 50
Length (cm): 102, 105, 108
Size S
Shoulder 1
Start: Chain 6 (ch6).
Row 1: ch1, 6 single crochet (sc) in the row.
Row 2: In each stitch of the previous row: ch4, 1 treble crochet (tr), 2 tr in the same stitch, 2 tr in the same stitch, 2 tr in the row.
Row 3: ch1, 8 sc.
Row 4: ch4, 2 tr in the row, 2 tr in the same stitch, 2 tr in the same stitch, 3 tr in the row.
Row 5: ch1, 10 sc.
Row 6: ch4, 3 tr in the row, 2 tr in the same stitch, 2 tr in the same stitch, 4 tr in the row.
Row 7: ch1, 12 sc.
Row 8: ch4, 4 tr in the row, 2 tr in the same stitch, 2 tr in the same stitch, 5 tr in the row.
Row 9: ch1, 14 sc.
Row 10: ch4, 5 tr in the row, 3 tr in the same stitch, 3 tr in the same stitch, 6 tr in the row.
Row 11: ch1, 18 sc.
Row 12: ch4, 7 tr in the row, 3 tr in the same stitch, 3 tr in the same stitch, 8 tr in the row.
Row 13: ch1, 22 sc.
Row 14: ch4, 9 tr in the row, 3 tr in the same stitch, 3 tr in the same stitch, 10 tr in the row.
Row 15: ch1, 26 sc.
Row 16: ch4, 11 tr in the row, 3 tr in the same stitch, 3 tr in the same stitch, 12 tr in the row.
Row 17: ch1, 30 sc.
Row 18: ch4, 13 tr in the row, 3 tr in the same stitch, 3 tr in the same stitch, 14 tr in the row.
Row 19: ch1, 34 sc.
Joining Shoulder 2 to Shoulder 1 (Front Panel)
Shoulder 2
Repeat the same 19 rows for the other shoulder.
Row 20: ch4, 15 tr in the row, 3 tr in the same stitch, 3 tr in the same stitch (increases), 16 tr in the row. Join Shoulder 1 by continuing from where the yarn was cut and work: 16 tr in the row, 3 tr in the same stitch, 3 tr in the same stitch, 16 tr in the row.
Row 21: ch1, 76 sc.
Shaping the Bodice
From this point, stitches are decreased to shape the bodice, decreasing 2 stitches at the beginning and end of each row:
Row 22: ch4, 2 tr together, 70 tr in the row, 2 tr together, 1 tr.
Row 23: ch1, 74 sc.
Row 24: ch4, 2 tr together, 68 tr in the row, 2 tr together, 1 tr.
Row 25: ch1, 72 sc.
Row 26: ch4, 2 tr together, 66 tr in the row, 2 tr together, 1 tr.
Row 27: ch1, 70 sc.
Row 28: ch4, 2 tr together, 64 tr in the row, 2 tr together, 1 tr.
Row 29: ch1, 68 sc.
Row 30: ch4, 2 tr together, 62 tr in the row, 2 tr together, 1 tr.
Row 31: ch1, 66 sc.
Row 32: ch4, 2 tr together, 60 tr in the row, 2 tr together, 1 tr.
Row 33: ch1, 64 sc.
Row 34: ch4, 2 tr together, 58 tr in the row, 2 tr together, 1 tr.
Row 35: ch1, 62 sc.
Row 36: ch4, 2 tr together, 56 tr in the row, 2 tr together, 1 tr.
Row 37: ch1, 60 sc.
Making the Back Panel
Repeat the same pattern as the front panel.
After finishing Row 19, cut the yarn and repeat the 19 rows for Shoulder 2.
Row 20: ch4, 3 tr (increase), 32 tr in the row, 3 tr (increase), 1 tr. Then continue from the previous piece and work: 1 tr, 3 tr (increase), 32 tr in the row, 3 tr (increase), 1 tr.
Row 21: ch1, 76 sc.
Then, repeat Rows 22 to 37 (same as the front panel).
Join the two pieces together, closing the shoulders and then the sides of the panels.
Finishing the Armhole and Neckline
Make 1 ch in the sc row.
Work 1 sc.
Create a ch3-picot: after the sc, make 3 ch, slip stitch (sl st) to close, continue:
Make 3 ch.
Insert the hook into the next sc stitch.
Work 1 sc and make a 3 ch picot above it.
Repeat this pattern along the entire edge.
Making the Skirt
The skirt will be worked in rounds, starting from the center stitch of the back panel.
Round 1 (R1) – Increases:
Chain 5 (counts as 1 double crochet (dc) – 2 ch), skip one stitch.
Repeat the following pattern for the entire round: 1 dc – 2 ch.
To close the round: work 2 ch, then sl st into the 3rd ch of the initial 5 ch.
At the end of the round, you should have an even number of (1 dc – 2 ch) groups.
Round 2 (R2) – Increases:
ch3 (counts as 1 dc).
In the next dc, work: (2 dc together – 1 ch – 2 dc together).
In the next dc: (1 dc – 2 ch – 1 dc).
Repeat for the entire round:
(2 dc together – 1 ch – 2 dc together), 1 dc – 2 ch – 1 dc.
To close the round:
Work 1 dc in the initial ch3 space, 2 ch, and sl st into the 3rd ch.
Rounds 3 & 4 (R3 & R4) – Base pattern:
ch5 (counts as 1 dc – 2 ch).
Work:
1 dc between the group of (2 dc together – 1 ch – 2 dc together), 2 ch.
1 dc over the next dc, 2 ch.
1 dc over the next dc, 2 ch.
Repeat for the entire round.
Close the round with 2 ch, sl st into the 3rd ch of the initial 5 ch.
Round 5 (R5):
ch4.
In the next dc, work: (2 dc together – 1 ch – 2 dc together), 1 ch.
In the next dc, work:
1 dc, 2 ch.
1 dc, 1 ch.
Repeat for the entire round:
(2 dc together – 1 ch – 2 dc together), 1 ch, 1 dc – 2 ch – 1 dc.
Close with sl st into the 3rd ch of the initial 4 ch.
Repeat Rounds 3, 4, and 5 until reaching the desired length (56 rounds).
Final edging: Use picot edging as done for the neckline and armhole.
Size M
Front Panel
Foundation: Chain 6 (ch6).
Row 1: Ch1 (turning chain), 6 single crochet (sc) in the row.
Row 2: In each stitch of the previous row: ch4, 1 treble crochet (tr), 2 tr in the same stitch, 2 tr in the same stitch, 2 tr in the row.
Row 3: Ch1, 8 sc.
Row 4: Ch4, 2 tr in the row, 2 tr in the same stitch, 2 tr in the same stitch, 3 tr in the row.
Row 5: Ch1, 10 sc.
Row 6: Ch4, 3 tr in the row, 2 tr in the same stitch, 2 tr in the same stitch, 4 tr in the row.
Row 7: Ch1, 12 sc.
Row 8: Ch4, 4 tr in the row, 2 tr in the same stitch, 2 tr in the same stitch, 5 tr in the row.
Row 9: Ch1, 14 sc.
Row 10: Ch4, 5 tr in the row, 2 tr in the same stitch, 2 tr in the same stitch, 6 tr in the row.
Row 11: Ch1, 16 sc.
Row 12: Ch4, 6 tr in the row, 3 tr in the same stitch, 3 tr in the same stitch, 7 tr in the row.
Row 13: Ch1, 20 sc.
Row 14: Ch4, 8 tr in the row, 3 tr in the same stitch, 3 tr in the same stitch, 9 tr in the row.
Row 15: Ch1, 24 sc.
Row 16: Ch4, 10 tr in the row, 3 tr in the same stitch, 3 tr in the same stitch, 11 tr in the row.
Row 17: Ch1, 28 sc.
Row 18: Ch4, 12 tr in the row, 3 tr in the same stitch, 3 tr in the same stitch, 13 tr in the row.
Row 19: Ch1, 32 sc.
Row 20: Ch4, 14 tr in the row, 3 tr in the same stitch, 3 tr in the same stitch, 15 tr in the row.
Row 21: Ch1, 36 sc. Fasten off.
Shoulder 2
Repeat the same 21 rows for the second shoulder.
Row 22: Ch4, 16 tr in the row, 3 tr in the same stitch, 3 tr in the same stitch (increase), 17 tr in the row. Join shoulder 1, continuing from where the yarn was fastened off, and work 17 tr in the row, 3 tr, 3 tr, 17 tr in the row.
Row 23: Ch1, 80 sc.
Shaping the Bodice
From this point, decrease 2 stitches at the beginning and end of each row:
Row 24: Ch4, 2 tr together, 74 tr in the row, 2 tr together, 1 tr.
Row 25: Ch1, 78 sc.
Row 26: Ch4, 2 tr together, 72 tr in the row, 2 tr together, 1 tr.
(Continue decreasing until Row 41.)
Pannello posteriore
Foundation: Chain 6 (ch6).
(Work the same increases as the front panel for 21 rows.)
Join Shoulders:
Row 22:
Work: Ch4, 3 tr (increase), 32 tr in the row, 3 tr (increase), 1 tr.
Then, join the previously made piece and continue from where the yarn was fastened off with: 1 tr, 3 tr (increase), 32 tr in the row, 3 tr (increase), 1 tr.
Row 23: Ch1, 80 sc.
Repeat Rows 24-41 as done for the front panel.
Joining the Pieces
Sew the shoulders and then the sides of both panels.
Sleeve and Neckline Finishing
Ch1 at the start of the sc row.
Work 1 sc.
Make a picot (ch3, sl st into the first ch).
Continue:
Ch3.
Insert the hook into the next stitch.
Work 1 sc and make a ch3 picot on top.
Repeat around the entire edge.
Skirt Construction
The skirt is worked in rounds, starting from the center stitch of the back panel.
Round 1 (R1):
Ch5 (counts as 1 dc + 2 ch), skip one stitch.
Repeat around: 1 dc – 2 ch.
To close the round: Work 2 ch, sl st into the 3rd ch of the starting ch5.
Round 2 (R2) – Increases:
Ch3 (counts as 1 dc).
In the next dc: (2 dc together – ch1 – 2 dc together).
In the next dc: (1 dc – ch2 – 1 dc).
Repeat around:
(2 dc together – ch1 – 2 dc together).
(1 dc – ch2 – 1 dc).
To close: Work 1 dc into the starting ch3, ch2, sl st into the 3rd ch.
Rounds 3 and 4 (R3 & R4) – Base Pattern:
Ch5 (counts as 1 dc – ch2).
Work:
1 dc between the (2 dc together – ch1 – 2 dc together), ch2.
1 dc into the next dc, ch2.
1 dc into the next dc, ch2.
Repeat around.
Close with ch2, sl st into the 3rd ch of the starting ch5.
Round 5 (R5):
Ch4.
In the next dc: (2 dc together – ch1 – 2 dc together), ch1.
In the next dc:
1 dc, ch2.
1 dc, ch1.
Repeat around:
(2 dc together – ch1 – 2 dc together), ch1.
1 dc – ch2 – 1 dc.
Close with sl st into the 3rd ch of the starting ch4.
Skirt Length Repeat Pattern:
Repeat Rounds 3, 4, and 5 until reaching the desired length.
The complete skirt consists of 59 rounds.
Round 59 will be identical to Round 5.
If a longer skirt is desired, continue repeating the pattern, but always finish with a Round 5-style round.
Skirt Hem Finishing:
Move with sl st to the ch1 between the (2 dc together).
Work:
Ch1, 1 sc.
On this sc, make a ch3 picot.
Continue:
Ch4, 1 sc between the next 2 dc.
Ch4, 1 sc in the (2 dc together), make a ch3 picot.
Repeat around.
Size L
Shoulder 1
Foundation: Chain 8 (ch8).
Row 1: Ch1, 8 single crochet (sc) across.
Row 2: In each stitch from the previous row: ch4, 7 treble crochet (tr) across.
Row 3: Ch1, 8 sc.
Row 4: Ch4, 2 tr in the row, 2 tr in the same stitch, 2 tr in the same stitch, 3 tr in the row.
Row 5: Ch1, 10 sc.
Row 6: Ch4, 3 tr in the row, 2 tr in the same stitch, 2 tr in the same stitch, 4 tr in the row.
Row 7: Ch1, 12 sc.
Row 8: Ch4, 4 tr in the row, 2 tr in the same stitch, 2 tr in the same stitch, 5 tr in the row.
Row 9: Ch1, 14 sc.
Row 10: Ch4, 5 tr in the row, 2 tr in the same stitch, 2 tr in the same stitch, 6 tr in the row.
Row 11: Ch1, 16 sc.
Row 12: Ch4, 6 tr in the row, 3 tr in the same stitch, 3 tr in the same stitch, 7 tr in the row.
Row 13: Ch1, 20 sc.
Row 14: Ch4, 8 tr in the row, 3 tr in the same stitch, 3 tr in the same stitch, 9 tr in the row.
Row 15: Ch1, 24 sc.
Row 16: Ch4, 10 tr in the row, 3 tr in the same stitch, 3 tr in the same stitch, 11 tr in the row.
Row 17: Ch1, 28 sc.
Row 18: Ch4, 12 tr in the row, 3 tr in the same stitch, 3 tr in the same stitch, 13 tr in the row.
Row 19: Ch1, 32 sc.
Row 20: Ch4, 14 tr in the row, 3 tr in the same stitch, 3 tr in the same stitch, 15 tr in the row.
Row 21: Ch1, 36 sc.
Row 22: Ch4, 16 tr in the row, 3 tr in the same stitch, 3 tr in the same stitch, 17 tr in the row.
Row 23: Ch1, 40 sc. Fasten off.
Joining Shoulder 2 to Shoulder 1 (Front Panel)
Shoulder 2
Repeat the same 23 rows for the other shoulder.
Row 24: Ch4, 18 tr in the row, 3 tr in the same stitch, 3 tr in the same stitch (increases), 19 tr in the row. Join shoulder 1 by continuing from the point where the yarn was cut and work 19 tr in the row, 3 tr in the same stitch, 3 tr in the same stitch, 19 tr in the row.
Row 25: Ch1, 88 sc.
Shaping the Bodice
From here, decrease stitches to shape the bodice by closing 2 stitches at the beginning and end of each row:
Row 26: Ch4, 2 tr together, 82 tr in the row, 2 tr together, 1 tr.
Row 27: Ch1, 86 sc.
Continue decreasing following this pattern until Row 45.
Pannello posteriore
The back panel follows the same shaping as the front panel but with increases at the start and end of each row.
Shoulder 1
Foundation: Chain 8 (ch8).
Follow the same pattern as the front panel for 23 rows.
Joining Shoulder 2 to Shoulder 1 (Back Panel)
Row 24:
Ch4, 3 tr (increase), 36 tr in the row, 3 tr (increase), 1 tr.
Continue from where the yarn was cut on the previous piece and continue: 1 tr, 3 tr (increase), 36 tr in the row, 3 tr (increase), 1 tr.
Row 25: Ch1, 88 sc.
Work from Row 26 to Row 45 exactly as in the front panel.
Joining the Two Pieces
Join the two panels by closing the shoulders together and then the sides.
Armhole and Neckline Finishing
Ch1 at the start of the sc row.
Work 1 sc.
Create a ch3 picot: ch3, sl st into the sc just made.
Continue:
Ch3.
Insert the hook into the next sc row stitch.
Work 1 sc and make a picot with ch3.
Repeat this pattern around the entire edge.
Skirt Construction
The skirt will be worked in rounds, starting from the center stitch of the back panel.
Round 1 (R1):
Ch5 (counts as 1 dc + 2 ch), skip one stitch.
Repeat for the entire round: 1 dc – 2 ch.
To close the round: Work 2 ch, then sl st into the 3rd chain of the starting ch5.
Round 2 (R2) – Increases:
Ch3 (counts as 1 dc).
On the next dc: (2 dc together – 1 ch – 2 dc together).
On the next dc: (1 dc – 2 ch – 1 dc).
Repeat this pattern for the entire round.
To close: 1 dc in the starting ch3, 2 ch, sl st in the 3rd ch.
Rounds 3 & 4 (R3 & R4) – Pattern Repetition:
Ch5 (counts as 1 dc – 2 ch).
Work:
1 dc between each (2 dc together – 1 ch – 2 dc together) group, 2 ch.
1 dc on the next dc, 2 ch.
1 dc on the next dc, 2 ch.
Repeat around.
Close with 2 ch, sl st into the 3rd chain of the starting ch5.
Round 5 (R5):
Ch4.
On the next dc: (2 dc together – 1 ch – 2 dc together), 1 ch.
On the next dc: (1 dc – 2 ch – 1 dc), 1 ch.
Repeat for the entire round.
Close with sl st in the 3rd chain of the starting ch4.
Skirt Length
Repeat rounds 3, 4, and 5 until reaching the desired length.
The full skirt is 59 rounds long.
Round 59 is the same as Round 5.
If a longer skirt is desired, continue repeating the pattern but always finish with a row similar to Round 5.
Skirt Hem Finishing
Move with sl st to the ch1 space between (2 dc together).
Work:
Ch1, 1 sc.
Create a ch3 picot on top of the sc.
Ch4, 1 sc between the next 2 dc.
Ch4, 1 sc in the (2 dc together) space, create a ch3 picot.
Repeat around the entire edge.