The Cozy Nest Sweater is a lightweight, versatile, and customizable garment that blends elegance and comfort. Designed with modular square construction and delicate materials, this pattern creates a timeless piece perfect for layering or standalone wear. Whether you’re looking to crochet a casual piece or a sophisticated sweater, this project is perfect for intermediate-level crocheters familiar with Tunisian techniques. Enjoy experimenting with colors and textures to create a truly unique sweater!
Sweater Description: This sweater has been designed in size M(38-40) with measurements that provide a comfortable fit. However, I’ve detailed the corresponding sizes S(34-36), L(42-44), and XL(46-48) for a more personalized fit depending on your body shape and style preferences.
Measurement:S,M,L,XL Neckline Circumference:62 cm,66 cm,68 cm,72 cm Bust Circumference:108 cm,116 cm,124 cm,132 cm Sleeve Circumference:,36 cm,38 cm,40 cm,42 cm Sleeve Length:,41 cm,42 cm,43 cm,44cm Length:50 cm,52 cm,54 cm,56 cm
If you want to give this sweater a try here is what you will need and how to make it: Materials Used Recommended Yarn: Drops Kid Silk — a luxurious blend of mohair and silk, providing softness and lightness. For this sweater, I used Drops Kid Silk yarn, which is recommended for a 3.5mm crochet hook. For this project, I will work with two strands of the same yarn using the same hook size. Feel free to choose a yarn of your preference, as long as it has similar characteristics.
Materials Needed: Yarn: Drops Kid Silk (25 g = approx. 210 m / 230 yds) Crochet hooks: 3.5 mm for the main sections. 3 mm for finishing details (e.g., neckline, sleeves, and hem).
Quantity of Yarn: Held double for all sizes. S-2100–2205 m-10–10.5 skeins-1050–1100 m(Yarn held double) M-2310 m-11 skeins-1155 m(Yarn held double) L-2520–2625 m-12–12.5 skeins-1260–1315 m(Yarn held double) XL-2730–2940 m-13–14 skeins-1365–1470 m(Yarn held double)
💡 Always add two extra skein(ball) of yarn to what the pattern suggestes. Better to have a little extra for adjustments or unforeseen needs!
Yarn Description and Tips Main Yarn: Drops Kid-Silk (mohair and silk) worked with two strands held together using a 3.5 mm crochet hook. This gives the sweater a light and airy texture.
Additional Tools Scissors. Stitch markers to mark important points. Measuring tape for square dimensions and fit accuracy. Notes:Mohair tends to “relax” and stretch over time, resulting in a soft drape. Always create a swatch to confirm the correct gauge before starting.
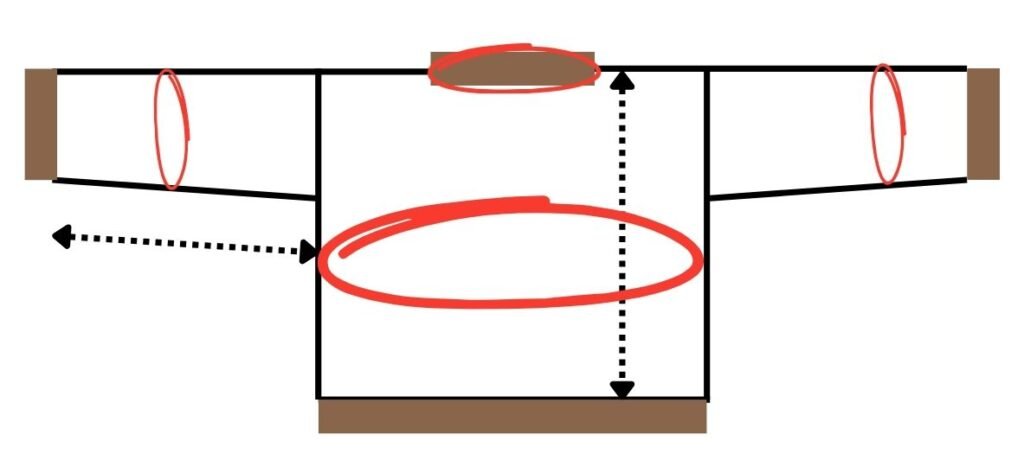
Sweater Structure The sweater consists of four crochet squares measuring approximately 21 cm x 21 cm each. To adjust the sweater’s length, add 2 or 4 extra squares if you want.
Size Adjustments: If your squares differ in size, adjust by: Using a larger or smaller crochet hook. Modifying your tension to achieve correct measurements.
Step-by-Step Instructions Making the Squares: Follow the provided pattern to make the squares. If you want to make a longer sweater add a square to each panel. Joining the Squares: Using the first row, work as follows: Alternate slip stitch (sl st) and half double crochet (hdc)on the reverse side, followed by chains (the number of chains will vary by size). Continue by joining the other two squares, maintaining the alternation of sl st and hdc. Note: Begin and end this row with a slip stitch (sl st) for a neat edge. Front and Back Panels: Once the squares are joined, create the panels using this pattern: Work 3 rows of double crochet (dc) consecutively.We have variation only in row 2 for any sizes. Follow with 2 rows of mesh stitch consecutively. Repeat this pattern for the entire panel. Use the same method for both the front and back panels. Finishing the Neckline: Using the 3 mm hook, finish the neckline by working decreases at the 4 corners to shape the collar.(3 loops in one) Sleeves: Start the sleeves directly from the panels, following the row design to maintain consistency. Once the sleeves are complete, join the sides of the sleeves and the sweater. Final Finishing Touches: Use the 3 mm hook to finish the bottom hem and sleeve edges. Make the necessary decreases in the first row to create a well-defined border.
Stitches Used US Terminology: ch- catenella sl st- maglia bassissima hdc- mezza maglia alta YO (yarn over) ** (repeat instructions between asterisks) bp dc (back post double crochet) fp dc (front post double crochet) dc: double crochet sc: single crochet sk: skip st: stitch sts: stitches * *: repeat instructions between asterisks 2Rdc st-2 rows of double crochet stitches simultaneously. (size S) 3Rdc st-3 rows of double crochet stitches simultaneously.(for all the saizes) 4Rdc st-4 rows of double crochet stitches simultaneously.(size L) 5Rdc st-5 rows of double crochet stitches simultaneously.(size XL) 2R mesh stitch at the same time(for all the saizes).
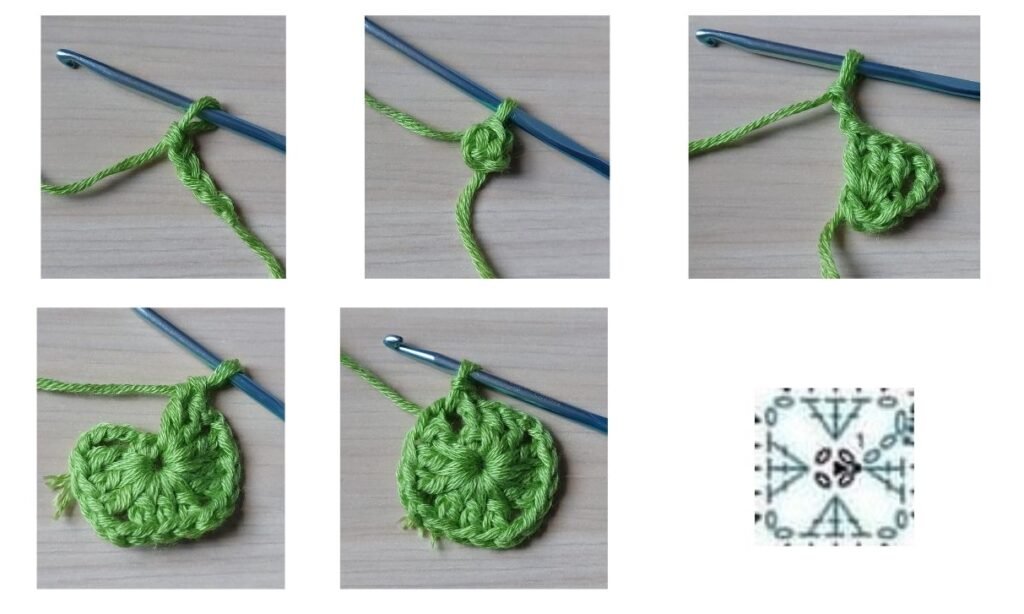
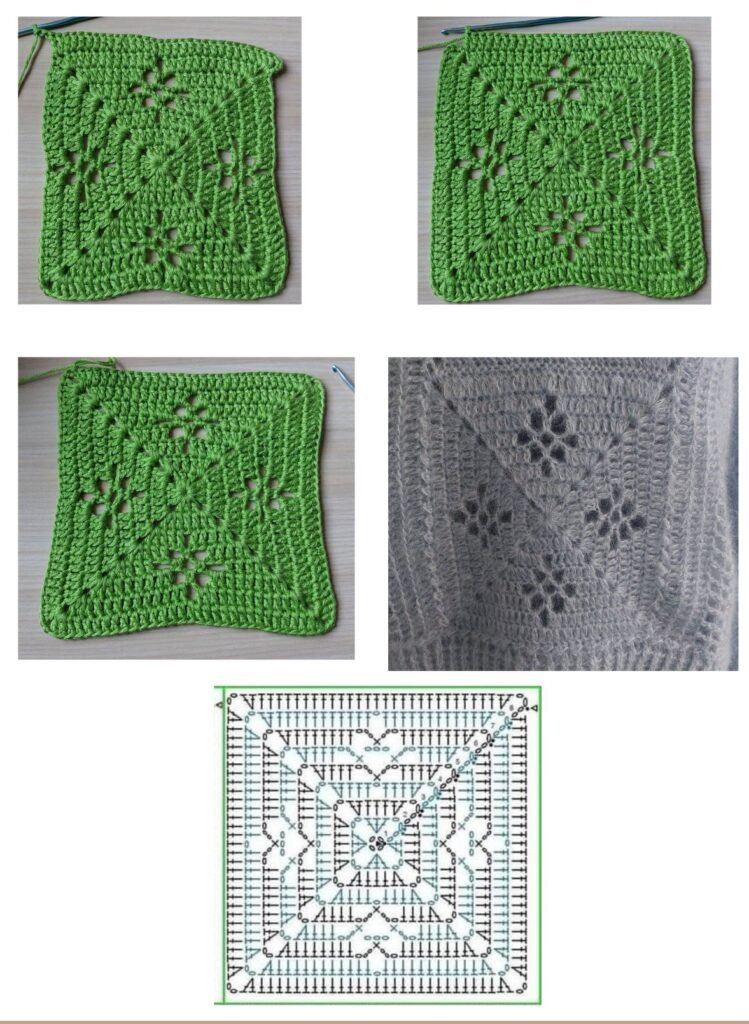
Step by step descriptio:How to make the Granny Square.
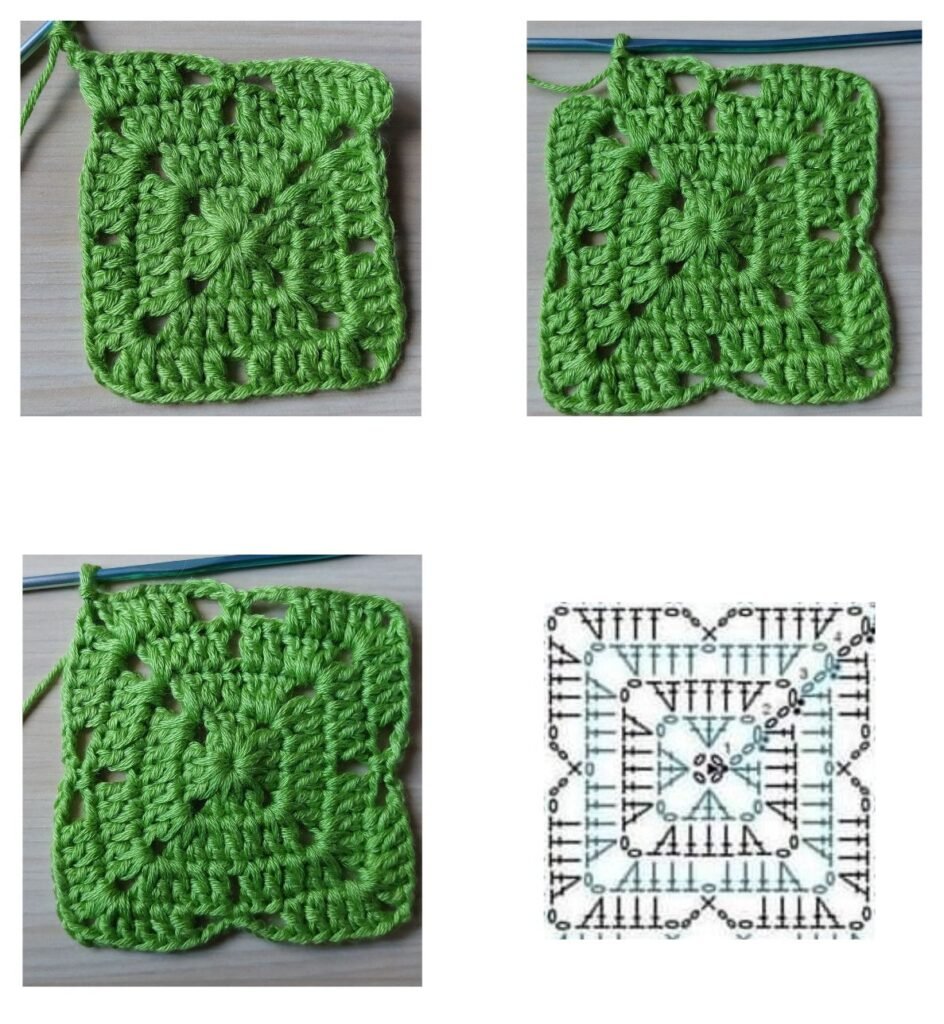
We need to make a total of 4 GRANNY SQUARES. To better show you how to make the crochet square, I’ll use a different yarn because the details aren’t as visible with mohair. This way, it will be easier to follow along. Round 1: Ch 4, join into a ring with a sl st. Ch 4, *3 dc, ch 2 *(repeat this sequence 4 times total, forming 4 groups of 3 dc separated by ch-2 spaces). Finish with 2 dc in the starting ring. Sl st into the 3rd ch of the starting ch-4, Sl st into the first ch-space .
Round 2: Ch 4,* 2 dc in the same ch- space, 3 dc in the next group of 3 dc, 2 dc in the next ch-2 space(corner), ch 2*. Repeat from * to * around. Finish with 1 dc in the starting ch space, sl st into the 3rd ch of the starting ch-4,sl st into the first ch-space .
Round 3:Ch 4,* 2 dc in the first ch space of the previous row, 3 dc as follows: ch 1, sk 1 st, 3 dc; 2 dc in the next ch-2 space (corner), ch 2.* Repeat from * to * around. Finish with 1 dc in the starting ch space, sl st into the 3rd ch of the starting ch-4,sl st into the first ch space of the previous round.
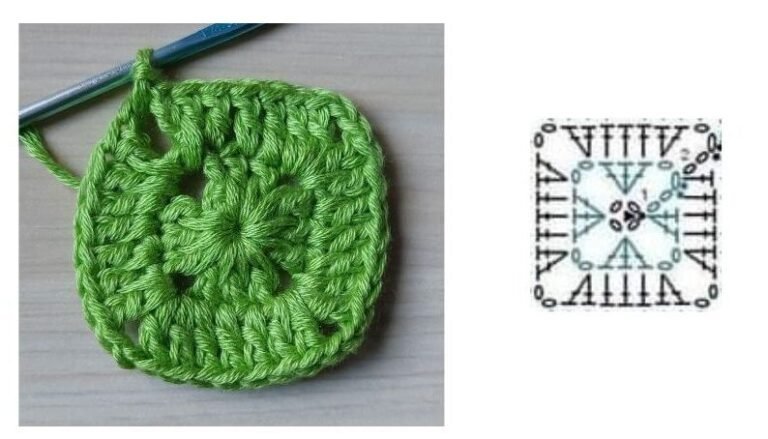
Round 4:Ch 4,* 2 dc in the chain space, 3 dc as follows: ch 3, sk 2 sts, one sc into the chain space from the previous round,ch3, sk 2 sts, 3 dc; 2 dc in the corner ch space, ch 2.* Repeat from * to * around. Finish the round with 1 dc in the first corner and sl st into the 3rd ch of the starting ch-4. Sl st into the first ch space from the previous round.
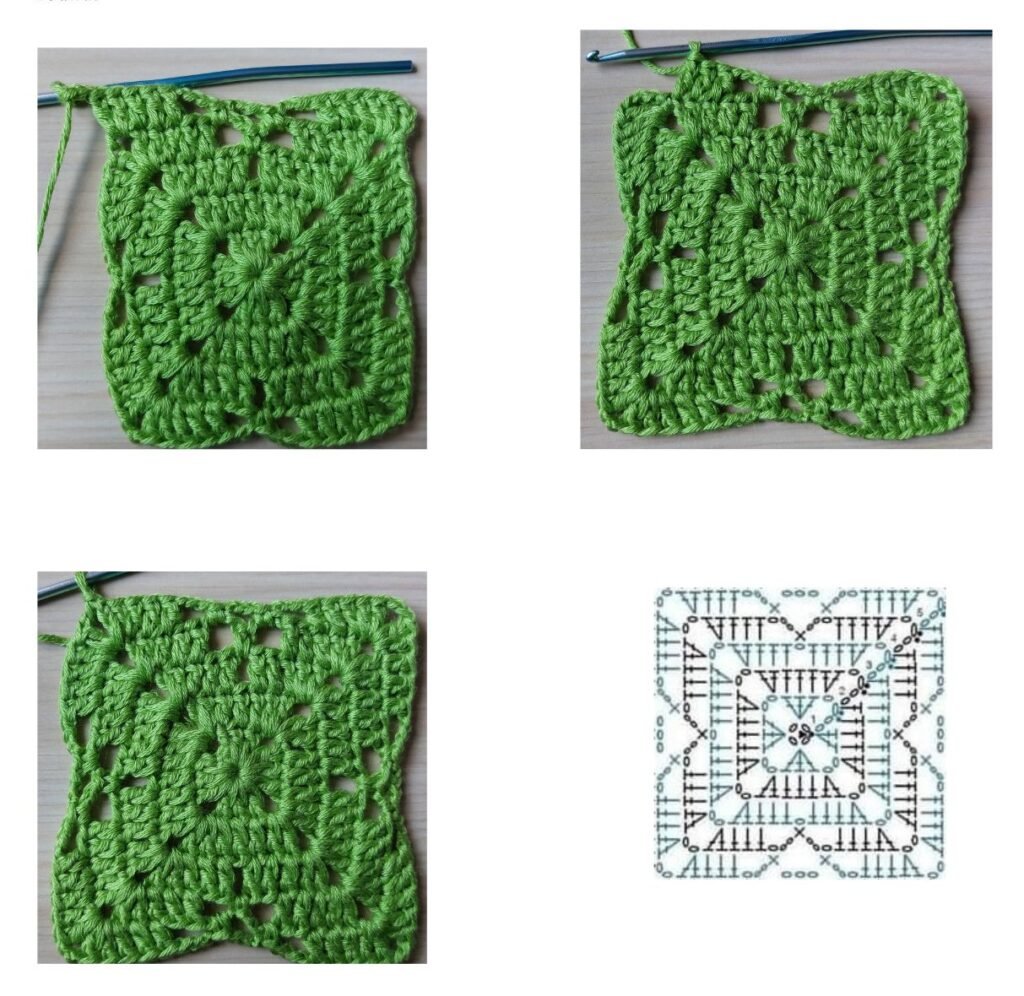
Round 5:ch4*2 dc in the first ch space of the previous round, 3 dc as follows: ch 3, sk 2 sts, sc into the first ch-3 space of the previous round, ch 3, sc into the second ch-3 space, ch 3, sk 2 sts, 3 dc; 2 dc in the next ch-2 space (corner), ch 2.* Repeat from * to * around. Finish the round with 1 dc in the first corner and sl st into the 3rd ch of the starting ch-4, Sl st into the first ch space from the previous round.
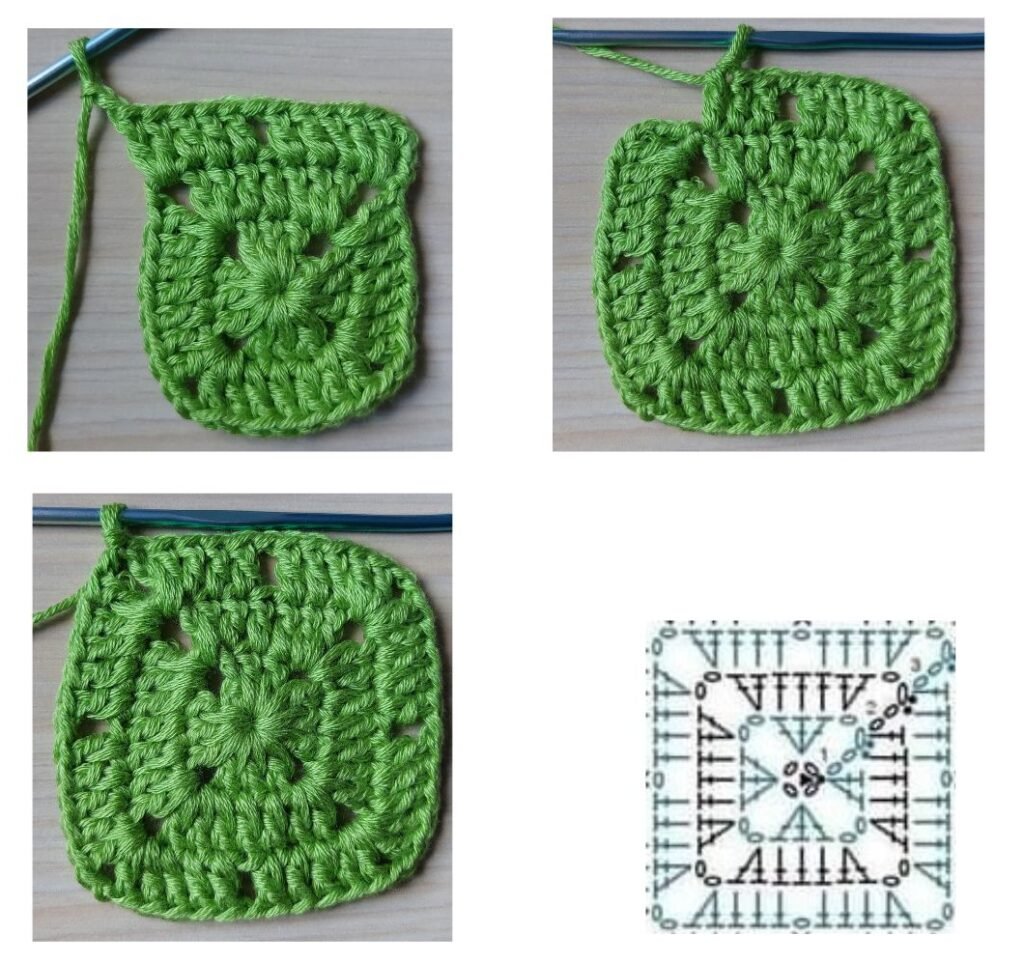
Round 6: ch4*2dc in the same ch-space,5dc as follows,2dc into the first ch 3 space of the previous round,ch3,1sc into the second ch-3 space,3ch,2dc into the third ch-3 space,5dc as follows,2dc in the next ch-2 space(corner),ch2*repeat from*to*around.Finish the round with 1 dc in the first corner and sl st into the 3rd ch of the starting ch-4,slst into the first ch space from the previous round.
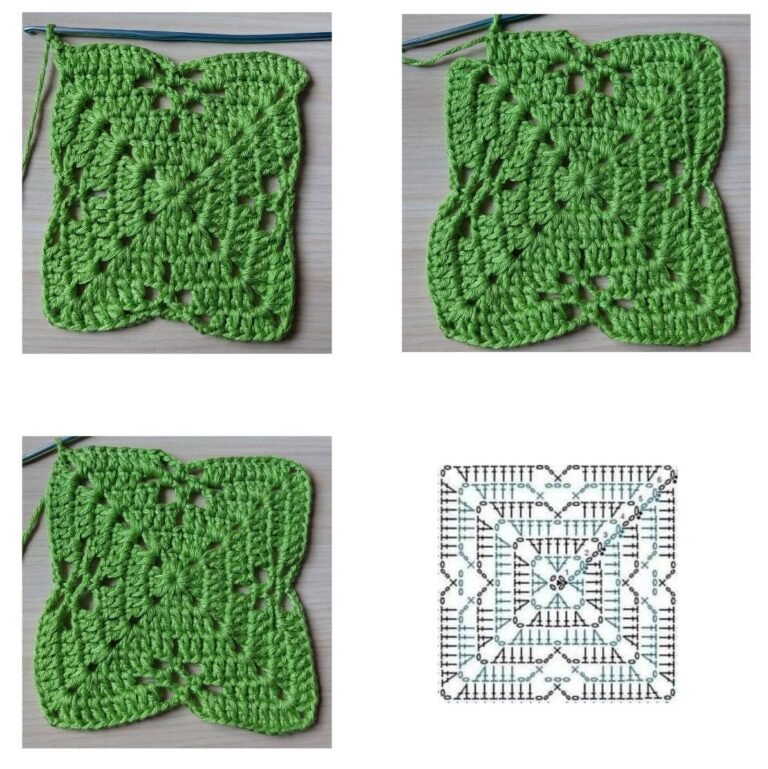
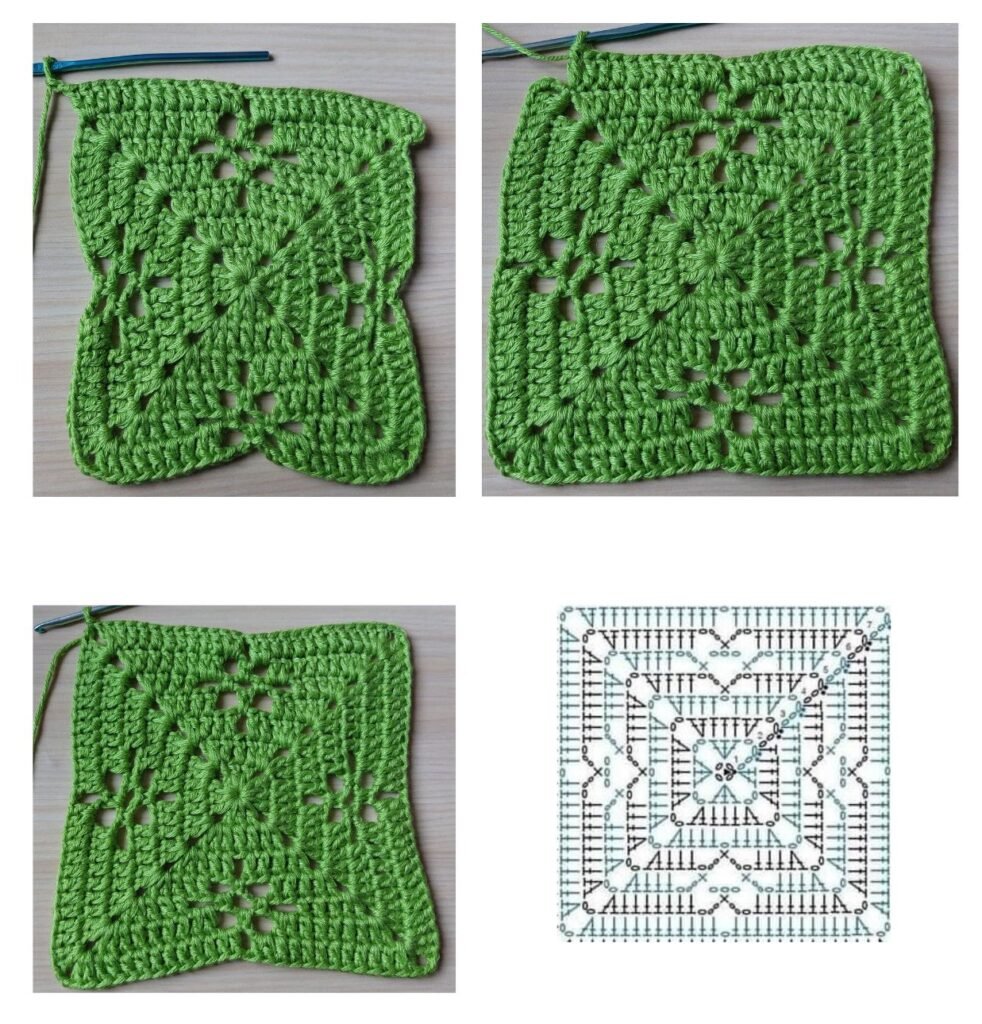
Round 7:ch4*2dc in the same ch-space,9dc as follows,2dc into the first ch-3 space of the previous round,ch1,2dc into the second ch-3 space,9dc as follows,2dc in the next ch-2 space(corner),ch2* Repeat from * to * around. Finish the round with 1 dc in the first corner and sl st into the 3rd ch of the starting ch-4, Sl st into the first ch space from the previous round.
Round 8:ch4*2dc in the same ch space,13dc as follows,1dc into the 1ch space of the previous round.13 dc as follows,2dc into the next ch-2 space(corner),ch2*.Repeat from * to * around. Finish the round with 1 dc in the first corner and sl st into the 3rd ch of the starting ch-4, Sl st into the first ch space from the previous round.
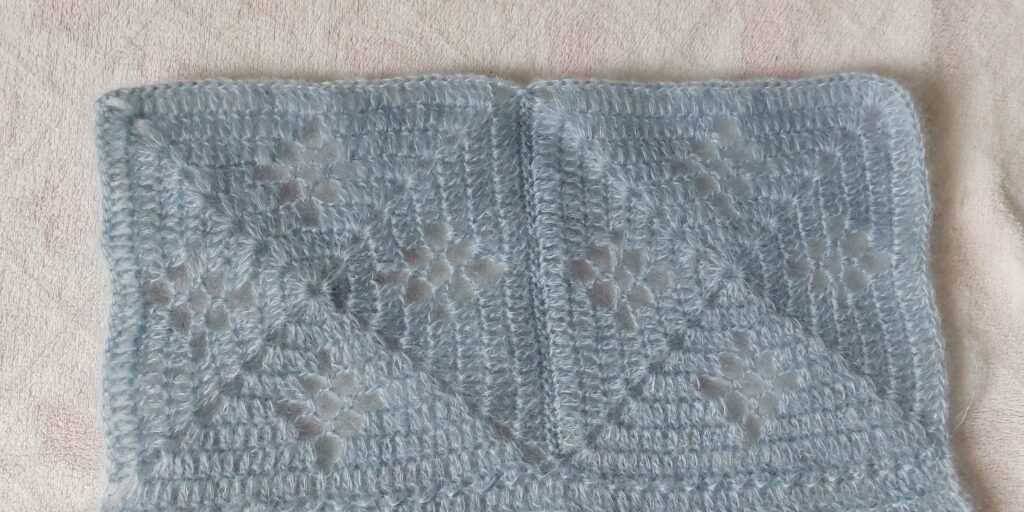
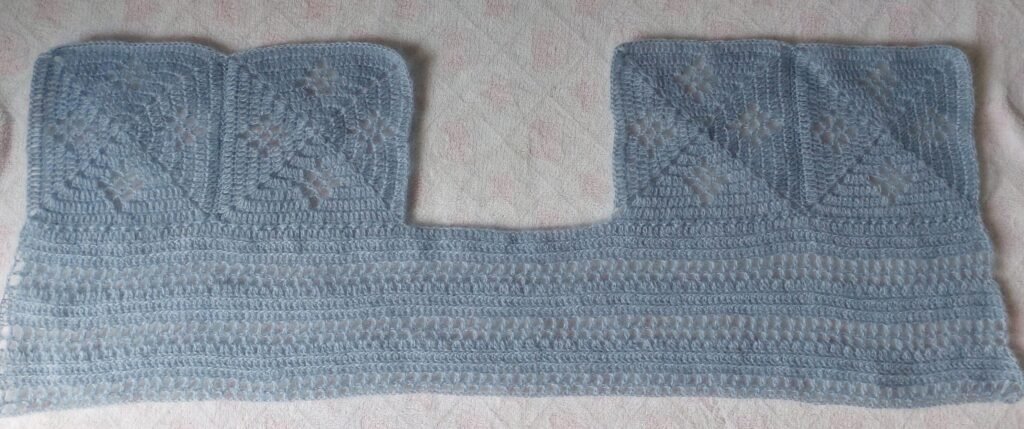
Joining the Squares and Starting the Sweater
After finishing the 4 square motifs, divide them into two groups of 2 squares each and joining them with sl st or sc st. We join two for the front panel and two for the back panel,this will be the basic structure of the sweate.For the first row start workin on the reverse of the squares.
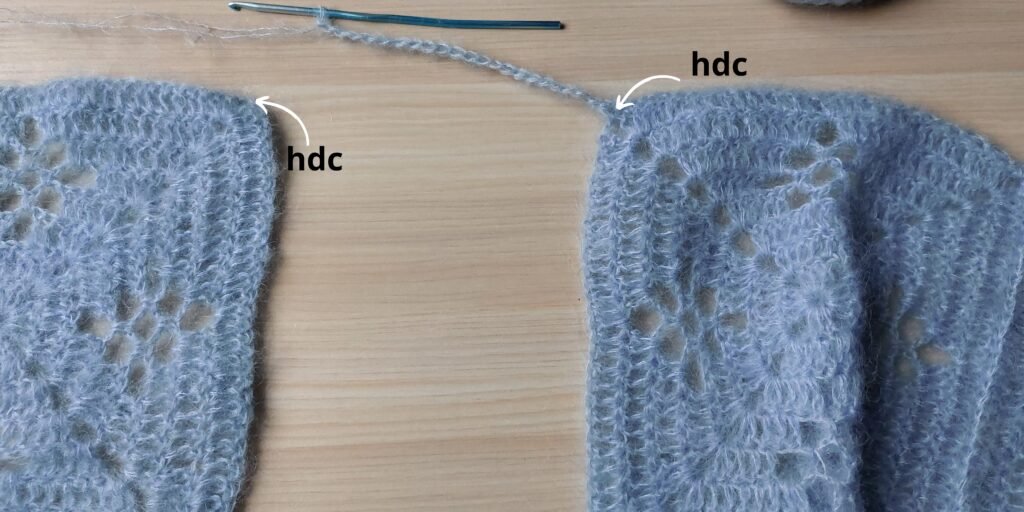
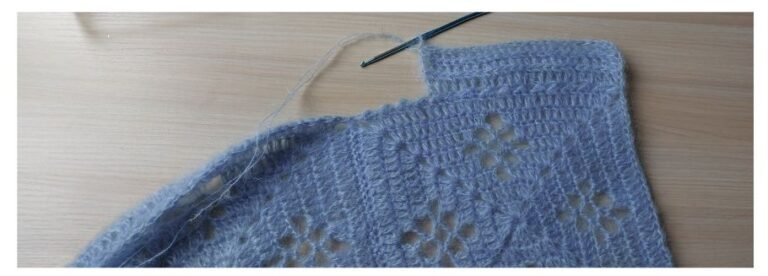
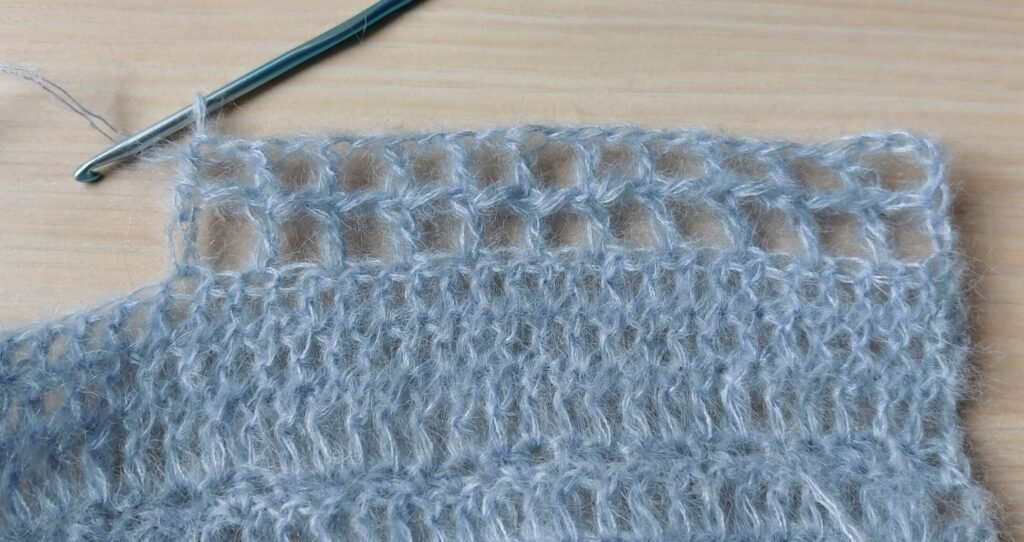
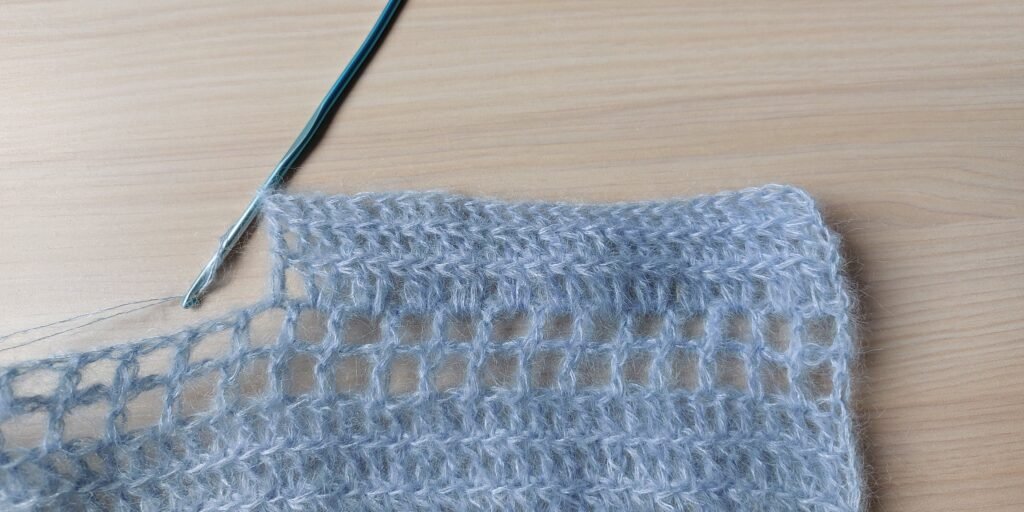
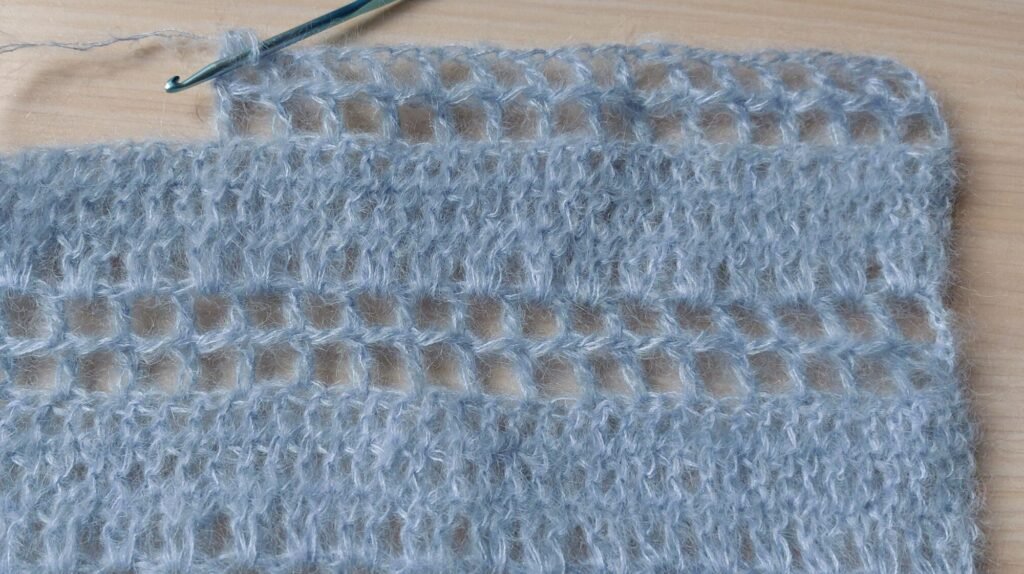
R1 Begin working along the back of the two squares: Start with ch1 Work a pattern of slst – hdc (66sts), repeating until you reach the second square. Finish the row on the second square with hdc.(the last hdc you will work under the two ch that form the corner of the square) Add chains based on the size . you are making: Size S: Ch 27. Size M: Ch 31. Size L: Ch35. Size XL: Ch 39. Continue on the second square: Work the same hdc-slst(66sts) pattern along the edge of the second square.(the first hdc you will work under the two ch that form the corner of the square) End the row with a sl st.
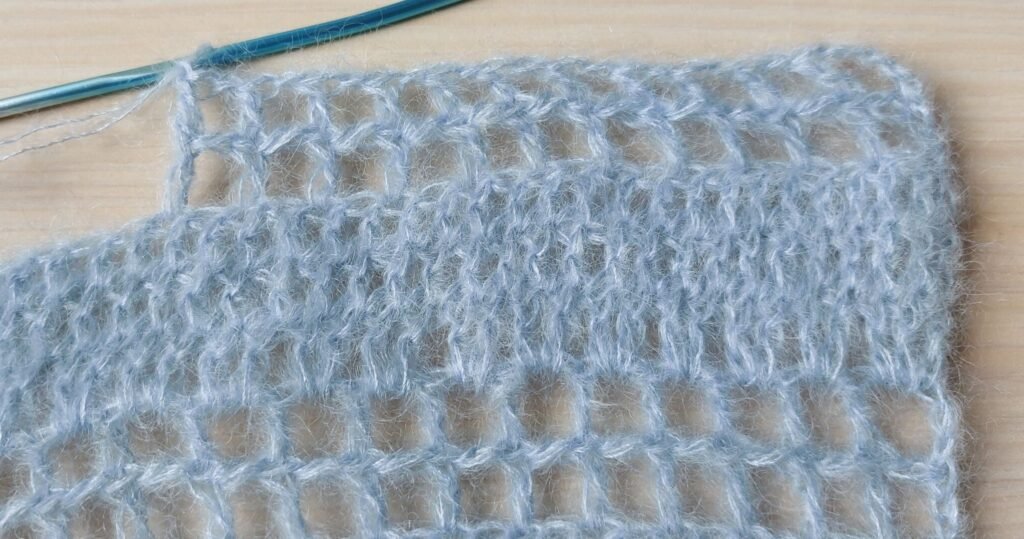
R2 For this row, you will work differently depending on the size: Size S:ch5 ,then work only* 2Rdc st*Repeat by going with the yarn through the two overlapping stitches.65+27+66-total 158 sts Size M: ch 8* 3Rdc st* Repeat by going with the yarn through the two overlapping stitches.65+31+66-total 162sts Size L:ch 11 * 4Rdc st*Repeat by going with the yarn through the two overlapping stitches.65+35+66-total 166sts Size XL: ch14* 5Rdc st*Repeat by going with the yarn through the two overlapping stitches.65+39+66-total 170 sts
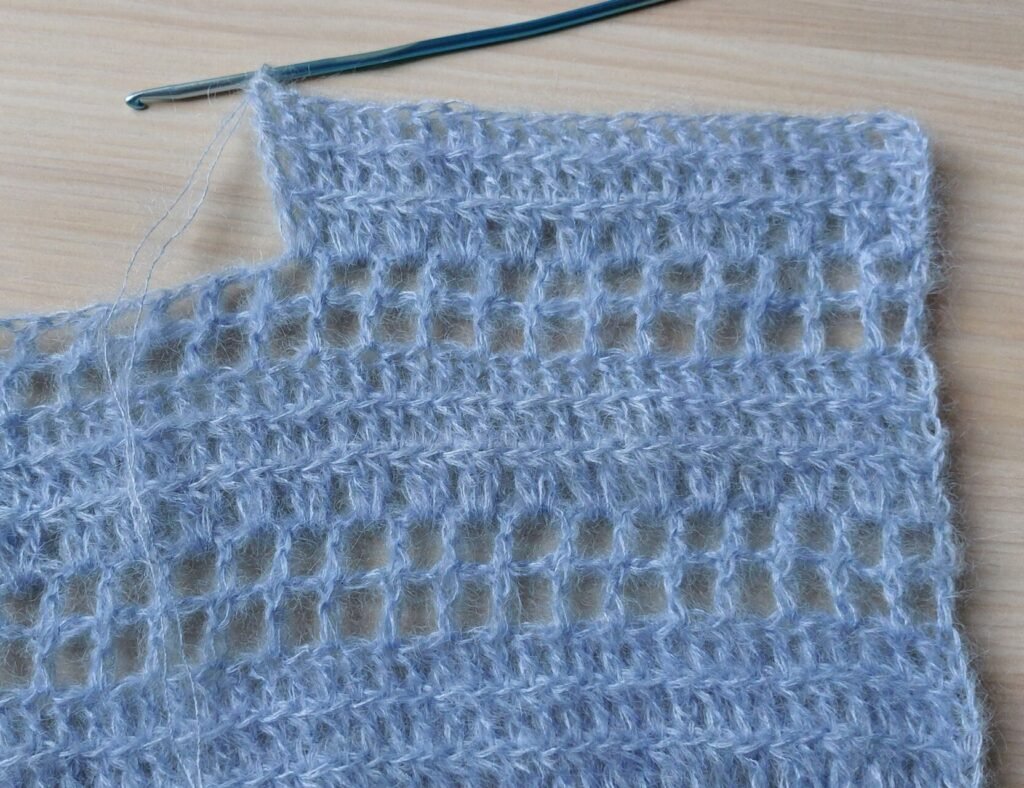
R 3:ch7- *2Rmesh st* Size S:ch7*2Rmesh st*-repeat for 79 times Size M:ch7*2Rmesh st*-repeat for 81 times Size L:ch7*2Rmesh st*-repeat for 83 times Size XL:ch7*2Rmesh st*-repeat for 85 times
R4:The same for all sizes *3Rdc st* Ch 8 Size S:158 sts Size M:162 sts Size L:166 sts Size XL:170 sts We will work this row by placing the stitches above the chain of the previous row.Only change the beginning and end of the row,one sts at the beginning and 3 sts at the end.
R5:*2Rmesh st* Size S:ch7*2Rmesh st*-repeat for 79 times Size M:ch7*2Rmesh st*-repeat for 81 times Size L:ch7*2Rmesh st*-repeat for 83 times Size XL:ch7*2Rmesh st*-repeat for 85 times
R6: ch8-*3Rdc st* Size S:ch8-158 sts Size M:ch8-162 sts Size L:ch8-166 sts Size XL:ch8-170 sts We will work this row by placing two stitches above the chain of the previous row.Only change the beginning and end of the row,one sts at the beginning and 3 sts at the end.
R7:ch7- *2Rmesh st* Size S:ch7*2Rmesh st*-repeat for 79 times Size M:ch7*2Rmesh st*-repeat for 81 times Size L:ch7*2Rmesh st*-repeat for 83 times Size XL:ch7*2Rmesh st*-repeat for 85 times
Now let’s repeat the usual rows for the other part of the squares to create the other two parts of the sweater, being careful to follow our measurement with changes in the number of chains on Row 1 and rows of dc in the row 2.
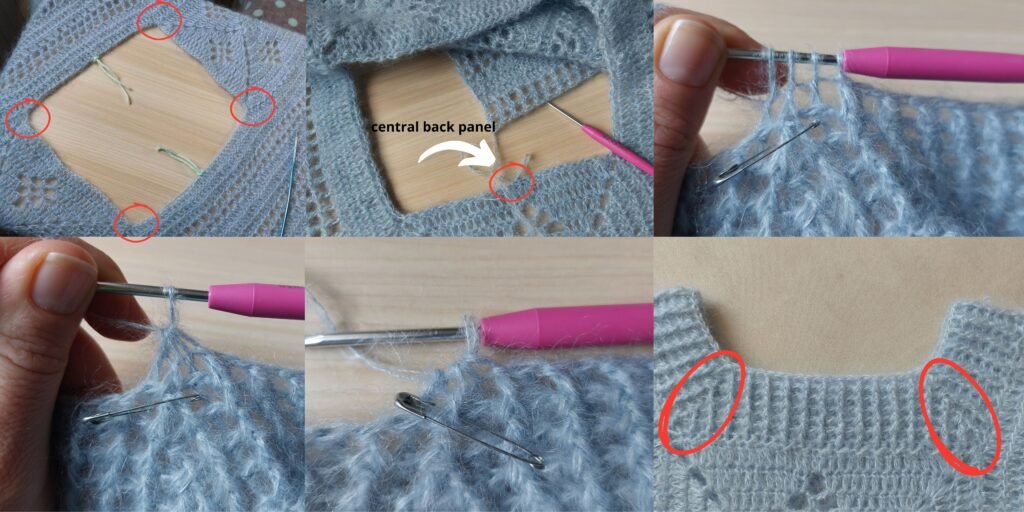
Once the two panels are finished, let’s finish the neckline using a 3mm crochet hook Decide which will be the front panel and which the back panel. Go to the neckline on the back panel, at the center. Start working this row on the wrong side(revers) of the panels:ch1, *slst-hdc* Once this row is completed, place stitch markers at the 4 corners. At these points, you will make decreases by working 3 stitches into 1, repeating for all rows. Continue:ch3, *fpdc-bpdc* When you reach the corner: Work in the following order ( 1fpdc-1bpdc-1fpdc or 1bpdc-1fpdc-1bpdc) and close them together to form the neckline. 1.Don’t forget to place a stitch marker to mark this stitch. Repeat this process for all 4 corners in all the rows needed to create the neckline, ensuring it sits well on your sweater. We make a total of 5 rows.
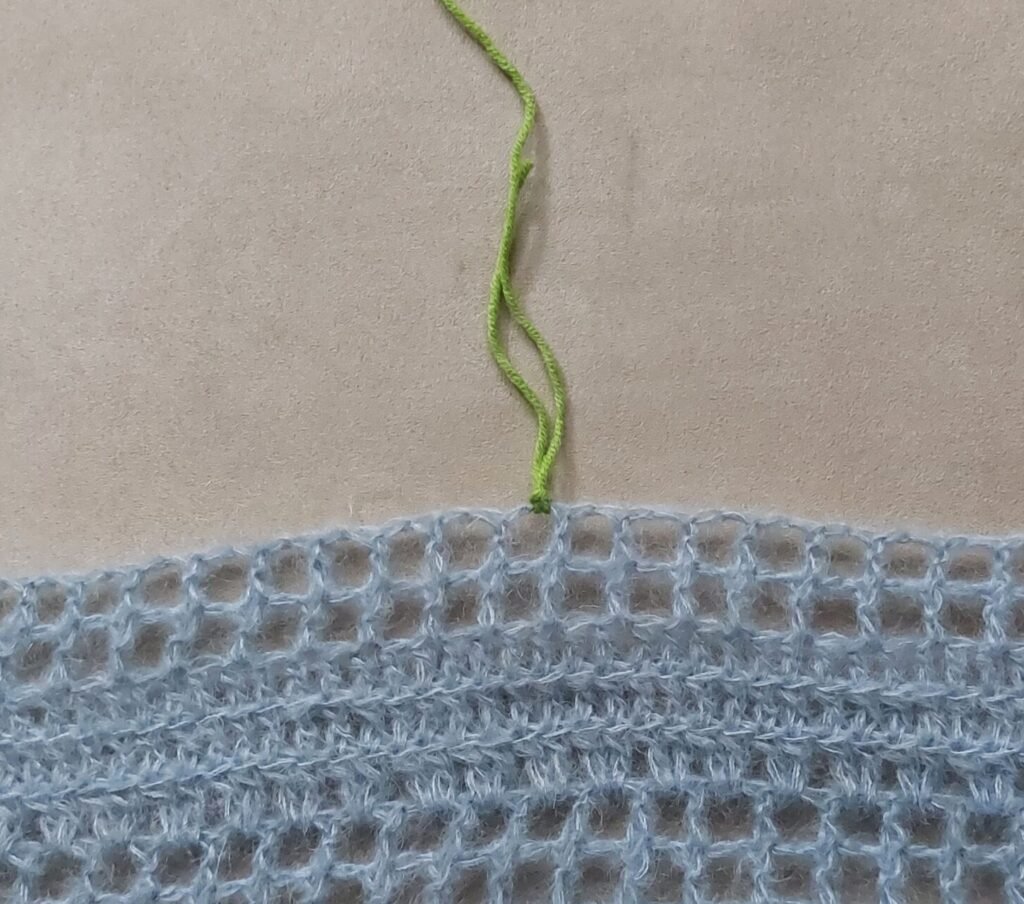
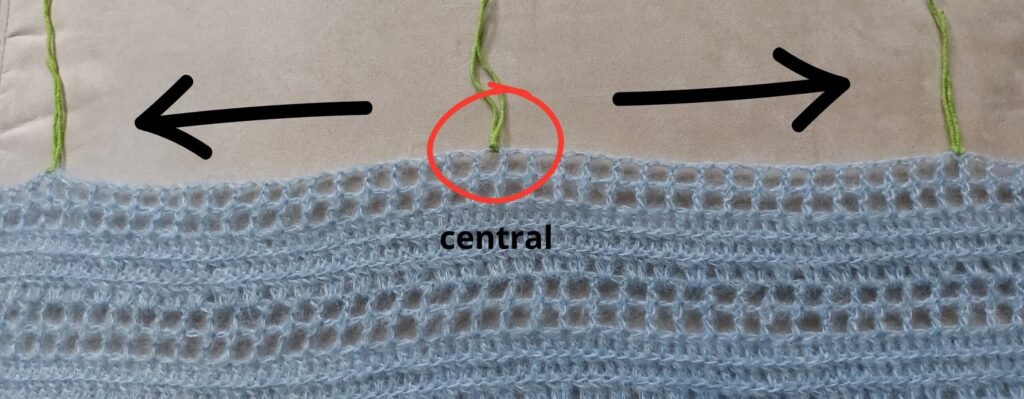
Sleeves We will create the sleeves directly from our two panels. First, locate the central stitch which divides the two panels and place a stitch marker to mark the position . Size S:79sts+1(central st-put the stitch marker)+79sts Size M:81sts+1(central st-put the stitch marker)+81sts Size L:83sts+1(central st-put the stitch marker)+83sts Size XL:85sts+1(central stitch-put the stitch marker)+85sts
Count stitches starting from the central stitch to the right and left. The number of stitches will vary depending on the size. Place stitch markers at the designated points for each size. S: 33st – 1 (central st) – 33st M: 35st – 1 (central st) – 35st L: 37st – 1 (central st) – 37st XL: 39st – 1 (central st) – 39st
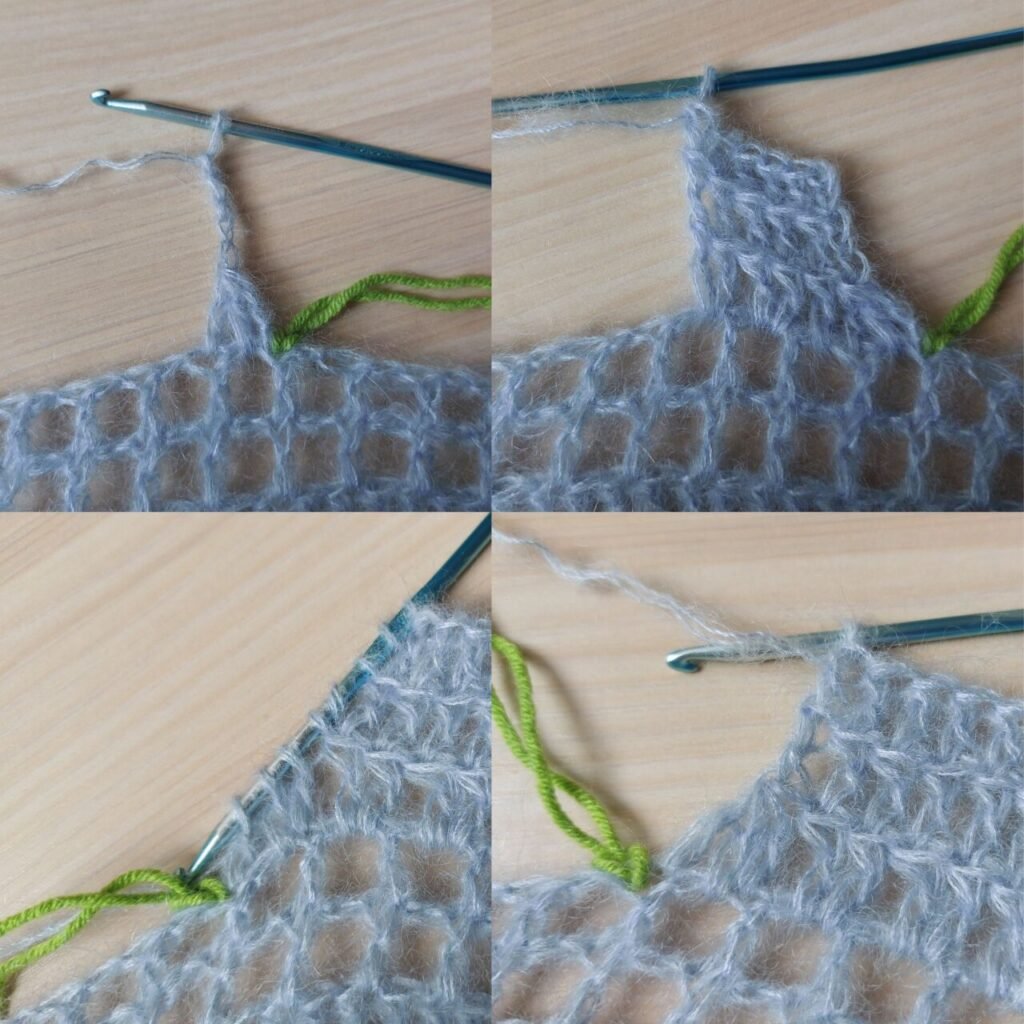
We will start working on the sleeves from right to left using our row of 3Rdc stitches, making decreases in the first and last stitches of this row. R1:ch2 Yarn over (YO), insert the hook, pull through, and close 2 loops. Yarn over again, insert the hook, pull through, and close 2 loops. Finally, yarn over and close 3 loops on the hook together. ch5, work 3Rdc st across the row.
At the end of the row, when there are 3 stitches left before the marker: In the last stitch worked: YO, pull through. YO, pull through again. YO, pull through on the stitch of the previous row, YO, and close 2 loops. YO, pull through on the chain of the previous row, YO, and close 2 loops. YO, pull through on the stitch with the marker, and close 2 loops. Close 4 loops together. Then, close 2 loops at a time until only one loop remains on the hook.
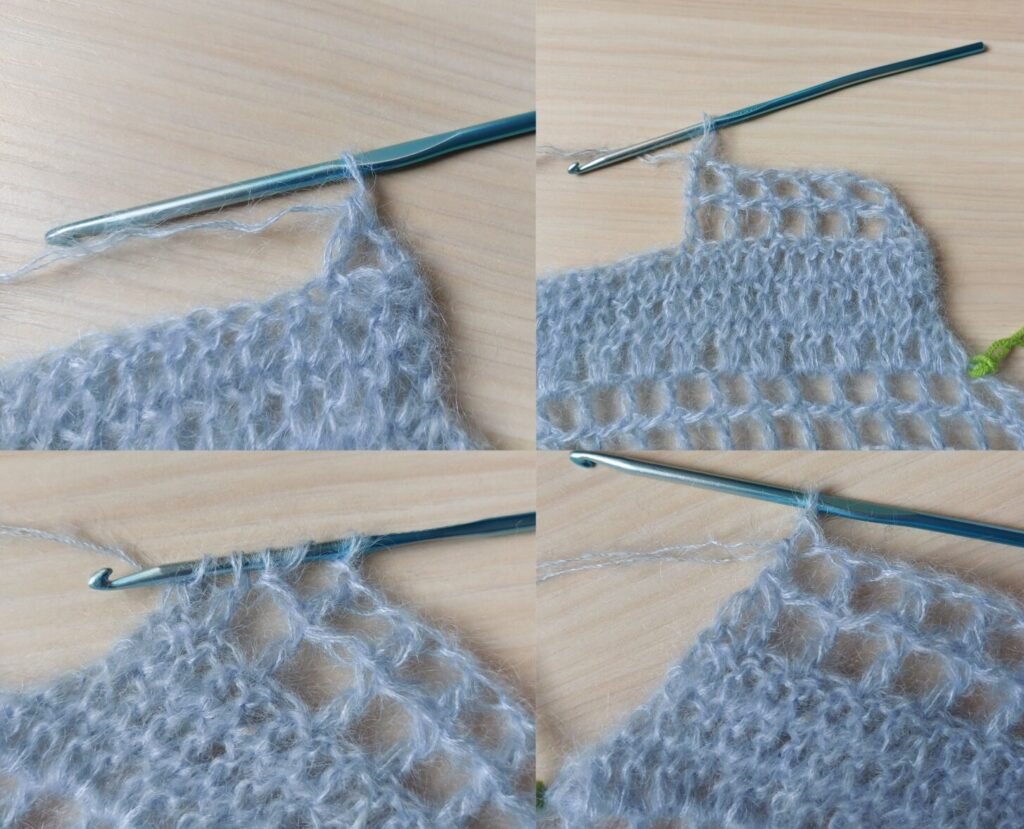
R2: In this row, we will make decreases in the row of 2R mesh stitches as follows: Ch 2, skip one stitch, YO, pull through,close 2 loops, YO again, and close the others 2 loops. Ch 4, then work 2R mesh stitches across the row. At the last stitch, when there are 4 stitches left from the previous row: Ch 1, YO, pull through, and close 2 loops (you will have 3 loops on the hook). YO, skip one stitch from the previous row, pull through, YO, and close 2 loops. YO, skip the next stitch, and in the last stitch, insert the hook, pull through, and close 2 loops. YO, close 3 loops. Finally, close 2 loops at a time until only one loop remains on the hook.
Continue with Row 3, following the pattern of the two different rows. For a tighter sleeve, you can continue decreasing stitches as done in Rows 1 and 2, otherwise, proceed without decreases following the established pattern.” R3: ch5,3Rdc st R4:ch7, 2Rmesh st R5:ch5, 3Rdc st R6: ch72Rmesh st R7: ch5,3Rdc st R8: ch7,2Rmesh st R9: ch5,3Rdc st R10: ch7,2Rmesh st R11: ch5,3Rdc st R12: ch7,2Rmesh st R13 (different for each size): S: ch5, *2Rdc st* M: ch8, *3Rdc st* L: ch11, *4Rdc st* XL: ch14, *5Rdc st* Repeat the same rows for the second sleeve.
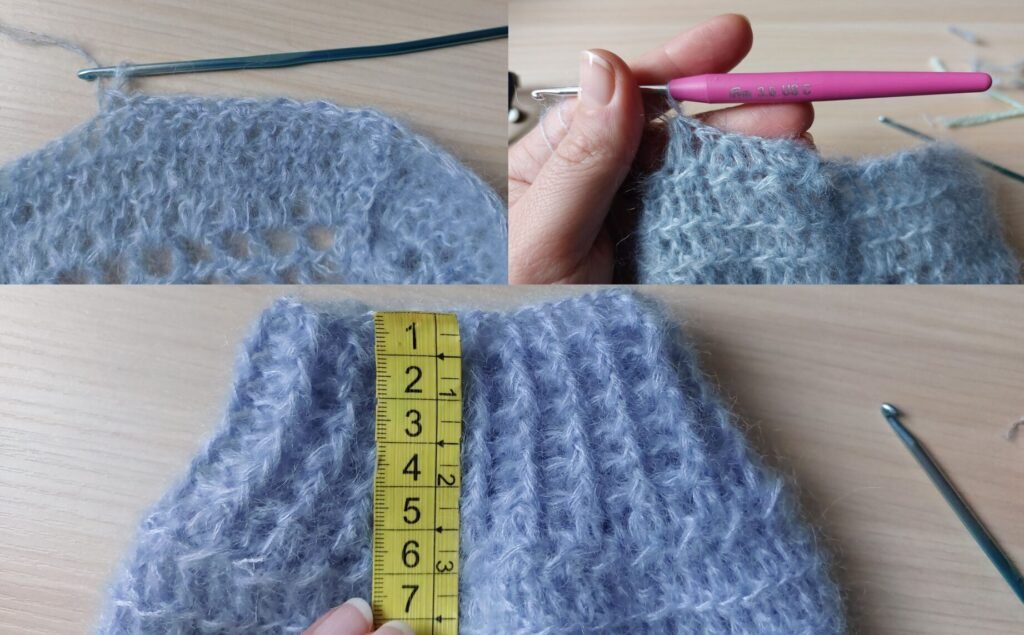
Rifinitura: Sweater assembly: Sew the sides and the sleeves.
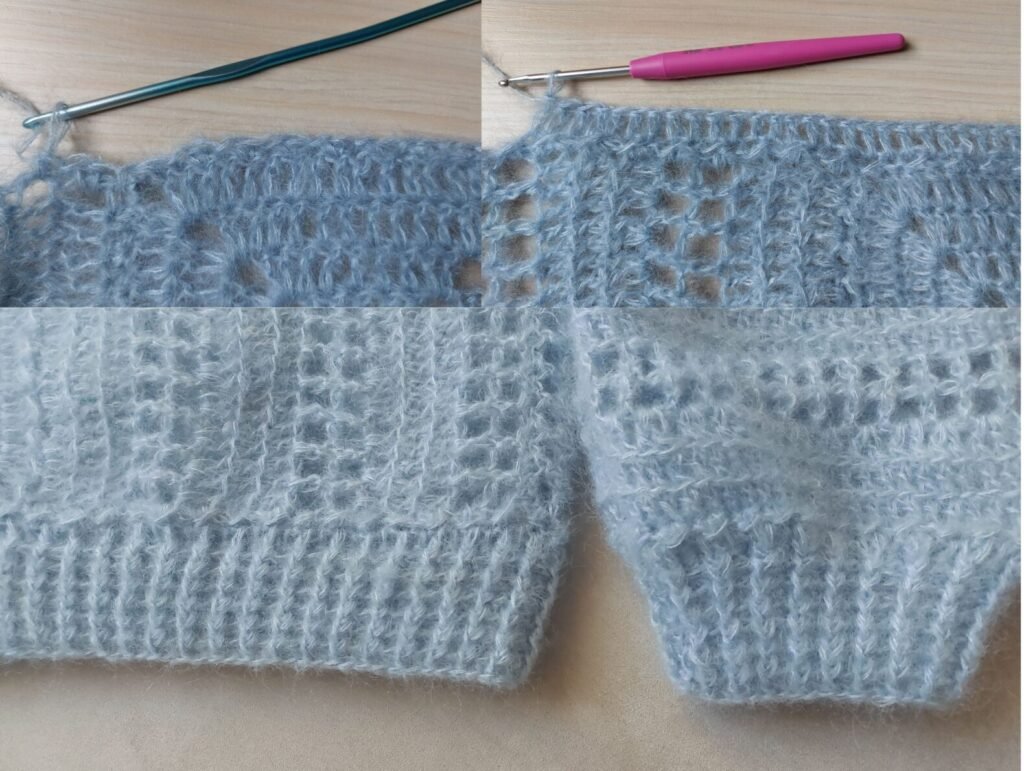
Cuffs: R1: ch1, *slst-hdc* (worked on the wrong side of the sleeve). Turn the work to the right side and work the first row, decreasing stitches for a snugger cuff. R2: ch3, *2dc tog, 1dc* R3: ch3, *fpdc-bpdc* R4: ch3, *fpdc-bpdc* R5: ch3, *fpdc-bpdc* R6: ch3, *fpdc-bpdc* R7:ch3,*fpdc-bpdc* R8:ch3,*fpdc-bpdc*
Bottom of the sweater: Start from the center back: R1: ch1, *slst-hdc* (worked on the wrong side of the sweater). R2: ch3, *dc* (decrease stitches every 10 stitches if needed). R3-R7: ch3, *fpdc-bpdc*.
You’ve just completed your Cozy Nest Crochet Sweater – a warm embrace made stitch by stitch.
This sweater is more than something to wear – it’s a shelter, a hug, a little piece of home you carry with you. In every loop lives your patience, your effort, and the comfort of creating something that truly belongs to you.
Whether it’s your first or your fiftieth, never stop building your creative nest – soft, imperfect, and beautifully yours.
Crochet is comfort made visible. Keep crafting your coziness, one stitch at a time.