Gipsy chic crochet top

✨ Create your own unique style with crochet! ✨

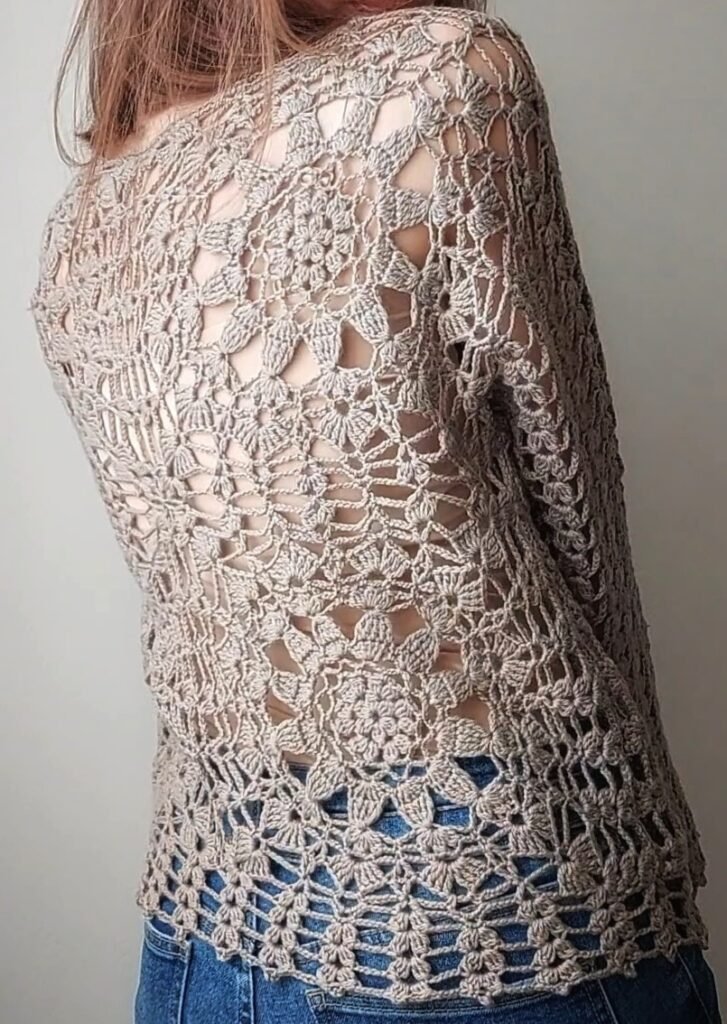
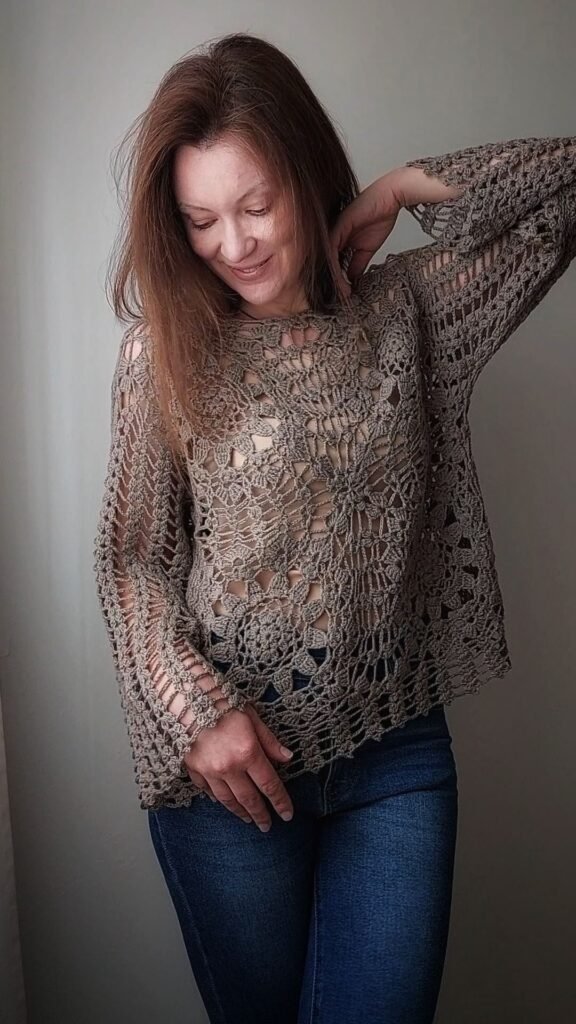
There is nothing more beautiful than wearing a handmade garment, full of details and personality.

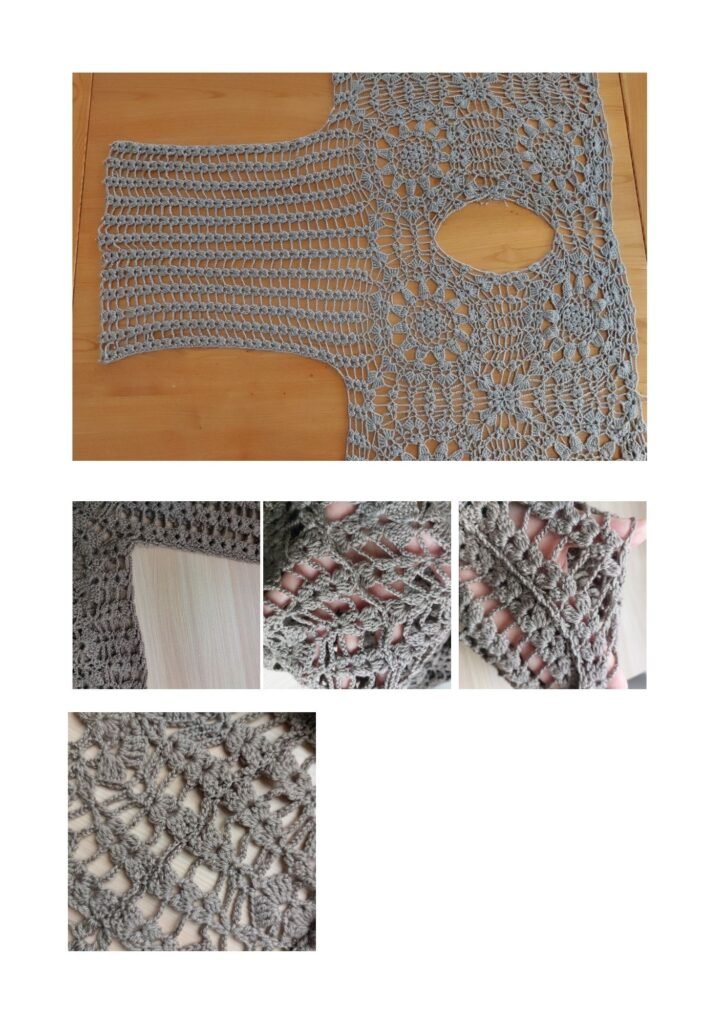
Today I present to you “Gipsy Chic”, a perforated blouse with a free and romantic charm, perfect for those who love the boho style with a touch of elegance.

In this guide, I will accompany you step by step in the creation of this sweater, from size S to 5X, so that you can create your perfect fit.

🧶 Materials needed:

3.5 mm crochet hook – for the entire work

3 mm crochet hook – for the edge finishing

Yarn: Lana Gatto Luxury VIP (color 8435) -50 g / 200 m

Scissors

Tape measure

Stitch marker


📌 Note on the yarn: You can choose the yarn you prefer, as long as it belongs to the same category (Fingering or Light Sport), in order to obtain the right fit and the best openwork effect.


📌 Difficulty level:Intermediate

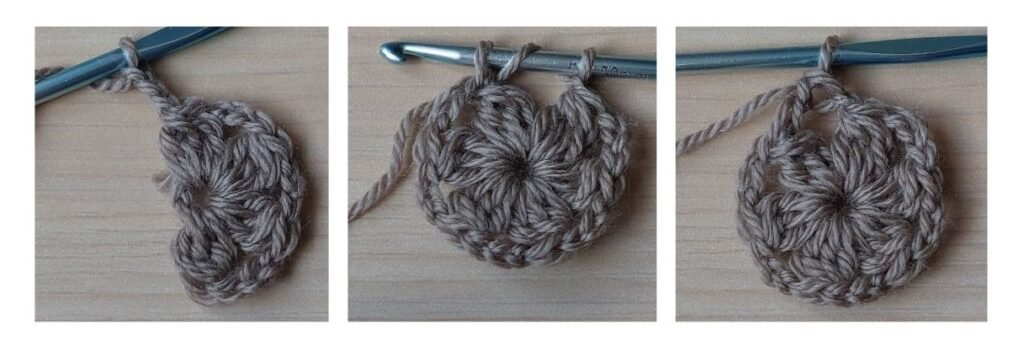
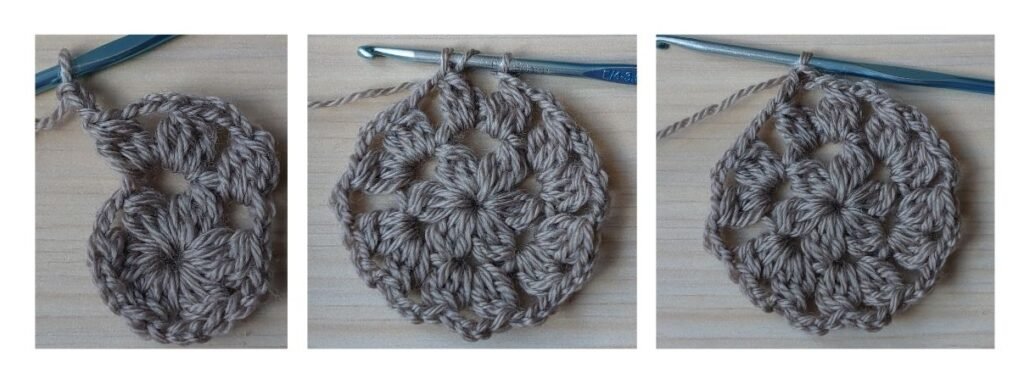
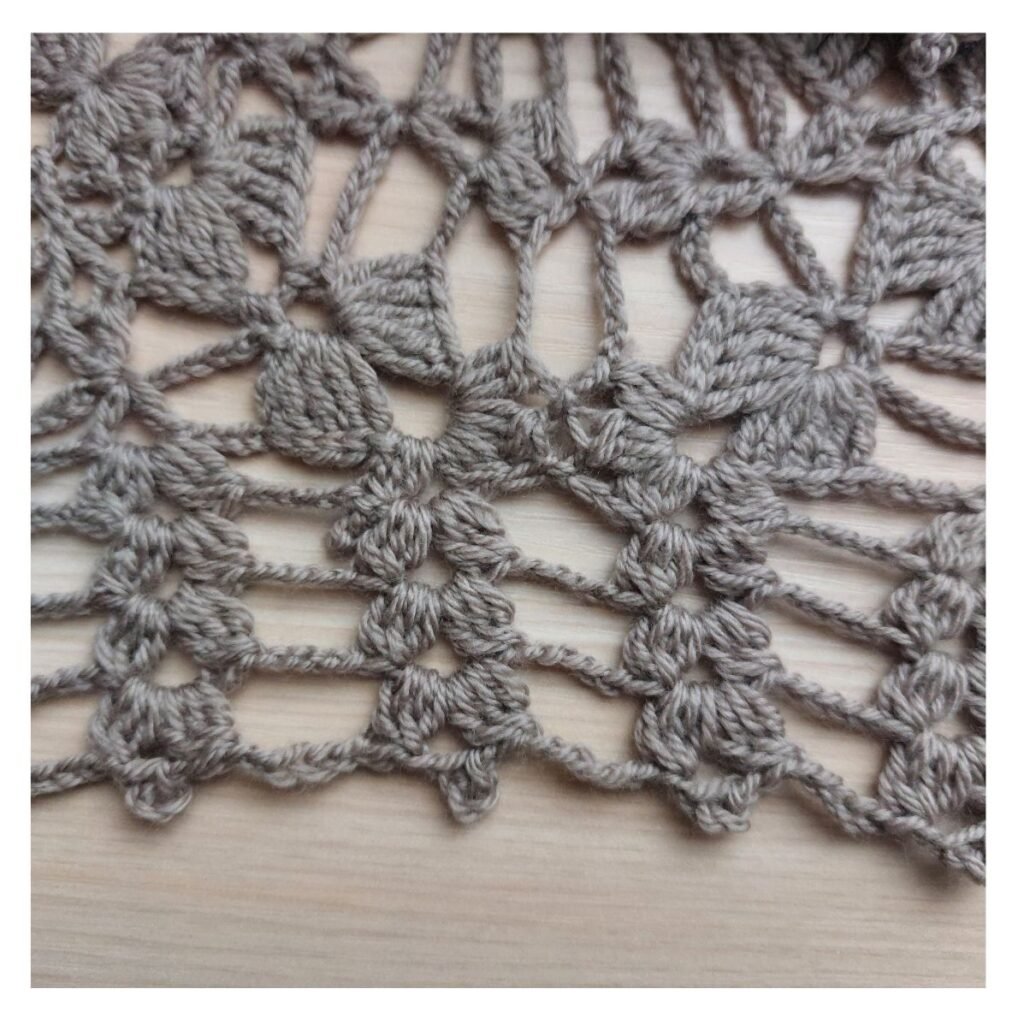
 Stitches used (American symbols):

ch – chain

dc – double crochet

sc – single crochet

sl st – slip stitch

tog – together

loop

sk 1st – skip one stitch

tr – treble crochet


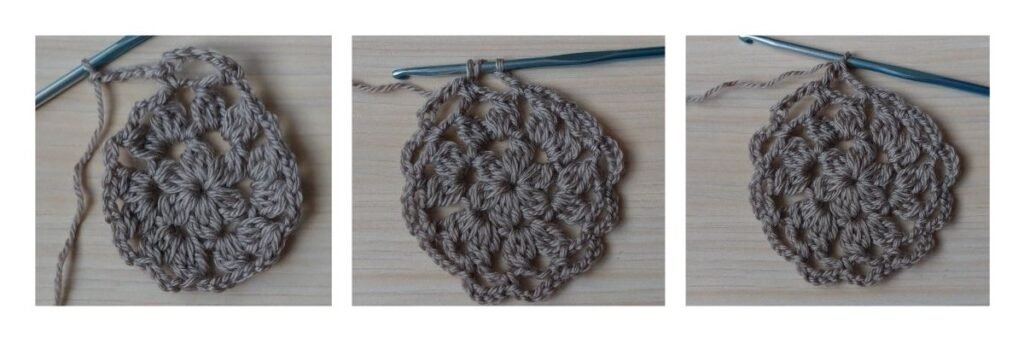
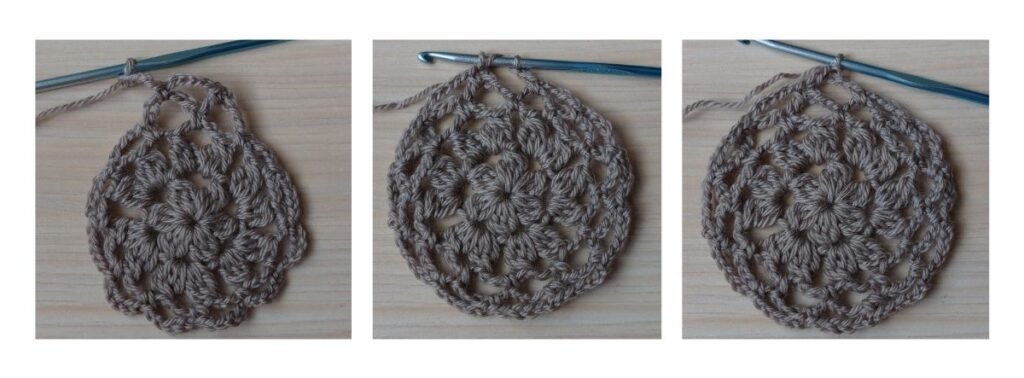
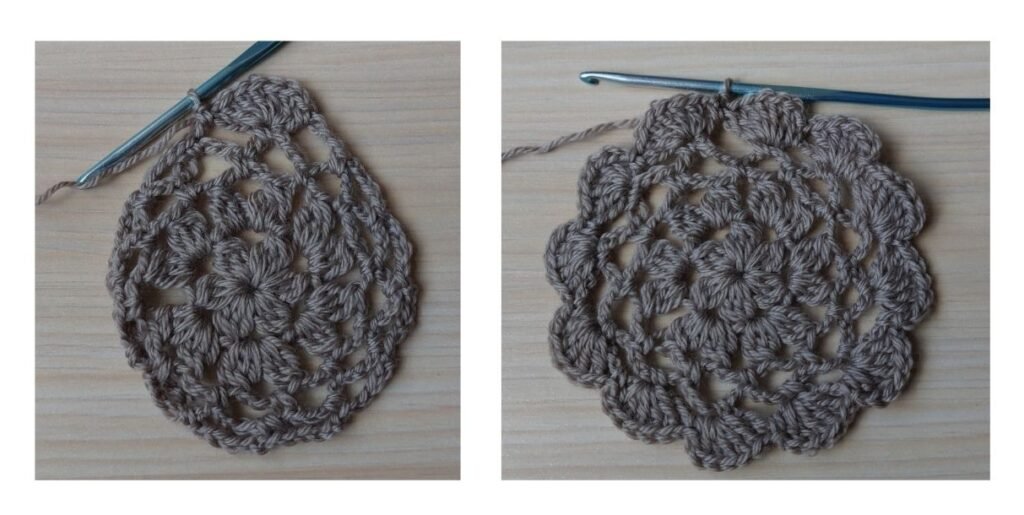
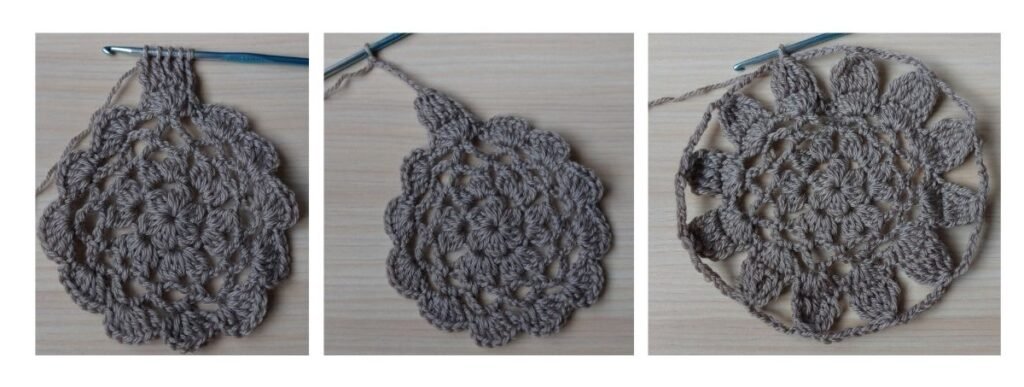
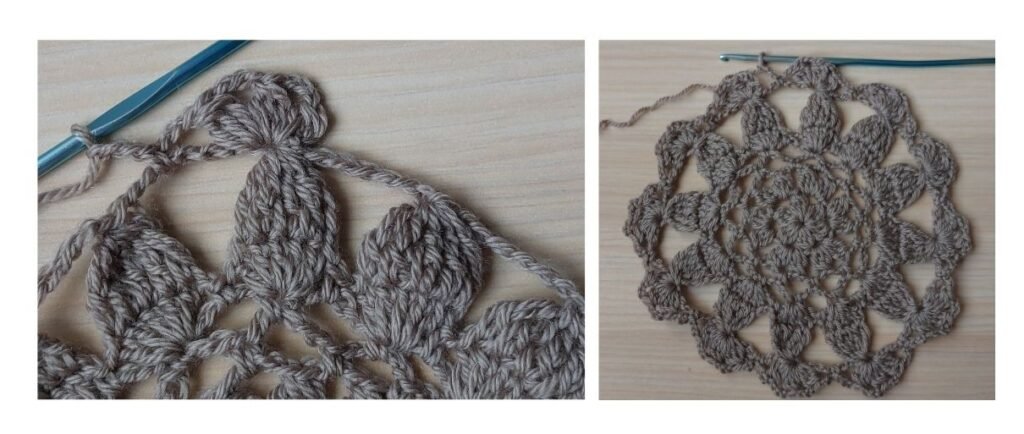
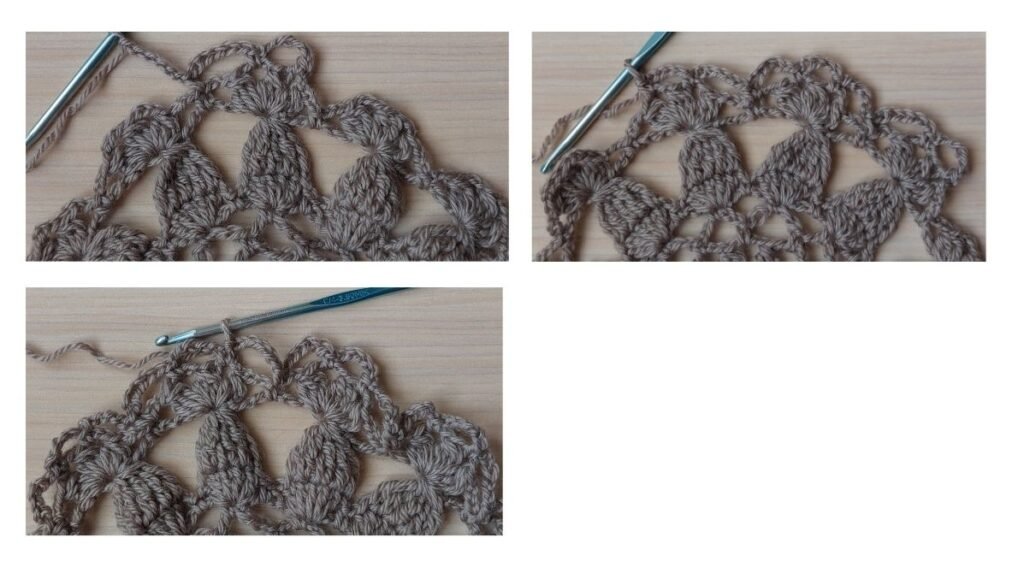
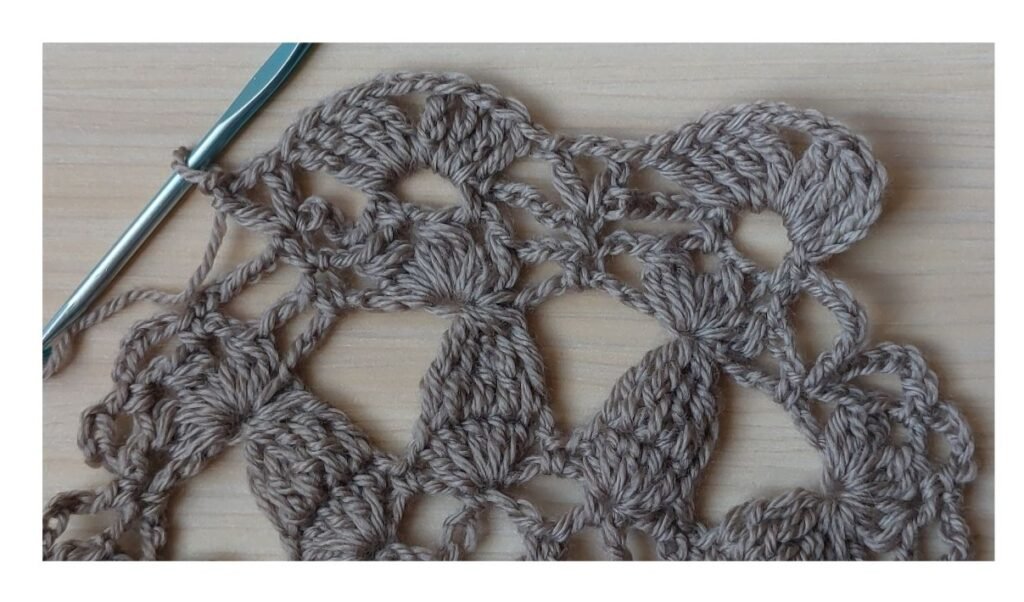
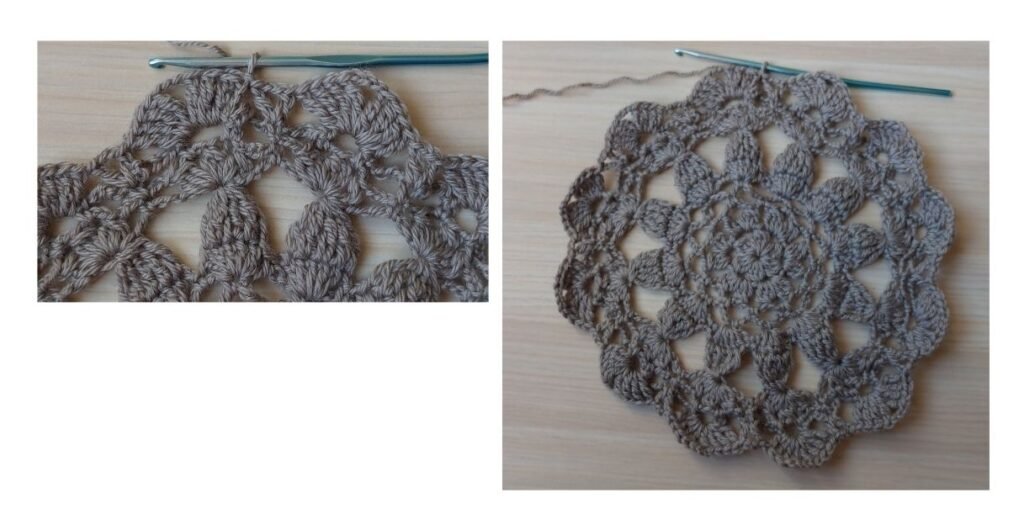
🧵 How do we make it?

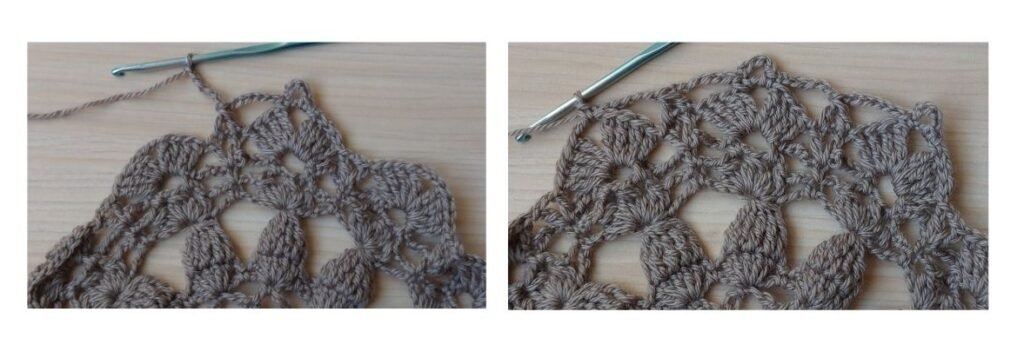
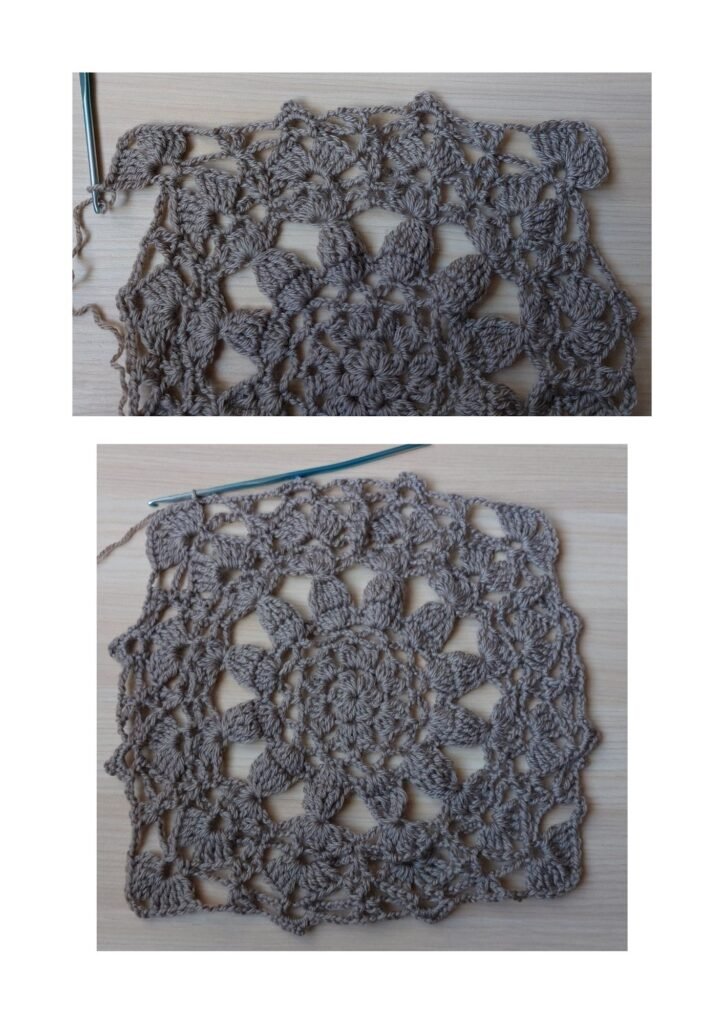
We start with 8 square motifs, divided between the front and back panel.

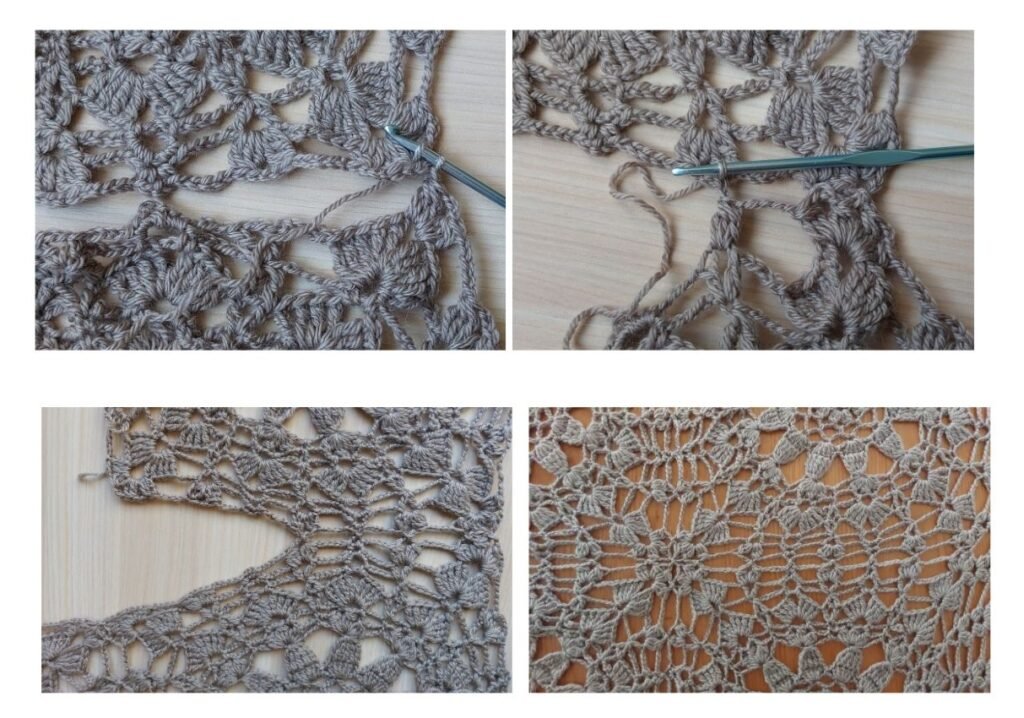
We add the necessary rows on the sides to reach the desired size.

We complete with the sleeves.

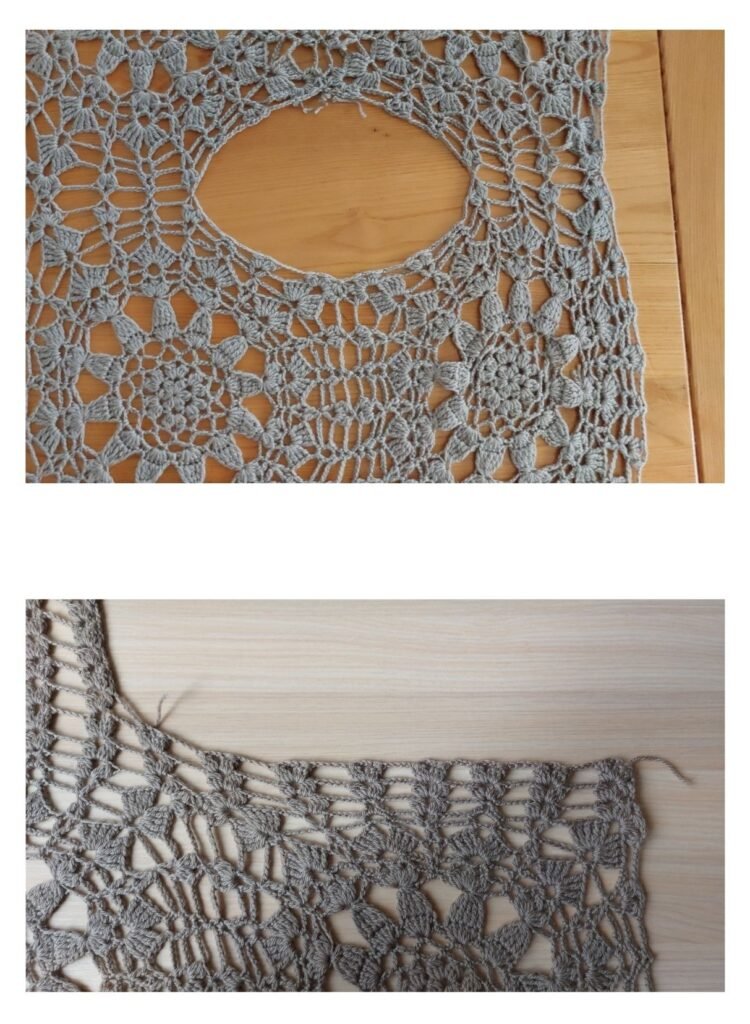
Finally, we join the panels and work the necessary rows to obtain the desired length.

And voilà! Your Gipsy Chic sweater is ready to be worn with style and lightness. 🌿✨

Grab your crochet hook and let’s start together! 🧵💖


Yarn needed for size

S-1140 m

M-1220 m

L-1520 m

XL-1760 m

2X-2040 m

3X-2360 m

4X-2720 m

5X-3120 m


Available sizes: S, M, L, XL ,2X, 3X, 4X, 5X
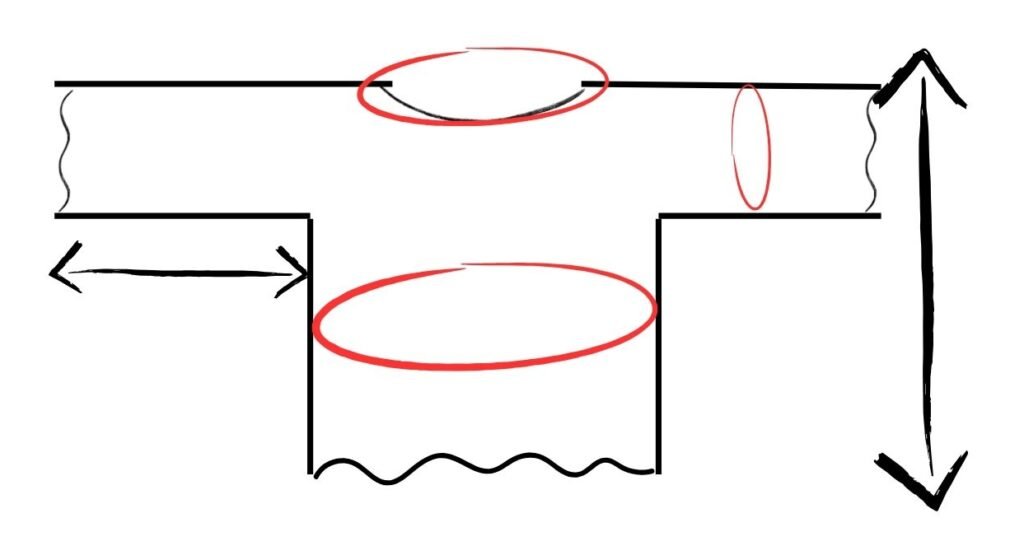
Measurements in cm

Neck circumference: *58

Body circumference: 102,112,116,124,136,140,144,154

Sweater length:50,52, 53,54,55,56,57,58

Sleeve length: 43,44,45,46,47,48,49,50

Sleeve circumference: 28,36,36,40,40,46,46,46

Pattern square motif

Start:

Cast on 4 ch and close in a circle with 1 sl st in the first ch.

Round 1:

Stand up with 3 ch (count as the first dc).

Work 2 dc, then close all 3 loops together.

Continue with (ch3 – 3 dc closed together). Repeat this sequence 4 more times to get a total of 6 groups of stitches.

To close the round: work 1 ch, yo, insert the hook over the first group of 3 dc, pull the yarn, close 2 loops at a time.

Round 2:

Stand up with 3 ch and 2 dc, then close the 3 loops together.

Cast on 3 ch, then work in the next space between the groups of 3 dc from the previous round:

(3 dc closed together – 3 ch – 3 dc closed together).

Repeat this sequence 5 times in total.

To close the round: ch3, 3 dc closed together, ch1, yo, insert the hook over the first group, pull the yarn, close 2 loops at a time.

Round 3:

Work ch1, 1 sc, then ch5.

Skip the first group of 3 dc and work 1 sc over the ch3.

Repeat (ch5 – 1 sc) 10 more times.

To close the round: ch2, yo, insert the hook over the first group, pull the yarn, close 2 loops at a time.

Round 4:

Ch1 – 1 sc, ch5 – 1 sc (over the ch5s from the previous round).

Repeat the sequence (ch5 – 1 sc) for 10 more times.

Close the round with ch2, yo, insert the hook over the first sc, pull the yarn and close 2 loops at a time.

Round 5:

Ch1, 5 dc (over the first sc of the previous round), ch1, 1 sc (over the ch5).

Repeat the sequence (ch1, 5 dc, ch1, 1 sc) for another 11 times.

Close with ch1 and 1 sl st.

Round 6:

Move over the first dc with sl st, then cast on 3 ch, 4 tr.

Close all 5 loops together and work ch7.

Repeat the sequence (5 tr closed together, ch7) 11 times.

Close with ch7 and 1 sl st

Round 7:

Ch3 – 2 dc closed together – ch3 – 3 dc closed together, ch3 – 3 dc closed together, ch3 – 1 sc above the ch7 of the previous round.

Repeat the sequence (ch3 – 3 dc together – ch3 – 3 dc together – ch3 – 3 dc together – ch3 – 1 sc) for 11 times.

Close with ch3 and 1 sl st.

Round 8:

Move with slip stitches (sl st) between the first and second element.

Work: ch1 – sc – ch5 – sc (between the second and third element of 3dc together), ch6, sc over the sc of the previous round, ch6.

Repeat the sequence: sc – ch5 – sc – ch6 – sc – ch6 for 11 times.

Close the round with a slip stitch (sl st) over the initial sc.

Round 9:

Move with sl st under the arch of ch5.

Work ch4 (counts as 1 tr), 3 tr, ch3, 4 tr.

Continue with:

1dc – ch2 – 1dc (over sc)

Repeat the sequence starting from the next ch5s of the previous round:

4tr – ch3 – 4tr,

1dc – ch2 – 1dc

Repeat for another 11 times.

Close the round with a sl st in the fourth chain of the initial ch4s.

Round 10:

Move with sl st over ch3.

Work: ch1 – sc – ch5 – sc – ch6.

Work 2dc into the 2 dc of the previous round and close them together, ch6.

Repeat the sequence: sc – ch5 – sc – ch6 – 2dc closed together – ch6 for 11 times.

Close the round with a sl st over the initial sc.

Round 11:

Move with slip stitches (sl st) over the 5ch-arc.

Work:

ch4 (counts as 1 tr), then 4tr, ch3, 5tr, ch4.

Over the 2dc closed together in the previous round, work: 1dc – ch2 – 1dc, ch4.

Over the 5ch-arc that follows, work: 3sc – ch3 – 3sc, ch4.

Over the group of 2dc closed together in the previous round, work: 1dc – ch2 – 1dc, ch4.

3sc – ch3 – 3sc, ch4.

1dc – ch2 – 1dc, ch4.

Now repeat the sequence:

  • 5tr – ch3 – 5tr, ch4.
  • 1dc – ch2 – 1dc, ch4.
  • 3sc – ch3 – 3sc, ch4.
  • 1dc – ch2 – 1dc, ch4.
  • 3sc – ch3 – 3sc, ch4.
  • 1dc – ch2 – 1dc, ch4.
  • Repeat 3 more times.

Round 12:

Move with sl st over 3ch.

Work:ch3 – 2dc closed together, ch3.

3dc closed together, ch3.

3dc closed together, ch3.

3dc closed together, ch5.

3dc closed together – ch3 – 3dc closed together (over ch2), ch5.

1sc – ch3 – 1sc (over ch3), ch5.

3dc closed together – ch3 – 3dc closed together (over ch2), ch5.

1sc – ch3 – 1sc (over ch3), ch5.

3dc closed together – ch3 – 3dc closed together, ch5.

Repeat the sequence starting from the second corner:

3dc – ch3 – 3dc – ch3 – 3dc – ch3 – 3dc, ch5.

3dc – ch3 – 3dc, ch5.

1sc – ch3 – 1sc, ch5.

3dc – ch3 – 3dc, ch5.

1sc – ch3 – 1sc, ch5.

3dc – ch3 – 3dc, ch5.

Repeat 3 more times.

Close with a sl st above the initial element.

Joining the Motifs

Once the first motif is completed, we proceed with creating the others and join them during the last round, when working the ch3 groups.

Steps to Join the Motifs:

Work up to the corner and, after completing the first two corner elements, make ch1.

Take the already completed motif and insert your hook under the ch3 loop at its corner.

Pull the yarn through and close the two loops on the hook, then make another ch1.

Continue this process to join the other ch3 groups until you reach the next corner.

If you need to join another motif at the next corner, repeat the same steps.

If there are no more motifs to join on that side, continue working normally to finish the round.

Motif Arrangement

  • Make 4 motifs, join them together, and set them aside.
  • Make 2 more motifs and join them together.
  • Attach these 2 motifs to the previous 2 motifs, and on the other side, join them to the 4 motifs, leaving space for the neckline.
  • The joining should be done at the middle of the edge or less, depending on how wide you want the neckline to be.

At this point, you will have a long rectangle, on which we will work side rows to reach the desired size.

Side and Sleeve Work

The row we will work on the sides and sleeves is:

ch3 – 3dc together – ch3 – 3dc together – ch5″- finish the row with 1dc.

The 3dc together – ch3 – 3dc together group will be made over each ch3 arch from the last round of our motifs.

Number of rows to work for each size:

  • S – 1 row
  • M – 2 rows
  • L – 3 rows
  • XL – 5 rows
  • 2X – 6 rows
  • 3X – 7 rows
  • 4X – 8 rows
  • 5X – 9 rows

After working the required number of rows, locate the ch5 spaces that divide the panel into two parts.

Now, count the elements on the right and left to determine where to continue with the sleeves.

Number of elements to count per side:

  • XS – S : 5 elements per side (total: 10)
  • M – L : 6 elements per side (total: 12)
  • XL – 2X : 7 elements per side (total: 14)
  • 3X – 4X – 5X : 8 elements per side (total: 16)

Working the Sleeves

Attach the yarn and continue with the established stitch pattern.

To create a smoother edge, for the first row:

  • Start with ch5 from the top of the element just before the counted number.
  • Follow the pattern and finish the row by working 1 tr into the top of the next element.In the last worked row, make a picot on top of the ch3.

Continue with the stitch pattern:

  • ch3, 3dc together – ch3 – 3dc together – ch5, repeat.
  • End the row with 1 dc.

Work back and forth, repeating the row.

Number of rows for the sleeves:

  • S – 26 rows
  • M – 28 rows
  • L – XL – 30 rows
  • 2X – 3X – 32 rows
  • 4X – 5X – 34 rows

Closing the Sides

Now we proceed with joining the sides of the sleeves and the panel.

Turn the work to the back of the panel.

Take both sides and join them by working as follows:

  • 1sc in the stitch that connects the 3dc.
  • ch4, then sc in the next stitch.
  • ch4, sc in the next stitch, and so on.

This method will create a neat and clean closure.

Adding Rows to the Bottom

After closing the sides, we add rows to the bottom of the sweater to reach the desired length.You can choose to work in rounds or rows back and forth.

We use the same stitch pattern as the sleeves and sides:

3dc together – ch3 – 3dc together – ch5″.

Number of rows for the bottom part:

  • S – 2 rows
  • M – 3 rows
  • L – 4 rows
  • XL – 5 rows
  • 2X – 6 rows
  • 3X – 7 rows
  • 4X – rows
  • 5X – 9 rows

In the last worked row, make a ch3 picot on top of the ch3.

You’ve just finished your Gypsy Crochet Sweater 

This isn’t just a sweater – it’s freedom woven into every stitch, a celebration of your creative spirit. Maybe the path wasn’t perfect, maybe you unraveled and started again – and that’s okay. That’s part of the magic.
Gypsy is bold, wild, and made to move with you – just like your imagination.
 
Keep creating without rules, without fear – your hands know the way.
Made with freedom, worn with joy.
 

For more free-spirited patterns, ideas, and crochet adventures, subscribe to my newsletter and let inspiration find you.

Want to try another project?

If you enjoyed the Gipsy Chic Top,you might also love making the Zahira dress,perfect item for this summer!

Slow down, create more, live simply

Subscribe to my newsletter and receive:

🧶 Easy & beautiful crochet patterns
🌸 Slow living tips and inspiration
🌿 Peaceful guides for a more natural, mindful life

Let’s slow down together — with creativity, intention, and joy.

No spam, just thoughtful emails — sent slowly & with love

We don’t spam! Read our Privacy Policy for more info.