Blog

Gilet Soft Harmony
Checkered Vest – Soft Harmony
A modern and chic crochet vest featuring a striking checkered pattern that won’t go unnoticed.
Easy to make, it’s perfect for adding a sophisticated touch to your wardrobe.
The pattern is worked in two colors, but you can personalize it with your preferred combinations for a unique result.
I used a DK (Light, Size 3) yarn with an approximate thickness of medium-light.
Versatile and elegant, this piece is perfect for a casual yet refined look and is especially fun to create.
Grab your crochet hook, and let’s get started together! 🧶✨
Skill level: Intermediate.
For better understanding, refer to size M, where photos are attached.
Materiali necessari
Yarn: Lana Gatto Super Soft (50 g ≈ 125 m)
- Color 1 (C1): Base color, used for the main elements
- Color 2 (C2): Used to separate the elements
Yarn Suggestions:
A DK (Light, Size 3) yarn with an approximate medium-light thickness, suitable for a 4-5mm crochet hook, depending on your tension and the desired effect.
Before starting, make a gauge swatch to ensure the correct measurements.
For C2, you can choose a textured yarn (mohair, alpaca, or faux fur) for an interesting contrast.
Tools:
- Crochet hook – 4.5 mm
- Crochet hook – 4 mm (for finishing touches)
- Optional: If you have trouble holding multiple loops on a regular crochet hook, you may opt for a Tunisian crochet hook of the same size.
- Stitch markers, scissors, measuring tape
Required Yarn for Sizes:
XS (S, M, L) XL (2X, 3X, 4X, 5X)
C1 (80%) – C2 (20%)
575m (650m, 725m, 788m) 750m (863m, 1000m, 1075m, 1150m)
Yarn Breakdown for C1 and C2:
- C1: 460m / C2: 115m
- C1: 520m / C2: 130m
- C1: 580m / C2: 145m
- C1: 630m / C2: 158m
- C1: 690m / C2: 173m
- C1: 750m / C2: 188m
- C1: 800m / C2: 200m
- C1: 860m / C2: 215m
- C1: 920m / C2: 230m
Terminology & Abbreviations
This pattern uses U.S. crochet terminology:
- ch → chain
- R → row
- tog-together
- x t→ repeat x times
- yo → yarn over
- loop → chain
- fpdc → front post double crochet
- bpdc → back post double crochet
- sl st → slip stitch
- sc → single crochet
- hdc → half double crochet
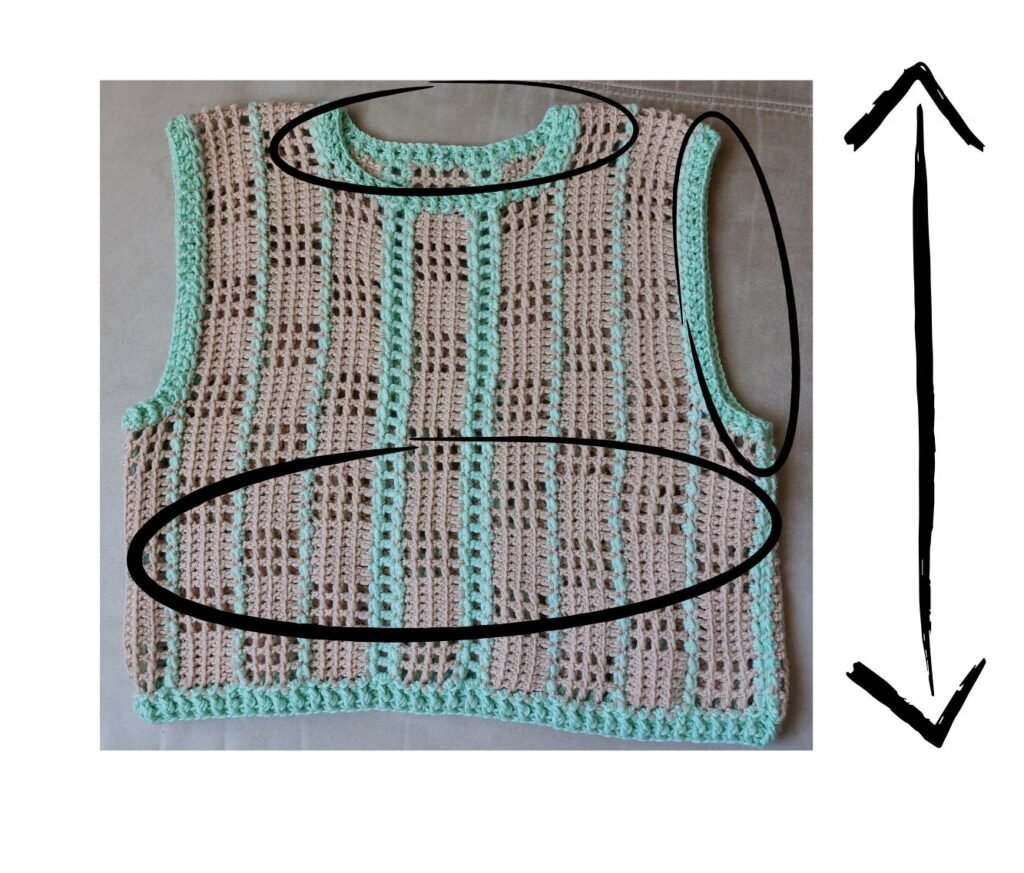
Model features
This vest stands out for its checkered stitch, which gives style and sophistication to the garment.
The openwork design makes it perfect for pairing with different outfits, adding a unique touch to your wardrobe.
Stitch pattern used
The stitch is composed of two main elements:
Full element – rows of consecutive double crochet stitches to give structure to the garment.
Net element – rows of net stitch, which give lightness and breathability.
These elements are alternated by a subtle workmanship with slip stitch e mezza maglia alta, using a contrasting color compared to the base of the vest.
This color combination creates a harmonious and elegant visual effect. Alternatively, the vest can be made in a single color.
Size adaptability
The central elements of the front and back panels allow you to easily change the fit of the vest, adapting it to different sizes.
The garment is worked by joining the two panels and adding the necessary elements under the armpits for a tailored fit.
🌿 Ideal for those looking for a quick but effective project, perfect for any season!
🔹 Before starting the pattern: Before starting with the desired size, it is important to make a sample to check that the result obtained corresponds to the one shown in the photo.
📌 If the sample is larger or smaller than the pattern, try changing the size of the crochet hook or adjusting the tension of the thread. Starting from the right base is essential to obtain an optimal result!
How to make the checkered stitch
💡 Work on a base of chains with a multiple of* 12* + 6 + 1 ch. The elements will be modified based on the number of rows worked consecutively, to adapt it to more sizes.
The number of starting chains varies based on the rows worked at the same time.
Examples of starting a full element:
ch8 – 3 rows worked at the same time
ch11 – 4 rows worked at the same time
ch14 – 5 rows worked at the same time
ch17 – 6 rows worked at the same time
ch20-7 rows worked at the same time
Examples of starting an openwork element:
ch10 – 3 rows worked in the same time
ch13 -4 rows worked in the same time
ch16 – 5 rows worked in the same time
ch19-6 rows worked in the same time
ch22-7 rows worked in the same time
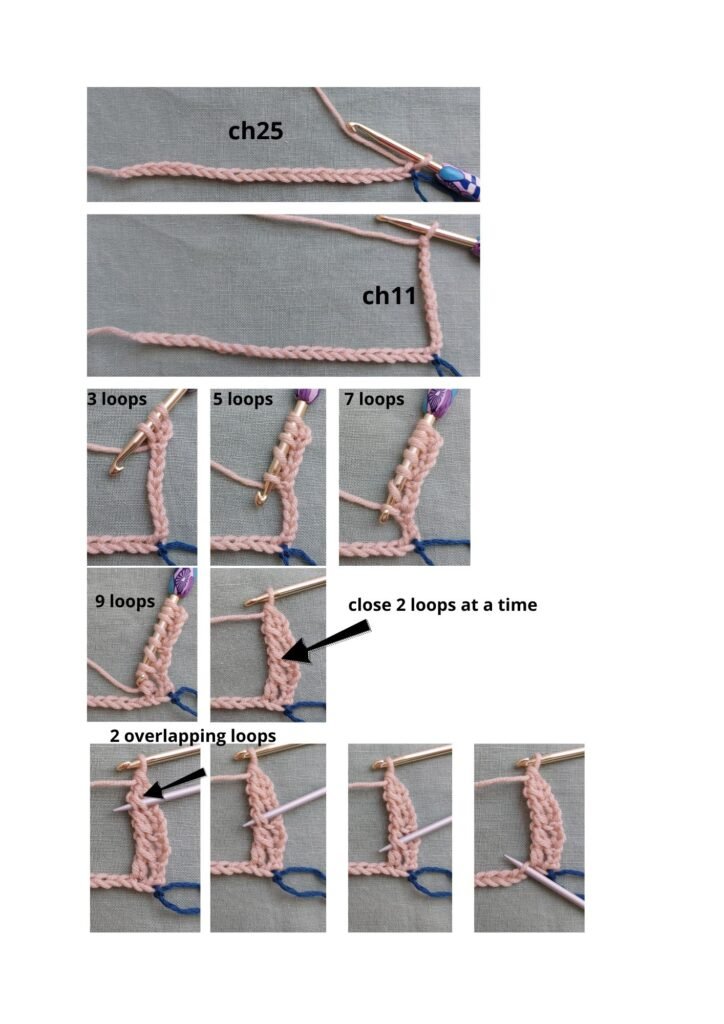
🔹 We will see how to work 4 rows at the same time
Start with ch25
Row 1 (R1)-c1: full element-openwork element
Realizza 11(ch) chains.
YO (yo), skip 2 ch, insert hook into ch 3 and pull yarn over (3 loops on hook).
Yo, skip 2 ch, insert hook into next one and pull yarn over (5 loops on hook).
Yo, skip 2 ch, insert hook into next one and pull yarn over (7 loops on hook).
Yo, skip 4 ch, insert hook into next one and pull yarn over (9 loops on hook).
Close 2 loops at a time until you have 1 loop on hook. We have our first long stitch.
🔹 Full element repeat:
Yo, insert hook into 2 overlapping loops, pull yarn over (repeat 2 more times).
Yo, insert hook into next stitch of base and pull yarn over.
Close 2 loops at a time.
Repeat the process 4 more times.
🔹 Continuation with openwork element:
Realizza 1 ch
Yo, twist (rotate the yarn slightly), insert the hook into the 2 overlapping loops, pull the yarn and close 2 loops (3 loops on the hook).
Repeat the same step two more times.
Yo, skip 1 stitch of the base, insert the hook into the next one, pull the yarn and close 2 loops at a time until you have 1 loop on the hook.
Repeat the process one more time.
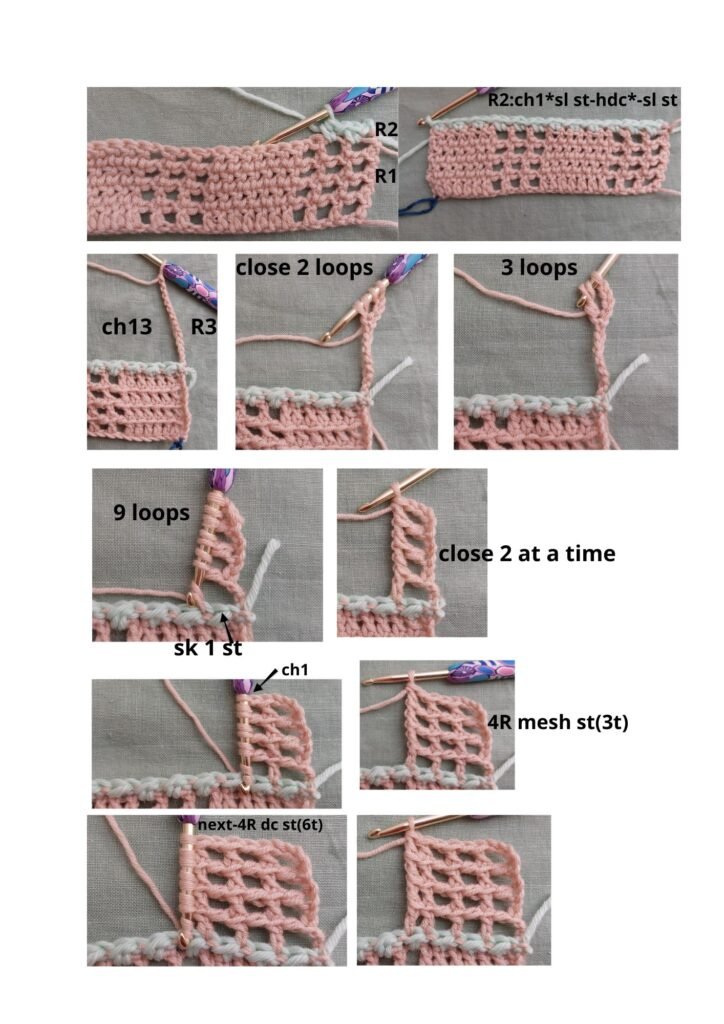
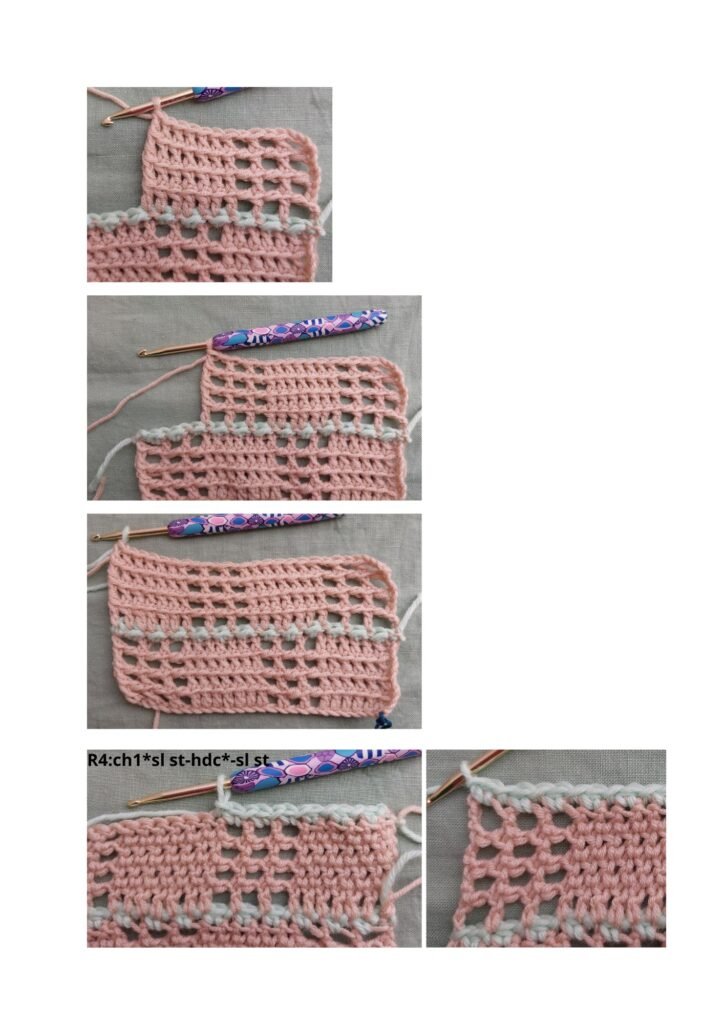
Row 2 (R2)-c2: ch1, sl st-hdc-end row with sl st
Row 3 (R3)-c1: Repeat Row 1, reversing elements: openwork element- solid element
🔹 Starting an openwork element-4 rows:
Chain 13 (ch13).
Yo, twist, skip 4 ch, insert hook into ch 5 and pull yarn over (4 loops on hook), close 2 loops (3 loops on hook).
Yo, twist, skip 2 ch, insert hook and pull yarn over (6 loops on hook), close 2 loops (5 loops on hook).
Yo, twist, skip 2 ch, insert hook and pull yarn over (8 loops on hook), close 2 loops (7 loops on hook).
Yo, skip 1 loop from the previous row, pull yarn over.
Close 2 loops at a time until you have 1 loop on your hook.
🔹 openwork element repeat:
ch1, Yo, twist, insert hook into 2 overlapping loops, pull yarn over and close 2 loops.
Repeat twice more.
Yo, skip a stitch from the previous row, insert the hook.
Close 2 loops at a time.
Repeat one more time.
🔹 Switch to the full element:
Worked 6 times, alternating the same steps as in row 1.
Row 4 (R4-c2): Repeat Riga 2
ch1, sl st-hdc-end the row with sl st
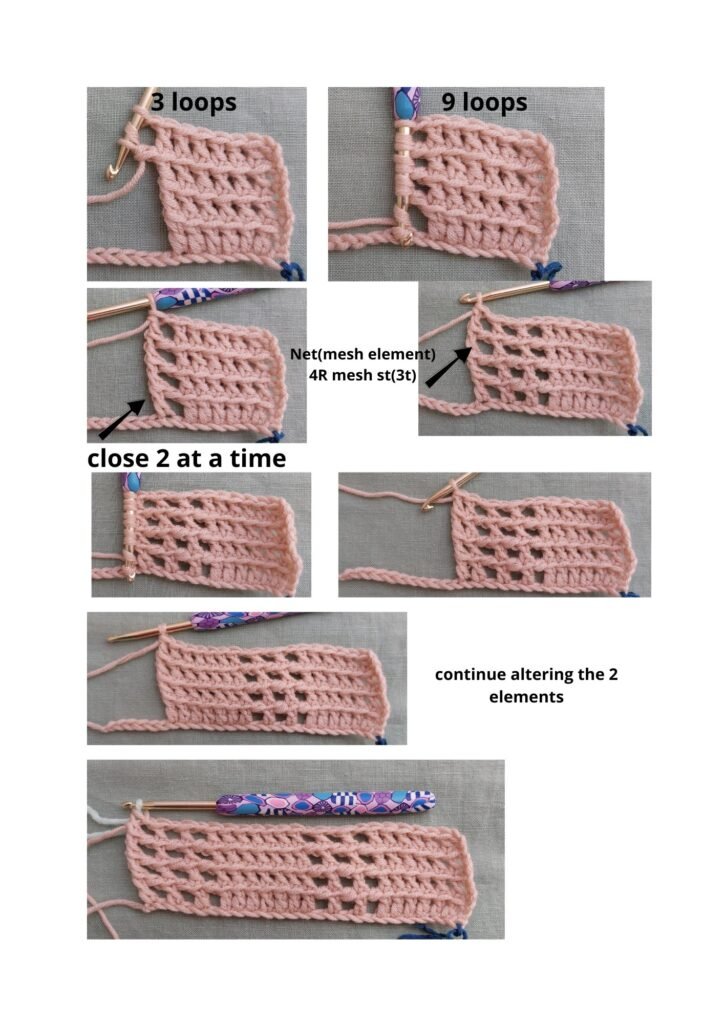
💡 Repeat the pattern
After completing Row 4, the pattern is repeated alternating:
Rows 1 and 3: exchanging the position of the full and openwork elements.
Rows 2 and 4: sequence of *sl st and hdc*
To adapt the vest to more sizes, the rows will also be:
ch4, sk1 *dc-ch1* – end the row with dc.
ch3, sk1* hdc-ch1* – end row with hdc.
ch7*2R mesh st* – 2 rows of mesh stitch worked together.
ch10*3R mesh st*-3 rows of mesh stitch worked together.
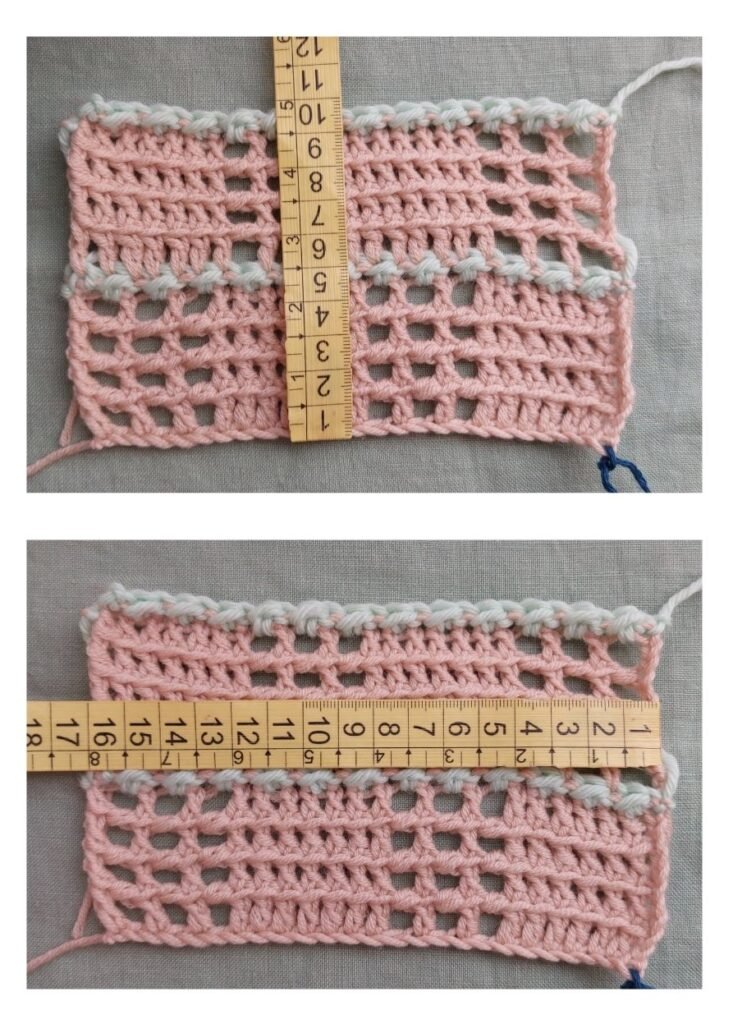
When we measure our sample, we should obtain approximately the following dimensions:
- Height: 4 rows should measure around 10 cm
- Length: The sample made with 25 chains should measure approximately 16 cm
If your sample’s measurements differ significantly, we recommend:
- Changing the hook size (if the sample is too small, use a larger hook; if it’s too big, use a smaller hook)
- Adjusting your yarn tension while crocheting
Make sure your measurements are as close as possible to the indicated ones to achieve the best results in the final project.
How to work 2,3 rows of mesh stitch at the same time (2,3R mesh st):
– Guida video:https://youtu.be/1ueJpXYIx7k?si=XGfVs2UKH4XUWTRX
For 2R mesh st -ch7;
For 3R mesh st-ch10;
Example:2R mesh st
Ch7, yo with a twist, skip 4 ch, insert hook into 5ch, pull yarn, close 2 loops. YO, skip 1 stitch from the previous row, insert hook, pull yarn, close 2 loops at a time until 1 loop is left on hook.
Ch1, yo with a twist, insert hook into next 2 overlapping stitches, close 2 loops.
YO, skip 1 stitch from the previous row, insert hook, pull yarn and close 2 loops at a time.
Pattern to adapt the vest to multiple sizes
Basic sequences:
Ch 20 → 7 rows of double crochet, repeat 6 times → 7R dc st (6t)
Ch 22 → 7 rows of mesh stitch, repeat 3 times → 7R mesh st (3t)
Ch 17 → 6 rows of double crochet, repeat 6 times → 6R dc st (6t)
Ch 19 → 6 rows of mesh stitch, repeat 3 times → 6R mesh st (3t)
Ch 14 → 5 rows of double crochet, repeat 6 times → 5R dc st (6t)
Ch 16 → 5 rows of mesh stitch, repeat 3 times → 5R mesh st (3t)
Ch 11 → 4 rows of double crochet, repeat 6 times → 4R dc st (6t)
Ch 13 → 4 rows of mesh stitch, repeat 3 times → 4R mesh st (3t)
Ch 8 → 3 rows of double crochet, repeat 6 times → 3R dc st (6t)
Ch 10 → 3 rows of mesh stitch, repeat 3 times → 3R mesh st (3t)
Adaptation for sizes:
Sizes XS, S, M, L → we use basic elements from 4R dc st – mesh st
Sizes XL, 2X, 3X, 4X, 5X → we use basic elements from 5R dc st – mesh st
The other variations are modifications to further adapt the measurements.
Directions for working:
For each row, make a multiple of these combined groups.
At the end of the row, add the same element you started with.
Final Measurements
XS (S, M, L) (XL, 2X, 3X, 4X, 5X)
Neckline: 44cm (48cm, 50cm, 52cm) (52cm, 58cm, 58cm, 60cm, 62cm)
Bust: 92cm (94cm, 96cm, 102cm) (110cm, 122cm, 126cm, 130cm, 138cm)
Length: 42cm (42cm, 46cm, 50cm) (56cm, 60cm, 64cm, 68cm, 68cm)
Armhole:46cm(46cm,50cm,50cm)(52cm,54cm,56cm,56cm,56cm)
Size XS-EXTRA SMALL
Cast-127ch
R1 (C 1): ch10 * 3R mesh st (3t) – 3R dc st (6t) – total 10 times. + 3R mesh st (3t)
R2 (C 2): ch1 * sl st-hdc * + sl st
R3 (C 1): ch11 * 4R dc st (6t) – 4R mesh st (3t)* – total 10 times. + 4R dc st (6t)
R4 (C 2): ch1 * sl st-hdc * + sl st.
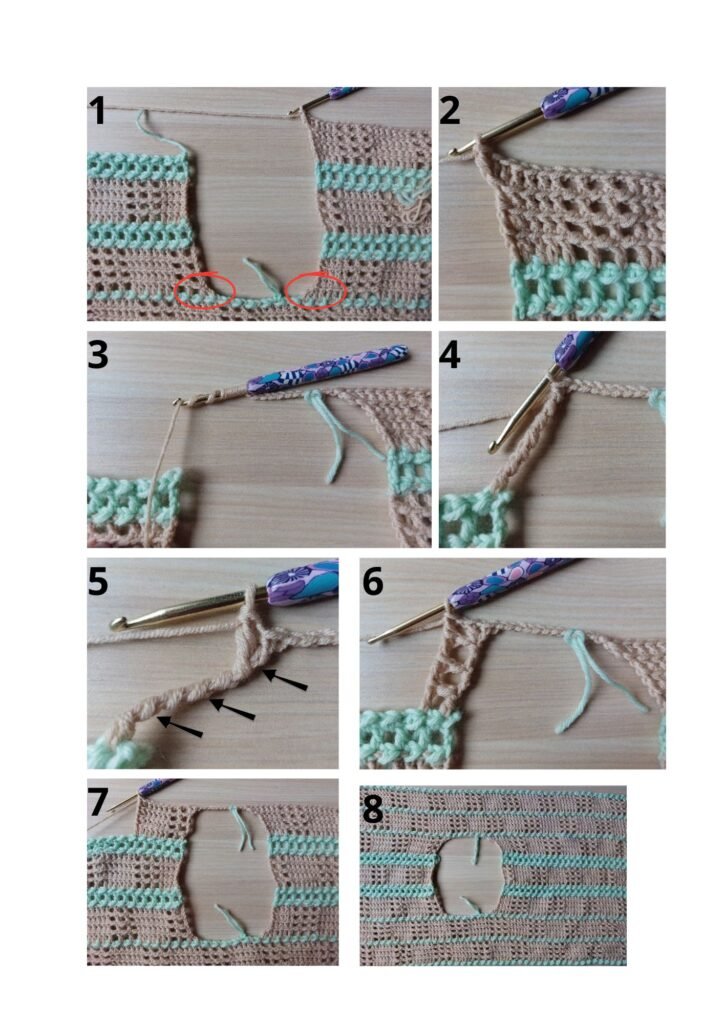
Divide the panel in two: place the marker on stitch 64 (stitch that divides the back part from the front part).
Continue working from where we finished R4, only for the back panel (the rows behind the neck). We will finish the row 2 stitches before the marker.
R5 (back, C 1): ch13 * 4R mesh st (3t) – 4R dc st (6t) * – repeat 4 times + 4R mesh st (3t), 4R dc st (4t).
Before closing the loops on the last stitch, work as follows: close two loops, work 2 dc, close 4 loops . Continue closing 2 loops at a time until you are left with only one loop on the hook. This will give you a softer corner for finishing the neckline.(img.size M-n.1)
R6 (back, C 2): ch1 * sl st-hdc * – sl st
R7 (back, C 1): ch11 * 4R dc st (6t) – 4R mesh st (3t) * – repeat 4 times + 4R dc st (6t) + 4R mesh st (2t)
R8 (back, C 2): ch1 * sl st-hdc * – sl st
R9 (back, C 1): ch13 * 4R mesh st (3t) – 4R dc st (6t) * – repeat 4 times + 4R mesh st (3t) + 4R dc st (4t)
Work 2 dc into the two overlapping loops for a softer corner.((img.size M-n.1,2)
Leave the work on hold and move on to work the rows for the front panel.
From the marker that divides our panel in two, count 8 stitches; in the ninth work:
R5 (front, C 1): ch3, sk1 st, 1dc, close tog, ch10, 4R mesh st (2t), * 4R dc st (6t) – 4R mesh st (3t) * – repeat 4 times((img.size M-n.1)
R6 (front, C 2): ch1 * sl st-hdc * – sl st
R7 (front, C 1): ch11, 4R dc st (4t), * 4R mesh st (3t) – 4R dc st (6t) * – repeat 4 times
R8 (front, C 2): ch1 * sl st-hdc * – slst
Go back to where you left R9 (back) and continue.
R9 (back-front, Color 1): ch11, yo 8 times, close 2 loops at a time until you have only 1 loop on the hook.(
Ch1, dc in the second 2 overlapping stitches.(img.size M-n.3,4,5,6)
Continue with the pattern: 4R mesh st (2t), * 4R dc st (6t) – 4R mesh st (3t) * – repeat 4 times.(img.size M-n.7)
R10 (C 2): ch1 * sl st-hdc * – sl st
R11 (C 1): ch11 * 4R dc st (6t) – 4R mesh st (3t) * – repeat 10 times + 4R dc st (6t).(img.size M-n.8)
R12 (C 2): ch1 * sl st-hdc * – sl st
R13 (C 1): ch10 * 3R mesh st (3t) – 3R dc st (6t) * – repeat 10 times + 3R mesh st (3t)
R14 (C 2): ch1 * sl st-hdc * – sl st
Return to the beginning of the work, where we started the initial chains, and work a row :ch1* sl st-hdc*-sl st on the wrong side to get an even finish.
Place markers to make the necessary rows under the arms. Place markers on the outside of the panel, at stitch number 64. From this stitch, count 31 stitches to the right and 31 to the left on both sides. Place marker in stitch 31. (both sides)
At this point, go back to row 14 and continue with row 15.
R15 (C 1): ch11,* 4R dc st (6t) – 4R mesh st (3t)*, repeat 2 times + 4R dc st (6t).
Before closing the loops on the last row, work as follows:
Close 2 loops, cast on 2dc, close 4 loops, then close 2 at a time.
R16(C2): ch1,* sl st-hdc*-sl st.
Repeat the 2 rows also for the other side of the panel
Work in stitch 31.
Ch 3, 2dc, close tog, ch8, continue with the pattern *4R dc st (6t)-4R mesh st (3t)*-repeat 2 times+4R dc st (6t)
Do the same for the other part of the panel.(img.size M-n.9.10,11,12,13)
Close the sides.(img.size M-n.14)
Finish the neckline, the armholes and the bottom edge of the vest by first working a row:ch1*sl st-hdc *-sl st on the wrong side.
Then, turn the work and work :ch3* fpdc-bpdc* to create an elastic edge.(img.size M-n.15,16,17,18)
Size S – Small Size
Cast on: 127 ch
Front and Back
R1 (C1): ch13 *4R mesh st (3t) – 4R dc st (6t)* – repeat 10 times + 4R mesh st (3t).
R2 (C 2): ch1 *sl st – hdc* – sl st.
R3 (C1): ch11* 4R dc st (6t) – 4R mesh st (3t)* – repeat 10 times + 4R dc st (6t).
R4 (C 2): ch1* sl st – hdc* – sl st.
We place the marker on stitch 64 (it will be the stitch that divides the two panels).
Pannello posteriore
We continue from where we closed R4, working only the back panel (rows behind the neck).
R5 (Back – C 1): ch13 *4R mesh st (3t) – 4R dc st (6t)* – repeat 4 times + 4R mesh st (3t) + 4R dc st (4t).
Before closing the stitches in the last row, we work :close 2 loops,work 2 dc,close 4 loops,finally, close 2 loops at a time.(img.size M-n.1)
This way we will have a softer corner to finish the neckline.
R6 (Back – C 2): ch1* sl st – hdc* – sl st.
R7 (Back – C2): ch3, sk 1,* hdc – ch1* – hdc.
R8 (Back – C 2): ch1* sl st – hdc* – sl st.
R9 (Back – C 1): ch11* 4R dc st (6t) – 4R mesh st (3t)* – repeat 4 times + 4R dc st (6t) + 4R mesh st (2t).
R10, 11, 12 (Back – C 2): Repeat R6, R7, R8.
R13 (Back – C 1): ch13* 4R mesh st (3t) – 4R dc st (6t)* – repeat 4 times + 4R mesh st (3t) – 4R dc st (3t).
Add 2 dc in the first overlapping loops for a softer angle.(img.size M-n.1,2)
Leave hanging, move to the front.
Front Panel
From the marker dividing the panel, count 8 stitches, in the 9th, work:
R5 (Front – C 1): ch3, sk 1 st, 1 dc, close tog, ch10, 4R mesh st (2t), *4R dc st (6t) – 4R mesh st (3t)* – repeat 4 times.(img.size M-n.1)
R6, 7, 8 (Front – C2): Same instructions as R6, R7, R8 (Back).
R9 (Front – C1): ch11, 4R dc st (4t),* 4R mesh st (3t) – 4R dc st (6t) *- repeat 4 times.
R10, 11, 12 (Front – C2): Same instructions as R10, 11, 12 (Back).
Back to R13 (Back) and continue:
R13 (Back-Front – C 1): ch11, yo 8 times, close 2 loops at a time until one is left on hook.
– Ch1, dc on the first 2 overlapping stitches, then follow the pattern:
– 4R mesh st (2t) – *4R dc st (6t) – 4R mesh st (3t)* – repeat 4 times.
R14 (C 2): ch1 *sl st – hdc *- sl st.
R15 (C 1): ch13 *4R dc st (6t) – 4R mesh st (3t)* – repeat 10 times + 4R dc st (6t).
R16 (C 2): ch1* sl st – hdc* – sl st.
R17 (C 1): ch13* 4R mesh st (3t) – 4R dc st (6t)* – repeat 10 times + 3R mesh st (3t).
R18 (C2): ch1 *sl st – hdc *- sl st.(img.size M-n.3,4,5,6,7,8)
Finishing and Underarm Work
Go back to the beginning where we started the chains and work a row :ch1*sl st – hdc*-sl st on the wrong side for an even structure.
We place the marker on the stitch that divides the panel in 2 (stitch 64), count 31 stitches on the left-31 on the right, place the marker on stitch 31.
We continue with the necessary rows under the armpits:
R19 (C 1): ch11* 4R dc st (6t) – 4R dc mesh st (3t)* – repeat 2 times + 4R dc st (6t).
With the closing of the last stitch, worh:close 2 loops,work 2dc,close 4 loops,and then 2 at a time to create a softer corner.
R20 (C 2): ch1* sl st – hdc* – sl st.
Repeat the same for the other part of the panel. Start inside panel (st31)
Ch 3, 2 dc, close tog, ch 8, then continue with:
*4R dc st (6t) – 4R mesh st (3t)* → repeat 2 times, + 4R dc st (6t).
Repeat R19-20 for the other side of the panel:(img.size M-n.9,10,11,12,13)
Close the sides.(img.size M-n.14)
Finish the neckline, armholes and bottom edge of the vest by first working a row:ch1*sl st-hdc-sl st on the wrong side.
Then, turn the work and work :ch3* fpdc-bpdc* to create an elastic edge.(img.size M-n.15,16,17,18)
Size M – MEDIUM
Cast on: 139 ch
R1: C 1: ch11,* 4R dc st (6t) – 4R mesh st (3t)* repeat 11 times + 4R dc st (6t)
R2: C 2: ch1* sl st – hdc* + sl st
R3: C 1: ch13 *4R mesh st (3t) – 4R dc st (6t) *repeat 11 times + 4R mesh st (3t)
R4: C2: ch1* sl st – hdc *+ sl st
Stitch marker: Place the stitch marker on stitch 70 (which will divide the two panels).
Back panel work
Continue from where R4 closed, working only for the back panel (back neck rows).
R5 (Back): C 1: ch11 *4R dc st (6t) – 4R mesh st (3t)* repeat 5 times + 4R dc st (4t).
Before closing the last stitch: close 2 loops, work 2dc, close 4 loops, then close 2 loops at a time .(n1)
R6 (Back): C 2: ch1 *sl st – hdc *- sl st
R7 (Back): C 2: ch4, sk 1, *dc – ch1* – dc
R8 (Back): C 2: ch1* sl st – hdc* – sl st
R9 (Back): C1: ch13* 4R mesh st (3t) – 4R dc st (6t)* repeat 5 times + 4R mesh st (2t)
R10,11,12 (Back): Color 2 – repeat R6,7,8
R13 (Back): Color 1: ch11* 4R dc st (6t) – 4R mesh st (3t) *+ 4R dc st (4t) + 2 dc in the first 2 overlapping loops. Leave on hold. Work the rows for the front panel.(n.2)
Working the front panel
From the marker dividing the two panels, count 8 st,for the 9 st:
R5 (Front): C 1: ch3, sk1 st, 1 dc, close tog, ch10, 4R mesh st (2t),* 4R dc st (6t) – 4R mesh st (3t)* repeat 4 times + 4R dc st (6t).(n.1)
R6,7,8 (Front): C 2 – repeat R6,7,8 (Back)
R9 (Front): C 1: ch1, 4R dc st (4t), *4R mesh st (3t) – 4R dc st (6t)* repeat 4 times + 4R mesh st (3t).
R10-12 (Front): C 2 – repeat R10,11,12 (Back)
Resume work
Return to R13 (Back) and continue:
R13 (Back-Front): C1: ch11, yo 8 times, close 2 loops at a time until there is only one loop on the hook. Ch1, dc on the first 2 overlapping stitches.(n.3,4,5,6)
Continue with the pattern: 4R mesh st (2t), *4R dc st (6t) – 4R mesh st (3t)* repeat 4 times + 4R dc st (6).(n.3,4,5,6)(n.7)
R14: C 2: ch1 *sl st – hdc* – sl st
R15: C 1: ch13 *4R mesh st (3t) – 4R dc st (6t) *repeat 11 times + 4R mesh st (3t)
R16: C 2: ch1 *sl st – hdc *- sl st
R17: C 1: ch11 *4R dc st (6t) – 4R mesh st* (3t) repeat 11 times + 4R dc st (6t)
R18: C 2: ch1 *sl st – hdc* – sl st(n.8)
Return to the beginning of the work (chain cast on) and work:
A row with color 2:ch1* sl st – hdc *- sl st (on the back of the work)
We place markers on the stitch that divides the panel into 2-stitches 70, count 37 stitches on the left 37 on the right, place the marker on stitch 37(n.9)
Working under the armpits
Continue from where you left off:
R19: C 1: ch13 *4R mesh st (3t) – 4R dc st (6t)* repeat 2 times + 4R mesh st (3t)
Before closing the last stitch, work: close 2 loops, skip 1, 1dc, work 3 loops, then close 2 at a time until you have only one loop left.
R20: C2: ch1* sl st – hdc* – sl st(n.11)
Repeat R19-20 for the other corner of the panel: in stitch 37: ch3, sk 1 st,1dc, close tog-ch10, continue with the pattern.(n.10)
Finishing and closing
Repeat R19-20 also on the other side of the panel.(n.12,13)
Close the sides.(n.14)
Finish the neckline, armholes and bottom edge of the vest by first working a row of ch1* slst-hdc* on the wrong side. Then, turn the work and work ch3:*fpdc-bpdc *to create an elastic edge.(n.15,16,17,18)
Size L – LARGE
Cast on: 151 ch
R1 (C 1): ch13 →* 4R mesh st (3t), 4R dc st (6t) *→ repeat 12 times → 4R mesh st (3t)
R2 (C 2): ch1 →* sl st – hdc* → sl st
R3 (C 1): ch11 →* 4R dc st (6t) – 4R mesh st (3t) *→ repeat 12 times + 4R dc st (6t)
R4 (C 2): ch1 →* sl st – hdc *→ end with sl st
Divide the panel in two, place marker on stitch 76 (stitch that divides the stitches of the back panel from the stitches of the front panel).
We continue working from where we left off only rows for the back panel. We will finish row 5, 2 stitches before the marker:
R5 (C 1): ch13 →* 4R mesh st (3t) → 4R dc st (6t)* → repeat 5 times + 4R dc st (4t).
Before closing the last row, we work: we close 2 loops, work 2 more dc, close 4 loops, then 2 at a time until we are left with one loop on the hook. This way we get a softer corner.
R6 (C 2): ch1 →* sl st – hdc *→ sl st
R7 (Back, C 2): ch7 →* 2R mesh st *
R8 (Back, C 2): ch1 →* sl st – hdc *→ sl st
R9 (Back, C 1): ch11 →* 4R dc st (6t) – 4R mesh st (3t) *→ repeat 5 times + 4R dc st (6t), 4R mesh st (2t)
R10,11,12 (Back, C 2): -R6,7,8
R13 (Back, C 1):ch13 *4R mesh st (3t) – 4R dc st (6t)*→ repeat 5 times + 4R mesh st (3t) + 4R dc st (4t), add 2 dc in the first 2 overlapping loops. Leave the row on hold and move on to work the rows on the front panel.
Front Panel Work: • Count 8 st from the marker dividing the two panels, in the ninth stitch:
R5 (Front, Co 1): ch3 → sk 1 st →1 dc-close tog → ch10 → 4R mesh st (2t) →* 4R dc st (6t) – 4R mesh st (3t)* → repeat 5 times
R6 (Front, C 2): ch1 →* sl st – hdc* → sl st
R7 (Front, C2): ch7 → *2R mesh st *
R8 (Front, C2): ch1 →* sl st – hdc *→ sl st
R9 (Front, C 1): ch11 → 4R dc st (4t) →* 4R mesh st (3t) – 4R dc st (6t) *→ repeat 5 times
R10,11,12 (Front, C 2): -R6,7,8
Go back to the row left hanging on the back panel, continue:
R13 (Back-Front, C 1): ch11, yo 8 times, close 2 loops at a time until you have one loop on the hook, ch1, 1 dc in the second 2 overlapping loops, 4R mesh st (2t),* 4R dc st (6t) – 4R mesh st (3t)* – 5 times
R14 (Front, C 2): ch1 →* sl st – hdc *→ sl st
R15 (C 1): ch11 *4R dc st (6t) – 4R mesh st (3t) *→ repeat 12 times + 4R dc st (6t)
R16 (C2): ch1 →* sl st – hdc *→ sl st
R17 (C 1): ch13 →* 4R mesh st (3t) – 4R dc st (6t)* → repeat 12 times → 4R mesh st (3t)
R18 (C 2): ch1 →* sl st – hdc *→ sl st(img.size M-n.3,4,5,6,7,8)
Go back to the beginning where we started the chains and work a row :ch1 * sl st – hdc*-sl st, worked on the back of the panel, to give uniformity to the piece.
We place markers on the stitch that divides the panels, stitch 76, we count to the right and left 37 and 37, we place markers in stitch 37
We continue where we left R18. We work the necessary rows under the armpits.
R19 (C 1): ch11* 4R dc st (6t) – 4R mesh st (3t)* → repeat 3 times.
Before closing the last stitch work: close 2 loops, sk 1, 1 dc, close 3 loops, then 2 at a time until you have one loop left on the hook.
R19 (C 2): ch1 *sl st – hdc *- sl st
• Repeat for the other side of the panel. For the other side of the panel we will start from the marker (st 37). Work: ch3, sk1 st, 1dc, close tog, ch10 and continue *4R mesh st (3t) – 4R dc st (6t) *- 3 times.
Repeat also on the other side of the panel.(img.size M-n.9,10,11,12,13)
Close the sides.(img.size M-n.14)
Finish the neckline, armholes and bottom edge of the vest by first working a row :ch1* sl st-hdc*-sl st on the wrong side. Then, turn the piece and work :ch3* fpdc-bpdc* to create an elastic edge.(img.size M-n.15,16,17,18)
XL-extra large
Start-163ch
R1-c1:ch14*5R dc st(6t)-5R mesh st(3t)*-repeat 13 times+5R dc st(6t)
R2-c2:ch1*sl st-hdc*-sl st
R3-c1:ch16*5R mesh st(3t)-4R dc st(6t)*-repeat 13 times+5R mesh st(3t)
R4-c2:ch1*sl st-hdc*-sl st
Divide the panel into two parts, place the marker on stitch 82.
Continue working from where we left off for the back panel only.
We will finish row 5, 2 stitches before the marker that divides the parts.
R5(back)-c1:ch14*5Rdc st(6t)-5R mesh st(3t)-repeat 6 times+5R dc st(4t).
Before closing the last row work: close 2 loops, add 2 dc, close 4 loops, then two at a time until you have one loop left on the hook.
R6(back)-c2:ch1*sl st-hdc*-sl st
R7(back)-c1:ch16*5R mesh st(3t)-5R dc st(6t)*-repeat 6 times+5R mesh st(2t)
R8(back)-c2:ch1*sl st-hdc*-sl st
R9(back)-c1:ch14*5R dc st(6t)-5R mesh st(3t)-repeat 6 times+5R dc st(4t),work 2 dc in first 2 loops. Leave hanging. Move on to work on front panel.
Count 8 stitches from the stitch marker and starting from the 9 stitch work:
R5(front)-c1:ch3,sk 1 st,1 dc,close together,ch13,5R mesh st(2t),*5R dc st(6t)-5R mesh st(3t)*-repeat 5 times+5R dc st(6t)
R6(front)-c2:ch1*sl st-hdc*-sl st
R7(front)-c1:ch14,5R dc st(4t),*5R mesh st(3t)-5R dc st(6t)*-repeat 5 times+5R mesh st(3t)
R8(front)-c2:ch1*sl st-hdc*-sl st
Let’s go back to row 9.
R9(back-front)-c1:ch11,yo 10 times,close 2 loops at a time until you have only one loop on the hook.-ch1,dc(in the second 2 overlapping loops),continue with the pattern:5R mesh st(2t)-*5R dc st(6t)-5R mesh st(3t)*-repeat 5 times+5R dc st(6t).
R10-c2:ch1*sl st-hdc*-sl st
R11-c1:ch16*5R mesh st(3t)-5R dc st(6t)*-repeat 13 times+5R mesh st(3t)
R12-c2:ch1*sl st-hdc*-sl st
R13-c1:ch14*5R dc st(6t)-5R mesh st(3t)*-repeat 13 times+5R dc st(6t)
R14-c2:ch1*sl st-hdc*-sl st
Let’s go to the chains started at the beginning and work a row :ch1*sl st-hdc*-sl st on the back of the panel.
We place markers on the stitch that divides the two panels, stitch 82, count to the right and left-37 stitches, place markers in stitch 37.
We return to where we finished R 14, continue with R15:
R15-c1: ch16 * 5R mesh st (3t) – 5R dc st (6t) – repeat 3 times + 5R mesh st (3t). Before closing the loops of the last stitch, work as follows: close 2 loops, sk1, 1dc, close 3 loops, then 2 at a time until you have one loop left on the hook.
R16-c2: ch1 * sl st – hdc * – sl st.
Let’s move on to work the other corner (work from stitch 37): ch3, sk1 st, 1dc, close together, ch13 * 5R mesh st (3t) – 5R dc st (6t) – repeat 3 times + 5R mesh st (3t).
Repeat R15 and R16 for the other part of the panel.(img.size M-n.9,10,11,12,13)
Close the sides.(img.size M-n.14)
We finish the neckline, bottom, and armpit by first working a row: ch1 * sl st – hdc * – sl st (on the back of the work).
Then, turn to the front side and work: ch3 * fpdc – bpdc * to create an elastic edge.(img.size M-n.15,16,17,18)
Size 2X
Start 175ch
R1-c1: ch16 * 5R mesh st (3t) – 5R dc st (6t) * – repeat 14 times + 5R mesh st (3t)
R2-c2: ch1 * sl st – hdc * – sl st
R3-c2: ch3, sk1, * dc – ch1 * – dc
R4-c2: ch1 * sl st – hdc * – sl st
R5-c1: ch14 * 5R dc st (6t) – 5R mesh st (3t) * – 14 times + 5R dc st (6t)
R6-c2: ch1 * sl st – hdc * – sl st
Split the panel, place a marker on stitch 88. Continue working from where we ended R6, the row will end 2 stitches before the marker.
R7 (back): ch16 * 5R mesh st (3t) – 5R dc st (6t) * repeat 6 times + 5R mesh st (3t) + 5R dc st (4t). When closing the loops of the last row, work as follows: close two loops, add 2 dc, close 4 loops, then 2 loops at a time.(img.size M-n.1)
R8 (back), c2: ch1 * sl st – hdc * – sl st
R9 (back), c2: ch4, sk1 * dc – ch1 * – dc
R10 (back), c2: ch1 * sl st – hdc * – sl st
R11 (back), c1: ch14 * 5R dc st (6t) – 5R mesh st (3t) * – repeat 6 times + 5R dc st (6t) + 5R mesh st (2t)
R12,13,14 (back), c2 – R8,9,10 (back), c2
R15-c1: ch16, * 5R mesh st (3t) – 5R dc st (6t) * repeat 6 times + 5R mesh st (3t) + 5R dc st (4t), add 2dc in the first two overlapping loops.
Leave it on hold, let’s work the rows on the front panel.(img.size M-n.1,2)
From the marker that divides our sides, count 8 stitches, in the ninth:
R7 (front), c1: ch3, sk1,1dc, close tog, ch13, work following the pattern, 5R mesh st (2t), * 5R dc st (6t) – 5R mesh st (3t) * – repeat 6 times.(img.size M-n.1)
R8,9,10,12,13,14 (front) – R8,9,10,12,13,14 (back) – color 2
R11 (front), c1: ch14 * 5R dc st (4t), * 5R mesh st (3t) – 5R dc st (6t) * – repeat 6 times
Let’s move on to work the row left on hold.
R15 (back-front), c1: ch11, yo 10 times, close 2 loops at a time until you are left with only one loop, ch1, 1dc in the second 2 overlapping loops, 5R mesh st (2t), * 5R dc st (6t) – 5R mesh st (3t) * – repeat 6 times.
R16-c2: ch1 * sl st – hdc * – sl st
R17-c1: ch14 * 5R dc st (6t) – 5R mesh st (3t) * – repeat 14 times + 5R dc st (6t)
R18,19,20 – R2,3,4 – color 2
R21-c1: ch16 * 5R mesh st (3t) – 5R dc st (6t) * – repeat 14 times + 5R mesh st (3t)
R22-c2: ch1 * sl st – hdc *-sl st(img.size M-n.3,4,5,6,7,8)
Go back to the beginning where we started the chains and make a row :ch1 * sl st – hdc *-sl st – color 2 on the back.
We place the stitch marker in the stitch that divides the two panels, external sides of the panel, stitch 86. We count to the right and left 37 stitches, then place the stitch marker on stitch 37.
Continue from where we finished R22
R23-c1: ch17 * 6R dc st (6t) – 6R mesh st (3t) * – 4 times. Before closing the last stitch, work: close two loops, sk1 st, 1dc, close 3 loops, then 2 at a time until you have only one loop on the hook.
R24-c2: ch1 * sl st – hdc * – sl st
We also make the two rows for the other side of the panel. In stitch 37, work: ch3, sk1, dc, close together, ch16, work following the pattern.(img.size M-n.9,10,11,12,13)
We close the sides.(img.size M-n.14)
- We finish the neckline, bottom, and armpit by first working a row: ch1 * sl st – hdc * – sl st on the back of the work.
- Then, we return to the front and work: ch3 * fpdc – bpdc * to create an elastic edge.(img.size M-n.15,16,17,18)
Size 3X
Start – 187ch
R1-c1: ch14 * 5R dc st (6t) – 5R mesh st (3t) * – end row with 5R dc st (6t)
R2-c2: ch1 * sl st – hdc * – sl st
R3-c2: ch4, sk1 * dc – ch1 * – dc
R4-c2: ch1 * sl st – hdc * – sl st
R5-c1: ch16 * 5R mesh st (3t) – 5R dc st (6t) * – end row with 5R mesh st (3t)
R6-c2: ch1 * sl st – hdc * – sl st
Divide the panel into 2, mark stitch 94.
Work rows on the back panel.
Continue R7
R7(back)-c1: ch14 * 5R dc st (6t) – 5R mesh st (3t) * – repeat 7 times + 5R dc st (4t). When closing the loops of the last row, work: close 2 loops, add 2 dc, close 4 loops, then 2 at a time until you have one loop left on the hook.(img.size M-n.1)
R8(back)-c2: ch1 * sl st – hdc * – sl st
R9(back)-c2: ch7 * 2R mesh st *
R10(back)-c2: ch1 * sl st – hdc * – sl st
R11(back)-c1: ch16 * 5R mesh st (3t) – 5R dc st (6t) * – repeat 7 times + 5R mesh st (2t)
R12,13,14(back-c2): R8,9,10(back)
R15(back)-c1: ch14 * 5R dc st (6t) – 5R mesh st (3t) * – repeat 7 times + 5R dc st (4t), 2dc in the first two overlapping loops.(img.size M-n.1,2)
Leave hanging, move on to make the rows on the front panel:
Skip 8 stitches from the marker dividing the panel, in the 9th stitch:
R7(front)-c1: ch3, sk1, dc, close tog, ch13, 5R mesh st (2t), * 5R dc st (6t) – 5R mesh st (3t) *(img.size M-n.1)
R8,9,10(front)-R8,9,10(back)-c2
R11(front)-c1: ch14, 5R dc st (4t) – * 5R mesh st (3t) – 5R dc st (6t) *
R12,13,14(front)-R12,13,14(back)-color2
We return to the row left hanging, continue:
R15(back-front): ch11, yo 10 times, close 2 loops at a time until you have 1 loop on the hook, ch1, dc (in the second 2 overlapping loops), 5R mesh st (2t), * 5R dc st (6t) – 5R mesh st (3t) *
R16: ch1 * sl st – hdc * – sl st
R17: ch16 * 5R mesh st (3t) – 5R dc st (6t)* – finish the row with 5R mesh st (3t)
R18,19,20: R2,3,4
R21: ch14 * 5R dc st (6t) – 5R mesh st (3t)* – finish the row with 5R dc st (6t)
R22: ch1 * sl st – hdc * – sl st(img.size M-n.3,4,5,6,7,8)
Go back to the beginning of the piece and work a row: ch1 * sl st – hdc * – sl st on the back of the panel.
Place the stitch marker on the stitch that divides the panel in two, stitch 88. Count 37 stitches to the right and left, then place the stitch marker on stitch 37.
Continue from row 23.
R23-c1: ch22 * 7R mesh st (3t) – 7R dc st (6t) * – repeat 4 times + 7R mesh st (3t).
Before closing the last stitch, work as follows: close 2 loops, sk1 st, 1dc, close 3 loops, then 2 at a time until only one loop remains on the hook.
R24-c2: ch1 * sl st – hdc * – sl st
Move on to work the other side of the panel.
In stitch 37, work: ch3, sk1 st, 1dc, close tog, ch20, follow the element pattern.
Repeat for the other part of the panel as well.(img.size M-n.9,10,11,12,13)
Close the sides.(img.size M-n.14)
Finish the neckline, armholes, and bottom edge of the vest by working: ch1 * sl st – hdc * – sl st on the wrong side. Then, turn the work and work: ch3 * fpdc – bpdc * to create an elastic edge.(img.size M-n.15,16,17,18)
Size 4X
Start: 199 ch.
R1 (color 1): ch 16 * 5R mesh st (3t) – 5R dc st (6t) * – finish with 5R mesh st (3t)
R2 (color 2): ch 1 * sl st – hdc * – sl st
R3 (color 2): ch 7 * 2R mesh st *
R4 (color 2): ch 1 * sl st – hdc * – sl st
R5 (color 1): ch 14 * 5R dc st (6t) – 5R mesh st (3t) – finish 5R dc st (6t)
R6 (color 2): ch 1 * sl st – hdc * – sl st
Split panel, place marker at stitch 100. Continue with back panel.
R7 (back – color 1): ch 16 * 5R mesh st (3t) – 5R dc st (6t)* – repeat 7 times + 5R mesh st (3t) + 5R dc st (4t), before closing the last stitch: close 2 loops, add 2 dc, close 4 loops, then two at a time.(img.size M-n.1)
R8 (back – suit 2): ch 1 * sl st – hdc * – sl st
R9 (back – color 2): ch 7 * 2R mesh st *
R10 (back – color 2): ch 1 * sl st – hdc * – sl st
R11 (back – color 1): ch 14 * 5R dc st (6t) – 5R mesh st (3t) * – repeat 7 times + 5R dc st (6t) + 5R mesh st (2t)
R12,13,14 (back – color 2): repeat R8,9,10
R15 (back – color 1): ch 16 * 5R mesh st (3t) – 5R dc st (6t) * – repeat 7 times + 5R mesh st (3t) + 5R dc st (4t), add 2 dc in the first 2 overlapping loops.(img.size M-n.1,2)
Leave it hanging and go to the front panel. Count 8 stitches from marker (stitch 100) and work into 9th stitch:
R7 (front – color 1): ch 3, skip 1, dc, bind off, ch 13, 5R mesh st (2t), *5R dc st (6t) – 5R mesh st (3t) *(img.size M-n.1)
R8,9,10 (front – color 2): repeat R8,9,10 (back)
R11 (front – color 1): ch 14 ,5R dc st (4t) -*5R mesh st (3t) – 5R dc st (6t) *
R12,13,14 (color 2): repeat R8,9,10
Return to R15
R15 (back-front – color 1): ch 11, yarn over 10 times, close 2 loops at a time until you have 1 loop left on hook, ch 1, dc (in the second 2 overlapping loops), 5R mesh st (2t), * 5R dc st (6t) – 5R mesh st (3t) *
R16 (color 2): ch 1 * sl st – hdc * – sl st
R17 (color 1): ch 14 * 5R dc st (6t) – 5R mesh st (3t)* – finish 5R dc st (6t)
R18,19,20 (color 2): repeat R2,3,4
R21 (color 1): ch 16 * 5R mesh st (3t) – 5R dc st (6t) * – finish with 5R mesh st (3t)
R22 (color 2): ch 1 * sl st – hdc * – sl st(img.size M-n.3,4,5,6,7,8)
Go back to the beginning, where we started the chains, and work a row :ch1* sl st – hdc *-sl st on the back of the work. Place the marker on stitch 100 (outer sides of the panel). Count 37 stitches to the right and left and place the markers.
Continue with Row 23
R23 (c 1): ch 20 * 7R dc st (6t) – 7R mesh st (3t) * – repeat 5 times. When closing the last stitch: close 2 loops, skip 1 st, 1dc, close 3 loops, then 2 at a time until you have one loop left on the hook.
R24 (c2): ch 1 * sl st – hdc * – sl st
Repeat rows for the other part of the panel following the pattern. Start from marker (st 37), work: ch 3, skip 1 st, 1dc, close tog, ch 19, follow the pattern * 7R mesh st (3t) – 7R dc st (6t) * Repeat for the other part of the panel.(img.size M-n.9,10,11,12,13)
Closing and Finishing
Close the sides.(img.size M-n.14)
Finish the neckline, armholes and bottom edge of the vest by first working a row :ch1* sl st – hdc *-sl st on the wrong side. Then, turn the piece and work:ch3* fpdc – bpdc* to create an elastic edge.(img.size M-n.15,16,17,18)
Size 5X
Start: 199 ch.
R1 (c 1): ch 16 * 5R mesh st (3t) – 5R dc st (6t) * – finish with 5R mesh st (3t)
R2 (c 2): ch 1 * sl st – hdc * – sl st
R3 (c 2): ch 10 * 3R mesh st *
R4 (c2): ch 1 * sl st – hdc * – sl st
R5 (c1): ch 14 * 5R dc st (6t) – 5R mesh st (3t) – finish 5R dc st (6t)
R6 (c 2): ch 1 * sl st – hdc * – sl st
Split panel, place marker at stitch 100. Continue with back panel.
R7 (back – c 1): ch 16 * 5R mesh st (3t) – 5R dc st (6t)* – repeat 7 times + 5R mesh st (3t) + 5R dc st (4t), before closing the last stitch: close 2 loops, add 2 dc, close 4 loops, then two at a time.(img.size M-n.1)
R8 (back – c 2): ch 1 * sl st – hdc * – sl st
R9 (back – c2): ch 10 * 3R mesh st *
R10 (back – c2): ch 1 * sl st – hdc * – sl st
R11 (back – c 1): ch 14 * 5R dc st (6t) – 5R mesh st (3t) * – repeat 7 times + 5R dc st (6t) + 5R mesh st (2t)
R12,13,14 (back – c 2): repeat R8,9,10
R15 (back – c 1): ch 16 * 5R mesh st (3t) – 5R dc st (6t) * – repeat 7 times + 5R mesh st (3t) + 5R dc st (4t), add 2 dc in the first 2 overlapping loops.(img.size M-n.1,2)
Leave it hanging and go to the front panel. Count 8 stitches from marker (stitch 100) and work into 9th stitch:
R7 (front – c 1): ch 3, skip 1st, dc-close tog , ch 13, 5R mesh st (2t), *5R dc st (6t) – 5R mesh st (3t) *(img.size M-n.1)
R8,9,10 (front – color 2): repeat R8,9,10 (back)
R11 (front – c1): ch 14 ,5R dc st (4t) -*5R mesh st (3t) – 5R dc st (6t) *
R12,13,14 (c 2): repeat R8,9,10
Return to R15
R15 (back-front – color 1): ch 11, yarn over 10 times, close 2 loops at a time until you have 1 loop left on the hook, ch 1, 1dc (in the second 2 overlapping loops), 5R mesh st (2t), * 5R dc st (6t) – 5R mesh st (3t) *
R16 (c 2): ch 1 * sl st – hdc * – sl st
R17 (c1): ch 14 * 5R dc st (6t) – 5R mesh st (3t)* – finish 5R dc st (6t)
R18,19,20 (color 2): repeat R2,3,4
R21 (c 1): ch 16 * 5R mesh st (3t) – 5R dc st (6t) * – finish with 5R mesh st (3t)
R22 (c 2): ch 1 * sl st – hdc * – sl st(img.size M-n.3,4,5,6,7,8)
Go back to the beginning, where we started the chains, and work a row :ch1 * sl st – hdc *-sl st on the back of the work. Place the marker on stitch 100 (outer sides of the panel).
Count 37 stitches to the right and left and place the markers.
continue with Row 23
R23 (c 1): ch 20 * 7R dc st (6t) – 7R mesh st (3t) * – repeat 5 times. When closing the last stitch: close 2 loops, skip 1 st , 1dc, close 3 loops, then 2 at a time until you have one loop left on the hook.
R24 (c2): ch 1 * sl st – hdc * – sl st
Repeat rows for the other part of the panel following the pattern. Start from marker (st 37), work: ch 3, skip 1 st, 1dc, close together, ch 19, follow the pattern * 7R mesh st (3t) – 7R dc st (6t) * Repeat for the other part of the panel.(img.size M-n.9,10,11,12,13)
Closing and Finishing
Close the sides.(img.size M-n.14)
Finish the neckline, armholes and bottom edge of the vest by first working a row :ch1*sl st – hdc*-sl st on the wrong side.
Then, turn the piece and work :ch3* fpdc – bpdc* to create an elastic edge.(img.size M-n.15,16,17,18)
You’ve just finished your Soft Harmony vest – well done!
Wear it proudly, gift it joyfully, and share your art with the world.
You’ve just finished your Soft Harmony vest – well done!
Wear it proudly, gift it joyfully, and share your art with the world.