Blog

Maglione Woolen Harmony
Woolen Harmony
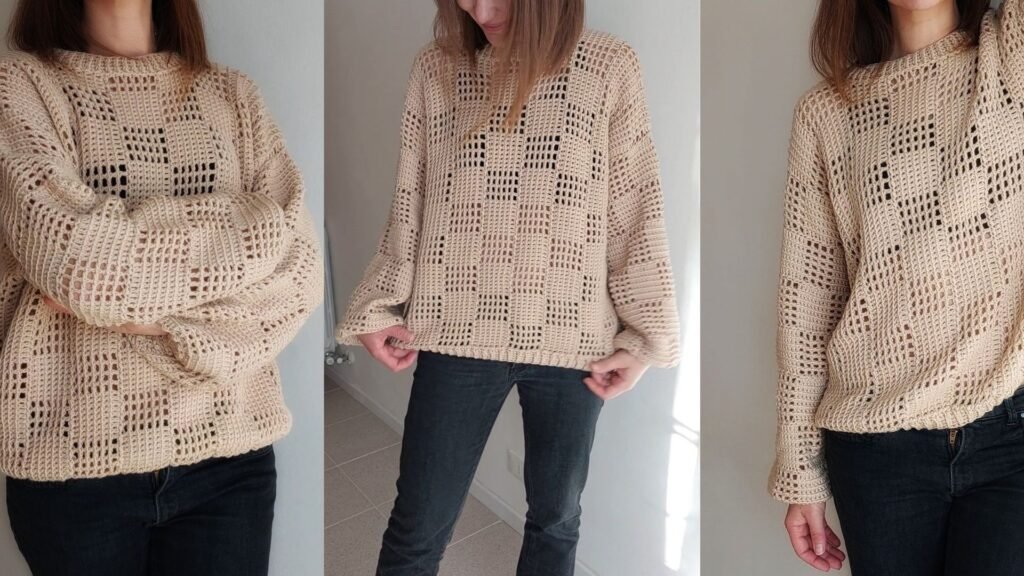
Welcome to the world of Woolen Harmony, a crochet sweater designed to wrap you in a hug of comfort and style. This design is perfect for those who love soft and versatile garments, featuring a relaxed fit that flatters different body types.
The model in the photo is wearing a size M and is 170 cm tall, while the pattern is written for a size XL, ensuring a roomy and comfortable fit. Woolen Harmony is ideal for transitional seasons and cooler days, with an elegant texture and an artisanal touch that makes it truly unique.
I hope this project inspires you and accompanies you in your creative journey!
Sweater Construction
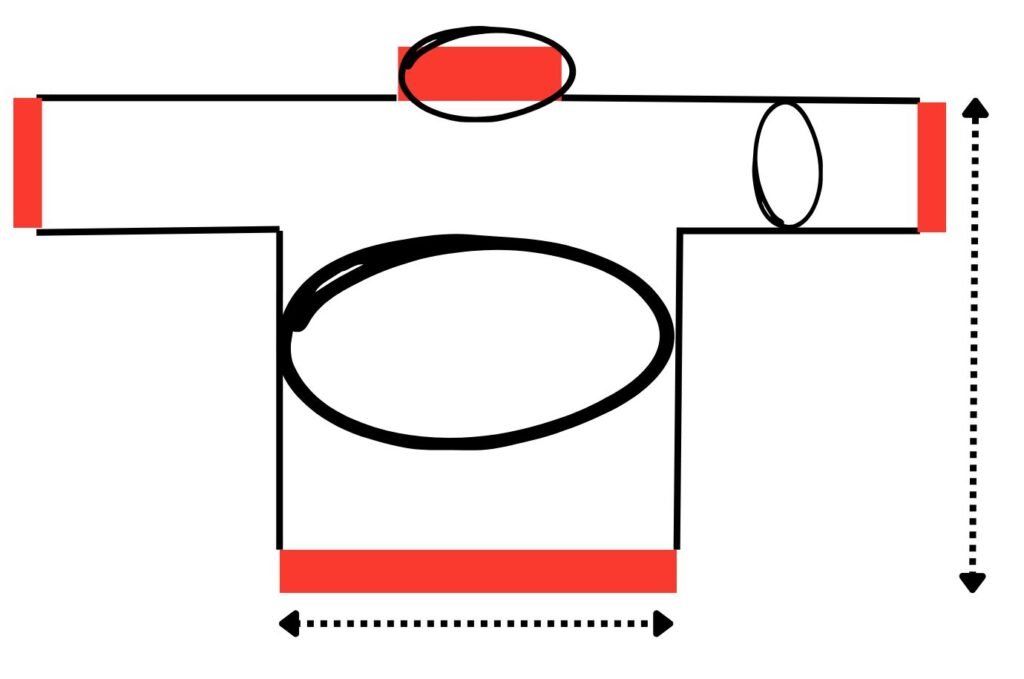
The sweater is constructed starting with a long foundation chain, allowing you to work both panels simultaneously. Once the required number of rows for one shoulder is completed, the work is divided to continue separately with the back and front panels.
After reaching the desired length, the two panels are joined again by adding the necessary number of chains to reconstruct the other shoulder. This construction method ensures a well-proportioned sweater with a harmonious fit.
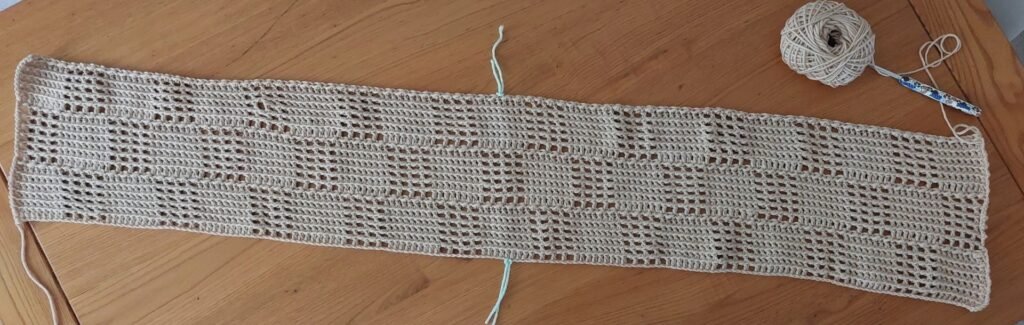
The Checkerboard Pattern
The checkerboard effect is created by alternating two key elements:
✔️ Solid element: Groups of double crochet stitches that form dense and compact sections.
✔️ Openwork element: Chains and mesh stitches that add lightness and breathability.
This combination of textures creates a visually striking effect, adding character and depth to the sweater’s design.
📌 Perfect for any season, this pattern is ideal for those looking for a crochet garment that combines style, comfort, and versatility.
Skill Level: Intermediate
Available Sizes
XS (S, M, L) XL (2X, 3X, 4X, 5X)
Measurements (in cm)
- Neck circumference: 44 (44, 44, 44) 46 (46, 48, 50, 50) cm
- Body circumference: 84 (88, 104, 108) 126 (132, 143, 153, 157) cm
- Sweater length: 50 (50, 60, 60) 61 (63, 66, 68) cm
- Sleeve length: 47 (48, 49, 50) 50 (52, 52, 56, 58) cm
- Sleeve circumference: 36 (36, 38, 40) 42 (42, 43, 44, 44) cm
***the neckline circ. is measured after the ribbing;
Required Materials
For this project, I used Lana Gatto Super Soft yarn (50 g = approximately 125 m / 137 yards). The recommended hook size for this yarn is 4 mm, but to achieve a softer texture, we will use a 5 mm crochet hook. For the cuffs, hem, and neckline finishing, we will switch back to a 4 mm hook for a more defined effect.
If you choose to substitute the yarn, select one with the same weight and a similar fiber composition to maintain the sweater’s structure. Ensure that the yarn works well with a 4 mm hook to achieve good drape and optimal fit.
Size – Grams – Meters (Approximate)
- XS – 500g – 1250m
- S – 570g – 1425m
- M – 640g – 1600m
- L – 690g – 1725m
- XL – 730g – 1825m
- 2X – 800g – 2000m
- 3X – 860g – 2150m
- 4X – 940g – 2350m
- 5X – 1020g – 2550m
These values include a small margin for safety. I still recommend taking an extra ball of yarn to avoid any issues!
Hooks:
- 5 mm (US H-8; UK 6) → Used for the main body of the sweater.
- Long Tunisian hook (optional) → Recommended if you find it difficult to manage many stitches on a regular hook.(I recommend it for sizes XL, 2X, 3X, 4X, 5X)
- 4 mm (US G-6; UK 8) → Used for finishing details such as the neckline, cuffs, and hem.
Other Tools:
- Forbici
- Stitch markers (or a contrasting yarn to mark important points)
- Tapestry needle (if you prefer to sew the sides of the sweater; alternatively, you can use a crochet hook)
Stitches Used:
The pattern follows US crochet abbreviations.
- R – row
- cat – catenella
- mbs – maglia bassissima
- hdc – mezza maglia alta
- dc – maglia alta
- tog – together
- sk x st – skip x stitches
- YO – yarn over
- * * – repeat
- xt – repeat x times
- fp dc – front post double crochet
- bp dc – back post double crochet
Checkerboard Pattern: Structure & Execution
The checkerboard pattern consists of two alternating elements that create its distinctive visual effect:
- Solid Element – Consecutive rows of double crochet (dc) repeated a set number of times.
- Definition: xR dc st (xt)
- Openwork Element – Consecutive rows of mesh stitch repeated a set number of times.
- Definition: xR mesh st (xt)
Between the rows with elements, we will work by alternating the two stitches sl st and hdc for the entire row.
Before You Begin
To achieve accurate results, it is recommended to make a gauge swatch. If your swatch turns out too large or too small compared to the pattern, adjust your hook size or yarn tension accordingly.
How to Work the Checkerboard Pattern
The pattern is created by repeating a 4-row cycle, alternating solid and openwork elements.
Example:
- 6R dc st (8t) → 6 consecutive rows of double crochet stitches, repeated 8 times.
- 6R mesh st (4t) → 6 consecutive rows of mesh stitch, repeated 4 times.
Detailed instructions, including the foundation chains and any necessary size adjustments, will be provided throughout the pattern.
When we create a sample for each element, for example, consisting of: 6R dc st (8t) – 6R mesh st (4t), we will obtain an approximate height of 7 cm for the 6 rows, while the width of the 2 elements will be around 11 cm.
You can find the guide for the crochet checkered stitch here:link
The checkerboard design will be created by following a sequence of double crochet and mesh stitch, with variations in the number of rows and stitch repetitions to accommodate all sizes:
- 5 rows of double crochet (8 repetitions) – 5R dc st (8t)
- 5 rows of mesh stitch (4 repetitions) – 5R mesh st (4t)
- 7 rows of double crochet (10 repetitions) -7R dc st (10t)
- 7 rows of mesh stitch (5 repetitions) – 7R mesh st (5t)
- 8 rows of double crochet (12 repetitions) – 8R dc st (12t)
- 8 rows of mesh stitch (6 repetitions) – 8R mesh st (6t)
The arrangement and number of repetitions for each element will vary depending on the size, ensuring a well-balanced fit. The pattern includes a detailed guide with the necessary adjustments for each size.
To adjust the sweater for multiple sizes, the number of rows worked simultaneously in the checkerboard elements will be modified. Additionally, the number of repetitions for each element will vary. Be sure to follow the specific instructions for your desired size.
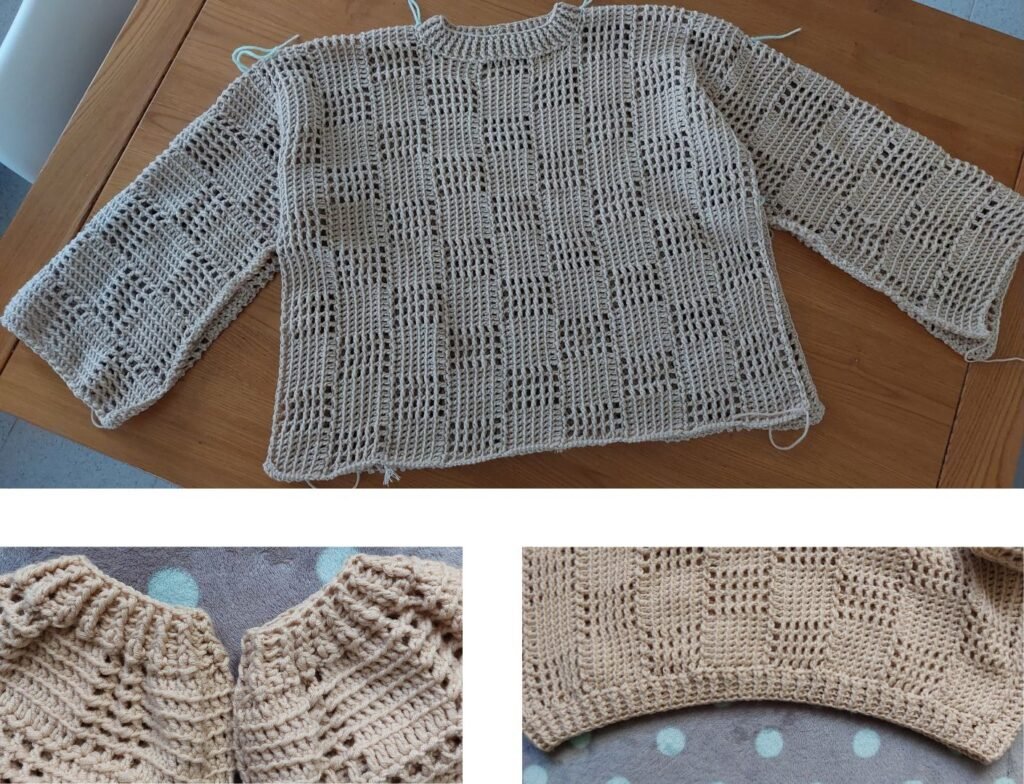
Assemblaggio e rifiniture
- Once you have completed the body panels and sleeves, join the sides of the sleeves and body panels.
- Finally, finish the edges: cuffs, hem, and neckline (starting with the neckline before attaching the sleeves).
Before starting the sweater, I suggest checking out the XL size, which includes more helpful photos to better visualize the final result, as the original sample was made in this size.
If you want a longer sweater, you can increase the number of starting chains by adding one extra element per panel. Since we are working with two panels at once, you will need to add two elements in total. Alternatively, you can increase the number of repeated stitches at the beginning and end of the row. The same process applies to the sleeves.
📌 Note:
- The differences between sizes mainly affect the first and last rows, as well as the beginning and end of each row.
- The neckline area (both front and back) is worked with the same number of rows, but there will be some variations in the checkerboard pattern rows and stitch repetitions within each element.
🎉 Happy Crocheting! 😊
Pattern XS-S
Start with 76 ch (back panel) + 1 ch (center) + 76 ch (front panel).
Row 1 (XS):ch 14,* 5R dc st (8t) – 5R mesh st (4t)* – repeat 9 times, finish with 5R dc st (8t).
Row 1 (S):ch 17,* 6R dc st (8t) – 6R mesh st (4t)* – repeat 9 times, finish with 6R dc st (8t).
Row 2:ch 1*, sl st – hdc* – finish the row with sl st.
Row 3:ch 16,* 5R mesh st (4t) – 5R dc st (8t)* – repeat 9 times, finish with 5R mesh st (4t).
Row 4:ch 1,* sl st – hdc *- sl st.
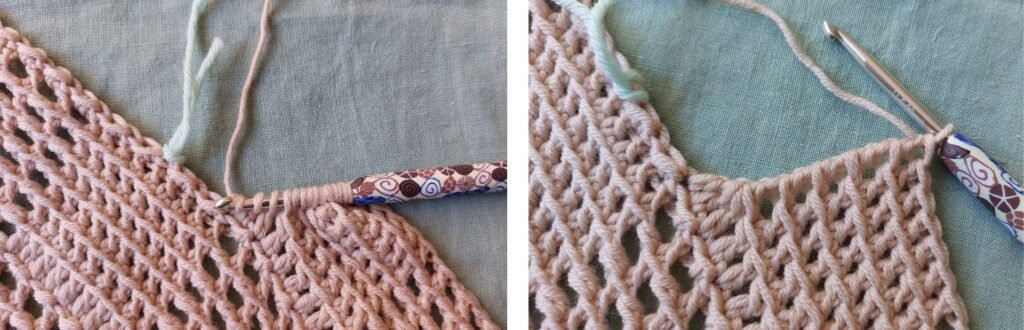
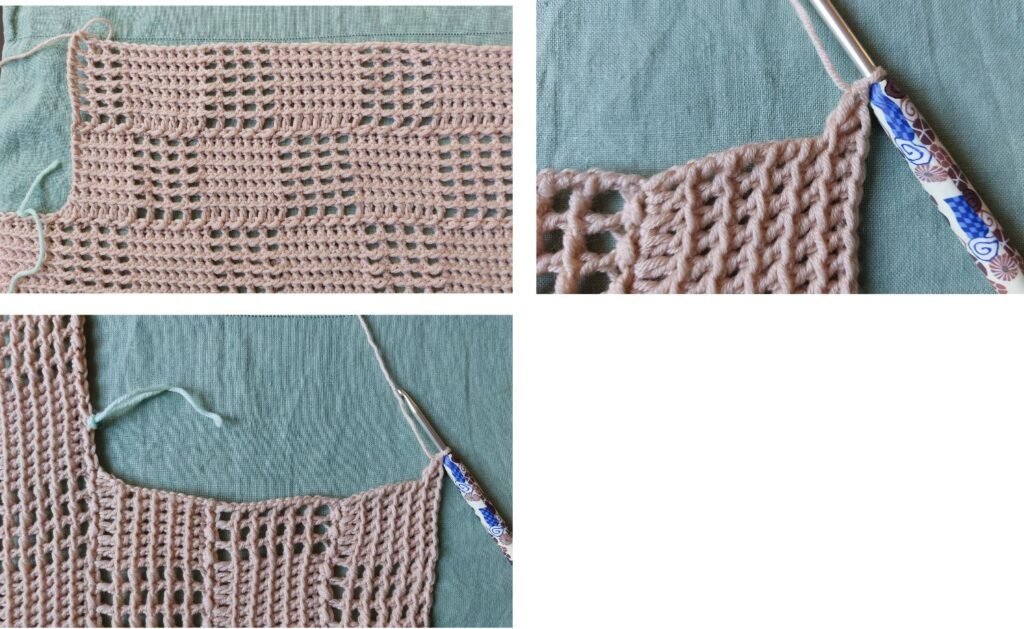
Dividing the Panel
Place a stitch marker in stitch 77. Continue working on the back panel.
Row 5 will end 3 stitches before the marker (see XL photos for reference).
Pannello posteriore
Row 5 (Back):ch 14,* 5R dc st (8t) – 5R mesh st (4t)* – repeat 4 times + 5R dc (6t).
Before closing the last stitch, work as follows:
- Close 2 loops,Add 2 dc,close 4 loops, then 2 at a time (see XL photos).
Row 6 (Back):ch 1,* sl st – hdc* – sl st.
Row 7 (Back):ch 16, *5R mesh st (4t) – 5R dc st (8t)* – repeat 4 times + 5R mesh st (3T).
Row 8 (Back):ch 1,* sl st – hdc* – sl st.
Row 9 (Back):ch 14,* 5R dc st (8t) – 5R mesh st (4t) *- repeat 4 times + 5R dc st (6t) + 2 dc worked into the first 2 overlapping loops (see XL photos).
Now, pause Row 9 and move on to the front panel.
Front Panel
Count 5 stitches from the marker that divides the sides. In the 6th stitch,lavora:
Row 5 (Front):ch 3, 2 dc, close the 3 loops together (see XL photos), ch 11, 5R dc st (4t), *5R mesh st (4t) – 5R dc st (8t)*.
Row 6 (Front):ch 1,* sl st – hdc* – sl st.
Row 7 (Front):ch 16, 5R mesh st (2t), *5R dc st (8t) – 5R mesh st (4t)*.
Row 8 (Front):ch 1,* sl st – hdc* – sl st.
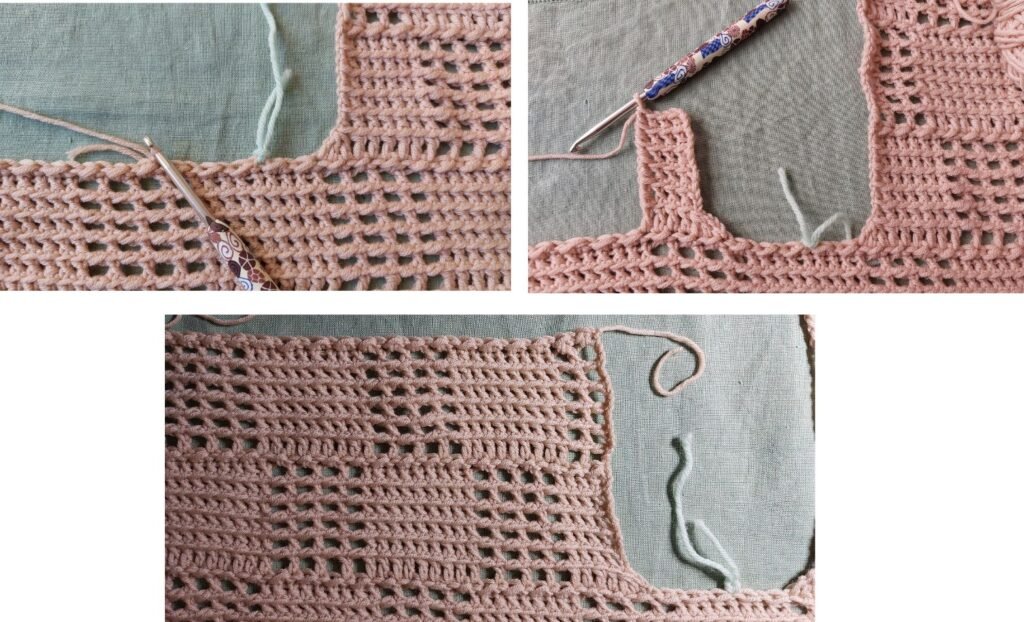
Now, return to Row 9 (Back) that was left on hold.
Row 9 (Back-Front Join):ch 9, YO 9 times (see XL photos), close 2 loops at a time,
- Add 2 dc into the second 2 overlapping sts (see XL photos),
- Continue with the pattern: 5R dc st (4t),* 5R mesh st (4t) – 5R dc st (8t)*.
Row 10:ch 1,* sl st – hdc *- sl st.
Row 11:ch 16,* 5R mesh st (4t) – 5R dc st (8t)* – repeat 9 times, finish with 5R mesh st (4t).
Row 12:ch 1,* sl st – hdc* – sl st.
Row 13 (XS):ch 14,* 5R dc st (8t) – 5R mesh st (4t)* – repeat 9 times, finish with 5R dc st (8t).
Row 13 (S):ch 17, *6R dc st (8t) – 6R mesh st (4t)* – repeat 9 times, finish with 6R dc st (8t).
Row 14:ch 1,* sl st – hdc* – sl st.
Edging and Finishing
Return to the beginning of the work where you started the foundation chain. On the wrong side of the panel, work a row of ch1 *sl st – hdc *- sl st (see XL photos).
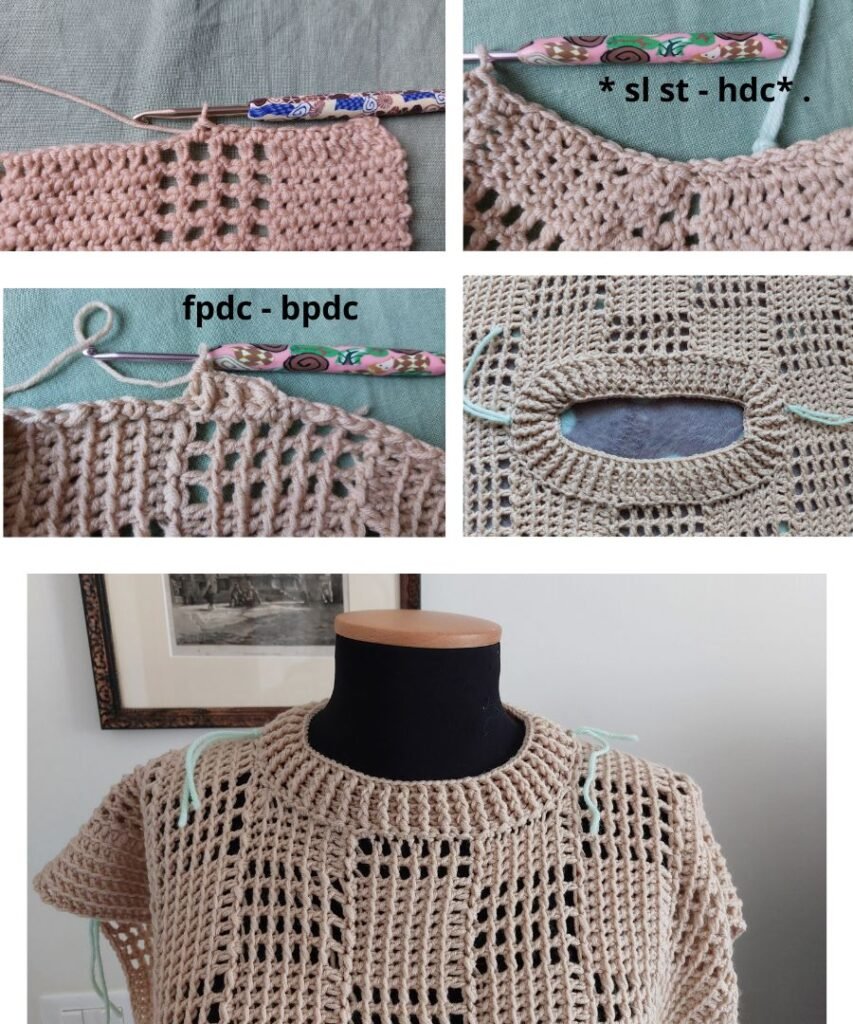
Change to a smaller hook size and start working the neckline edging.
Find the center stitch of the back panel collar and work a round of ch1,* sl st – hdc*.
Turn to the right side and continue alternating ch3* fpdc (front post double crochet) and bpdc (back post double crochet) for 2-6 rounds.
Sleeves (XS-S)
Place stitch markers at stitch 77 on both outer sides.
Count 30 stitches to the left and 30 stitches to the right, then place stitch markers.
Start working from stitch 30 (right) to stitch 30 (left).
Row 1:ch 3, 2 dc, close the 3 loops together, ch 13,
*5R mesh st (4t) – 5R dc st (8t)* – repeat 3 times + 5R mesh st (4t).
Before closing the loops of the last stitch, work:
- Close 2 loops,
- Add 2 dc,
- Close 4 loops, then 2 at a time.
Row 2:ch 1,* sl st – hdc* – sl st.
Row 3:ch 14, *5R dc st (8t) – 5R mesh st (4t)* – 5R dc st (8t).
Row 4:ch 1,* sl st – hdc* – sl st.
Row 5:ch 16,* 5R mesh st (4t) – 5R dc st (8t)* – 5R mesh st (4t).
Row 6:ch 1,* sl st – hdc* – sl st.
Row 7:ch 14,* 5R dc st (8t) – 5R mesh st (4t)* – 5R dc st (8t).
Row 8:ch 1,* sl st – hdc* – sl st.
Row 9:ch 16,* 5R mesh st (4t) – 5R dc st (8t)* – 5R mesh st (4t).
Row 10:ch 1,* sl st – hdc* – sl st.
Row 11 (XS):ch 14, *5R dc st (8t) – 5R mesh st (4t)* – 5R dc st (8t).
Row 11(S):ch 17, *6R dc st (8t) – 6R mesh st (4t) *- 6R dc st (8t).
Row 12:ch 1,* sl st – hdc *- sl st
Close the sides: sleeves and panels.
Cuff finishing: In the first round, decrease stitches by closing 2 stitches into one or alternating 2 into one and one free, depending on how tight you want the cuff. Then, work rounds alternating ch3 -* fpdc – bpdc* (2-6 rounds).
Bottom edge of the sweater: Work a round of ch1 – *sl st – hdc* in the back loop. Then, turn the work to the front and proceed as for the cuffs. If desired, you can decrease stitches.
Pattern M-L
Start: 80 ch (back panel) + 1 ch (center) + 80 ch (front panel)
R1 (M):ch 13,4R mesh st (6t), *4R dc st (8t) – 4R mesh st (4t)* – repeat 8 times + 4R dc st (8t) + 4R mesh st (6t)
R1 (L):ch 16, 5R mesh st (6t), *5R dc st (8t) – 5R mesh st (4t)* – repeat 8 times + 5R dc st (8t) + 5R mesh st (6t)
R2:ch 1, *sl st – hdc* – sl st
R3:ch 14, 5R dc st (12t), *5R mesh st (4t) – 5R dc st (8t)* – repeat 8 times + 5R mesh st (4t) + 5R dc st (12t)
R4:ch 1,* sl st – hdc* – sl st
R5:ch 16, 5R mesh st (6t),* 5R dc st (8t) – 5R mesh st (4t)* – repeat 8 times + 5R dc st (8t) + 5R mesh st (6t)
R6:ch 1,* sl st – hdc *- sl st
Divide the panel in two, place a stitch marker on stitch 81.
Continue working only on the back panel.
R7 will end 3 stitches before the stitch marker.
R7 (Back):ch 14, 5R dc st (12t), *5R mesh st (4t) – 5R dc st (8t)* – repeat 3 times + 5R mesh st (4t) + 5R dc st (6t).
Before closing the stitches, on the last stitch: close 2 loops, add 2 dc, close 4 loops, then 2 at a time. (See XL photo)
R8 (Back):ch 1,* sl st – hdc* – sl st
R9 (Back):ch 16, 5R mesh st (6t),* 5R dc st (8t) – 5R mesh st (4t)* – repeat 3 times + 5R dc st (8t) + 5R mesh st (3t)
R10 (Back):ch 1,* sl st – hdc* – sl st
R11 (Back):ch 14, 5R dc st (12t),* 5R mesh st (4t) – 5R dc st (8t)* – repeat 3 times + 5R mesh st (4t) + 5R dc st (6t) + 2dc in the first 2 overlapping loops. (See XL photo)
Leave on hold, move on to the front panel rows.
Count 5 stitches from the stitch marker, in stitch 6: (see photo XL)
R7 (Front):ch 3 – 2dc, close the 3 loops, ch 13, 5R dc st (4t), *5R mesh st (4t) – 5R dc st (8t) *- repeat 3 times + 5R mesh st (4t) + 5R dc st (12t)
R8 (Front):ch 1, *sl st – hdc *- sl st
R9 (Front):ch 16, 5R mesh st (2t),* 5R dc st (8t) – 5R mesh st (4t)* – repeat 3 times + 5R dc st (8t) + 5R mesh st (6t)
R10 (Front):ch 1,* sl st – hdc* – sl st
Return to the row left on hold: (See XL photo)
R11 (Back-Front):ch 9, yo 9 times, close 2 loops at a time, work 2 dc (in the second 2 overlapping loops), 5R dc st (4t),* 5R mesh st (4t) – 5R dc st (8t)* – repeat 3 times + 5R mesh st (4t) + 5R dc st (12t) – (See XL photo)
R12:ch 1,* sl st – hdc* – sl st
R13:ch 16, 5R mesh st (6t),* 5R dc st (8t) – 5R mesh st (4t)* – 5R mesh st (6t)
R14:ch 1,* sl st – hdc* – sl st
R15:ch 14, 5R dc st (12t),* 5R mesh st (4t) – 5R dc st (8t)*, 5R dc st (12t)
R16:ch 1,* sl st – hdc* – sl st
R17 (M):ch 13, 4R mesh st (6t), *4R dc st (8t) – 4R mesh st (4t)* – 4R mesh st (6t)
R17 (L):ch 16, 5R mesh st (6t), *5R dc st (8t) – 5R mesh st (4t) *- 5R mesh st (6t)
R18:ch 1,* sl st – hdc* – sl st
Edging and Finishing
Return to the beginning of the work where you started the foundation chains and work on the wrong side of the panel, making one row of ch1*sl st – hdc* – sl st (See XL photo).
Change the crochet hook size and start creating the neckline border. Find the center stitch on the collar of the back panel and work one round of ch1, *sl st – hdc*. Return to the right side and continue alternating ch3 * fpdc, bpdc* (2-6 rounds) – (See XL photo).
Sleeves (M-L)
Place a stitch marker on the stitch that divides the two parts (stitch 81).
Count 32 stitches to the right and 32 stitches to the left, then place the stitch markers.
Start working from the stitch corresponding to marker 32 (right) to the stitch corresponding to marker 32 (left).
R1 (Sleeve):ch 3, skip one stitch, dc (See XL photo), close together, ch 13, 5R mesh st (1t), *5R dc st (8t) – 5R mesh st (4t)* – repeat 3 times + 5R dc st (8t) + 5R mesh st (1t).
Before closing the loops on the last stitch, work as follows: close 2 loops, skip one stitch, dc, close 3 loops, then 2 at a time (See XL photo).
R2:ch 1,* sl st – hdc* – sl st
R3:ch 14, 5R dc st (2t),* 5R mesh st (4t) – 5R dc st (8t)* – repeat 3 times + 5R mesh st (4t) + 5R dc st (2t)
R4:ch 1,* sl st – hdc* – sl st
R5:ch 16, 5R mesh st (1t),* 5R dc st (8t) – 5R mesh st (4t)* – repeat 3 times + 5R dc st (8t) + 5R mesh st (1t)
R6:ch 1,* sl st – hdc* – sl st
R7:ch 14, 5R dc st (2t),* 5R mesh st (4t) – 5R dc st (8t)* – repeat 3 times + 5R mesh st (4t) + 5R dc st (2t)
R8:ch 1,* sl st – hdc* – sl st
R9:ch 16, 5R mesh st (1t),* 5R dc st (8t) – 5R mesh st (4t) *- repeat 3 times + 5R dc st (8t) + 5R mesh st (1t)
R10:ch 1, *sl st – hdc* – sl st
R11 (M):ch 17, 6R dc st (2t),* 6R mesh st (4t) – 6R dc st (8t)* – repeat 3 times + 6R mesh st (4t) + 6R dc st (2t)
R11 (L):ch 20, 7R dc st (2t),* 7R mesh st (4t) – 7R dc st (8t)* – repeat 3 times + 7R mesh st (4t) + 7R dc st (2t)
R12:ch 1,* sl st – hdc *- sl st
Closing the Sides: Sleeves and Panels
Join the sleeves and panels by sewing or crocheting the sides together.
Cuff Finishing:
In the first round, create a stitch decrease by closing 2 stitches into 1, or alternating 2 into 1 and 1 free, depending on how tight you want the cuff to be. Then, continue working rounds alternating ch3* fpdc – bpdc* (2-6 rounds) – (See XL photo).
Bottom Hem Finishing:
Work one round of ch1* sl st – hdc* on the wrong side. Then, turn to the right side and proceed as you did for the cuffs. If desired, you can decrease stitches for a more fitted look. (See XL photo).
Pattern Size-XL
Foundation:
ch 84 (back panel) + ch 1 (center) + ch 84 (front panel)
Row-R1:ch 17, 6R dc st (8t) – 6R mesh st (4t) – repeat 10 times + 6R dc st (8t)
Row-R2:ch 1, sl st – hdc – sl st
Row-R3:ch 19, 6R mesh st (4t) – 6R dc st (8t) – repeat 10 times + 6R mesh st (4t)
Row-R4:ch 1, sl st – hdc – sl st
Row-R5:ch 17, 6R dc st (8t) – 6R mesh st (4t) – repeat 10 times + 6R dc st (8t)
Row-R6:ch 1, sl st – hdc – sl st
Divide the Panel
Divide the panel in two, place a stitch marker on stitch 85.
Continue working only on the back panel. Row-R7 will end 3 stitches before the stitch marker.
Row-R7 (Back):
ch 19, *6R mesh st (4t) – 6R dc st (8t)* – repeat 4 times + 6R mesh st (4t) + 6R dc st (6t).
Before closing the loops on the last stitch, work as follows: close 2 loops, 2 dc, close the 4 loops together, then close 2 loops at a time.
Row-R8 (Back):ch 1,* sl st – hdc *- sl st
Row-R9 (Back):ch 17,* 6R dc st (8t) – 6R mesh st (4t) *- repeat 4 times + 6R dc st (8t) + 6R mesh st (2t)
Row-R10 (Back):ch 1,* sl st – hdc *- sl st
Row-R11 (Back):ch 19,* 6R mesh st (4t) – 6R dc st (8t)* – repeat 4 times + 6R mesh st (4t) + 6R dc st (6t) + 2 dc in the first 2 overlapping loops.
Front Panel
Leave the back panel on hold and proceed with the rows for the front panel.
Count 5 stitches from the stitch marker (85), and in the 6th stitch, work as follows:
Row-R7 (Front):ch 3, 2 dc, close the 3 loops together, ch 14, 6R dc st (4t), *6R mesh st (4t) – 6R dc st (8t)* – repeat 4 times + 6R mesh st (4t)
Row-R8 (Front):ch 1,* sl st – hdc* – sl st
Row-R9 (Front):ch 19, 6R mesh st (2t), *6R dc st (8t) – 6R mesh st (4t)* – repeat 4 times + 6R dc st (8t)
Row-R10 (Front):ch 1,* sl st – hdc* – sl st
Go to the row left pending, continue
R11 (back-front) – ch9, yo 11 times, close 2 loops at a time, 2dc (in the second two loops, continue with the pattern (photo); 6R dc st (4t), 6R mesh st (4t) – 6R dc st (8t) – repeat 4 times + 6R mesh st (4t)
R12: ch1, sl st-hdc – sl st
R13: ch17, 6R dc st (8t) – 6R mesh st (4t) – 6R dc st (8t)
R14: ch1, sl st-hdc – sl st
R15: ch19, 6R mesh st (4t) – 6R dc st (8t) – 6R mesh st (4t)
R16: ch1, sl st-hdc – sl st
R17: ch17, 6R dc st (8t) – 6R mesh st (4t) – 6R dc st (8t)
R18: ch1, sl st-hdc – sl st

Edge and Finishing
Go back to the beginning of the work where you started the chains and work on the wrong side of the panel a row of ch1* sl st – hdc* – sl st.
Change the hook size and begin creating the border for the neck. Find the center stitch on the collar of the back panel and work one round of ch1,* sl st – hdc*. Turn to the right side and continue : ch3*fpdc – bpdc*. (2-6 rounds)
XL Sleeves
Place the stitch markers on the stitch that divides the two sides (stitch 85), on both outer sides.
Count 36 stitches to the right and 36 stitches to the left, then place the stitch markers.
Start working from the right stitch marker towards the left one.
R1: ch3, skip one stitch, dc, close 2 loops together, ch16, 6R mesh st (3t), *6R dc st (8t) – 6R mesh st (4t) *- 3 times + 6R dc st (8t) + 6R mesh st (3t), before closing the loops on the last stitch work: close 2 loops, skip one stitch, dc, close 3 loops, then 2 at a time.
R2: ch1,* sl st-hdc* – sl st
R3: ch17, 6R dc st (6t),* 6R mesh st (4t) – 6R dc st (8t) *- repeat 3 times + 6R mesh st (4t) + 6R dc st (6t)
R4: ch1, sl st-hdc – sl st
R5: ch19, 6R mesh st (3t),* 6R dc st (8t) – 6R mesh st (4t)* – 3 times + 6R dc st (8t) + 6R mesh st (3t)
R6: ch1,* sl st-hdc* – sl st
R7: ch17, 6R dc st (6t),* 6R mesh st (4t) – 6R dc st (8t) *- repeat 3 times + 6R mesh st (4t) + 6R dc st (6t)
R8: ch1,* sl st-hdc* – sl st
R9: ch19, 6R mesh st (6t)*, 6R dc st (8t) – 6R mesh st (4t)*-repeat 3 times* 6R mesh st (6t)
R10: ch1, *sl st-hdc – sl st*
R11: ch17, 6R dc st (6t),* 6R mesh st (4t) – 6R dc st (8t)* – repeat 3 times + 6R mesh st (4t) + 6R dc st (6t)
R12: ch1, sl st-hdc – sl st
Close the sides: sleeves and panels.
Cuff Finishing: In the first round, decrease stitches by closing 2 stitches into one or alternating 2 into one and one free, depending on how tight you want the cuff. Then, work ch3* fpdc – bpdc* (2-6 rounds).
Sweater Bottom Edge: Make a round of ch 1*sl st – hdc* worked in the back loops. Then, turn the work to the front and proceed as for the cuffs. If desired, you can decrease stitches.
Pattern 2X
Start: 88ch (back panel) + 1ch (center) + 88ch (front panel)
R1: ch23, 8R dc st (12t),* 6R mesh st (4t) – 6R dc st (8t)* – 9 times + 8R mesh st (4t) + 8R dc st (12t)
R2: ch1,* sl st-hdc* – sl st
R3: ch19, 6R mesh st (6t),* 6R dc st (8t) – 6R mesh st (4t)* – 9 times + 6R dc st (8t) + 6R mesh st (6t)
R4: ch1, *sl st-hdc *- sl st
R5: ch17, 6R dc st (12t), *6R mesh st (4t) – 6R dc st (8t)* – 9 times + 6R mesh st (4t) + 6R dc st (12t)
R6: ch1, *sl st-hdc* – sl st
Divide the panel in two, place a stitch marker at stitch 89.
Continue working only on the back panel. Row 7 will end 3 stitches before the stitch marker. (see XL photo)
R7 (back): ch19, 6R mesh st (6t), *6R dc st (8t) – 6R mesh st (4t)* – 4 times + 6R dc st (6t), before closing the loops on the last stitch, work: close 2 loops, 2dc, close the 4 loops together, then close 2 loops at a time. (see XL photo)
R8 (back): ch1,* sl st-hdc* – sl st
R9 (back): ch17, 6R dc st (12t), *6R mesh st (4t) – 6R dc st (4t) *- 4 times + 6R mesh st (3t)
R10 (back): ch1,* sl st-hdc* – sl st
R11 (back): ch19, 6R mesh st (6t), *6R dc st (8t) – 6R mesh st (4t)* – 4 times + 6R dc st (6t) + 3dc in the first 2 overlapping loops. (see XL photo)
Leave this section on hold and move on to working the rows on the front panel.
Count 5 stitches from the stitch marker (89), in stitch 6, work: (see XL photo)
R7 (front): ch3 – 2dc, close together, ch14, 6R dc st (4t),* 6R mesh st (4t) – 6R dc st (8t)* – 4 times + 6R mesh st (6t)
R8 (front): ch1,* sl st-hdc* – sl st
R9 (front): ch19, 6R mesh st (2t),* 6R dc st (8t) – 6R mesh st (4t)* – 4 times + 6R dc st (12t)
R10 (front): ch1,* sl st-hdc* – sl st
Return to the row left on hold and continue: (see XL photo)
R11 (back-front): ch9, yo 11 times, close 2 loops at a time, 2dc (in the second 2 loops), continue with the element (see XL photo); 6R dc st (4t),* 6R mesh st (4t) – 6R dc st (8t)* – repeat 4 times + 6R mesh st (6t)
R12: ch1, *sl st-hdc* – sl st
R13: ch17, 6R dc st (12t),* 6R mesh st (4t) – 6R dc st (8t)* – 6R dc st (12t)
R14: ch1, *sl st-hdc* – sl st
R15: ch19, 6R mesh st (6t),* 6R dc st (8t) – 6R mesh st (4t) *- 6R mesh st (6t)
R16: ch1,* sl st-hdc* – sl st
R17: ch23, 8R dc st (12t),* 6R mesh st (4t) – 6R dc st (8t)* – 8R dc st (12t)
R18: ch1,* sl st-hdc* – sl st
Edging and Finishing
Return to the beginning of the work where you started the foundation chains and, on the wrong side of the panel, work a row of: ch1,* sl st – hdc* – sl st.
Change the crochet hook size and start creating the neckline edging. Find the center stitch on the collar of the back panel and work a round of ch1,* sl st-hdc.* Turn to the right side and continue :ch3* fpdc, bpdc*. (2-6 rounds) (see XL photo)
Sleeves 2X
Place stitch markers on stitch 85, which divides the two sides, on both outer sides.
Count 36 stitches to the right and 36 stitches to the left, then place stitch markers.
Start working from the right stitch marker towards the left.
R1: ch3, skip one stitch, dc, close 2 loops, ch16, 6R mesh st (3t), *6R dc st (8t) – 6R mesh st (4t)* – 3 times + 6R dc st (8t) + 6R mesh st (3t), before closing the loops on the last stitch, work: close 2 loops, skip one stitch, dc, close 3 loops, then 2 at a time. (see XL photo)
R2: ch1,* sl st-hdc* – sl st
R3: ch17, 6R dc st (6t),* 6R mesh st (4t) – 6R dc st (8t)* – repeat 3 times + 6R mesh st (4t) + 6R dc st (6t)
R4: ch1,* sl st-hdc *- sl st
R5: ch19, 6R mesh st (3t),* 6R dc st (8t) – 6R mesh st (4t) *- 3 times + 6R dc st (8t) + 6R mesh st (3t)
R6: ch1, *sl st-hdc* – sl st
R7: ch17, 6R dc st (6t),* 6R mesh st (4t) – 6R dc st (8t)* – repeat 3 times + 6R mesh st (4t) + 6R dc st (6t)
R8: ch1,* sl st-hdc *- sl st
R9: ch19, 6R mesh st (3t),* 6R dc st (8t) – 6R mesh st (4t*) – 3 times + 6R dc st (8t) + 6R mesh st (3t)
R10: ch1, *sl st-hdc* – sl st
R11: ch17, 8R dc st (6t),* 8R mesh st (4t) – 8R dc st (8t)* – repeat 3 times + 8R mesh st (4t) + 8R dc st (6t)
R12: ch1, *sl st-hdc* – sl st
Assembly and Finishing
Close the sides: sleeves and panels.
Cuff Finishing: In the first round, decrease stitches by closing 2 stitches into one or alternating 2 into one and one free, depending on how tight you want the cuff. Then, work :ch3* fpdc – bpdc*. (2-6 rounds)
Sweater Bottom Edge: Work a round of ch1*sl st – hdc* in the back loops. Then, turn the work to the front and proceed as for the cuffs. If desired, you can decrease stitches. (see XL photo)
Pattern 3X
Foundation: 89ch (back panel) + 1ch (center) + 89ch (front panel)
Riga1: ch23, 8R dc st (14t),* 8R mesh st (5t) – 8R dc st (10t)* – 7 times + 8R mesh st (5t) + 8R dc st (14t)
R2: ch1,* sl st-hdc* – sl st
R3: ch22, 7R mesh st (7t), *7R dc st (10t) – 7R mesh st (5t) *- 7 times + 7R dc st (10t) + 7R mesh st (7t)
R4: ch1,* sl st-hdc *- sl st
R5: ch20, 7R dc st (14t), *7R mesh st (5t) – 7R dc st (10t)* – 7 times + 7R mesh st (5t) + 7R dc st (14t)
R6: ch1,* sl st-hdc* – sl st
Dividing the Panel
Divide the panel into two, place a stitch marker on stitch 90.
Continue working only on the back panel. Row 7 will end 4 stitches before the marker.
R7 (back): ch22, 7R mesh st (7t),* 7R dc st (10t) – 7R mesh st (5t) *- 3 times, + 7R dc st (8t). Before closing the stitches, on the last stitch work: close 2 loops, add 2 dc, close 4 loops, then 2 at a time. (see XL photo)
R8 (back): ch1,* sl st-hdc* – sl st
R9 (back): ch20, 7R dc st (14t),* 7R mesh st (5t) – 7R dc st (10t)* – 3 times + 7R mesh st (4t)
R10 (back): ch1,* sl st-hdc* – sl st
R11 (back): ch22, 7R mesh st (7t),* 7R dc st (10t) – 7R mesh st (5t)* – 3 times + 5R dc st (8t) + 2dc in the first 2 overlapping loops. (see XL photo)
Leave this section on hold and proceed to work on the front panel.
Count 6 stitches from the stitch marker (ch90), in stitch 7:
R7 (front): ch3 – 2dc, close together, ch16, 7R dc st (6t),* 7R mesh st (5t) – 5R dc st (10t)* – 3 times + 7R mesh st (7t)
R8 (front): ch1,* sl st-hdc* – sl st
R9 (front): ch22, 7R mesh st (3t),* 7R dc st (10t) – 7R mesh st (5t)* – 3 times + 5R dc st (14t)
R10 (front): ch1,* sl st-hdc* – sl st
Returning to the Suspended Row (see XL photo)
R11 (back-front): ch11, yo 13 times (see XL photo), close 2 loops at a time, work 2 dc (in the second 2 overlapping loops) (see XL photo), 7R dc st (6t), *7R mesh st (5t) – 7R dc st (10t) *- 3 times + 7R mesh st (7t)
R12: ch1,* sl st-hdc* – sl st
R13: ch20, 7R dc st (14t), *7R mesh st (5t) – 7R dc st (10t)*, 7R dc st (14t)
R14: ch1,* sl st-hdc* – sl st
R15: ch22, 7R mesh st (7t),* 7R dc st (10t) – 7R mesh st (5t)* – 7R mesh st (7t)
R16: ch1,* sl st-hdc* – sl st
R17: ch23, 8R dc st (14t), *8R mesh st (5t) – 8R dc st (10t)* – 8R dc st (14t)
R18: ch1, *sl st-hdc* – sl st
Edging and Finishing
Go back to the beginning where you started the foundation chains and work on the wrong side of the panel: ch1,* sl st – hdc* – sl st (see XL photo).
Change the hook size and start creating the neckline edging. Find the center stitch on the collar of the back panel and work a round of ch1, *sl st-hdc*. Turn to the right side and continue :ch3 *fpdc, bpdc*. (2-6 rounds)
Sleeves 3X
Place a stitch marker on stitch 90. On both sides of the panel, count 40 stitches to the right and 40 stitches to the left, then place stitch markers.
Work from the right stitch marker to the left:
R1: ch3, skip one stitch, dc, close together, ch19, 7R mesh st (2t.), *7R dc st (10t) – 7R mesh st (5t)* – repeat 3 times, + 7R dc st (10t) + 7R mesh st (2t).
Before closing the loops on the last stitch, work: close 2 loops, skip one stitch, dc, close 3 loops, then close 2 at a time.
R2: ch1, *sl st-hdc* – sl st
R3: ch20, 7R dc st (4t), *7R mesh st (5t) – 7R dc st (10t)* – 3 times + 7R mesh st (5t) + 7R dc st (4t)
R4: ch1,* sl st-hdc* – sl st
R5: ch22, 7R mesh st (2t) -* 7R dc st (10t) – 7R mesh st (5t)*-3 times + 7R dc st (10t) + 7R mesh st (2t)
R6: ch1,* sl st-hdc* – sl st
R7: ch20, 7R dc st (4t), *7R mesh st (5t) – 7R dc st (10t)* – 3 times + 7R mesh st (5t) + 7R dc st (4t)
R8: ch1,* sl st-hdc *- sl st
R9: ch22, 7R mesh st (2t) -* 7R dc st (10t) – 7R mesh st (5t)*-3 times +7R dc st (10t) + 7R mesh st (2t)
R10: ch1,* sl st-hdc* – sl st
R11: ch20, 7R dc st (4t),* 7R mesh st (5t) – 7R dc st (10t)* – 3 times + 7R mesh st (5t) + 7R dc st (4t)
R12: ch1,* sl st-hdc* – sl st
Closing the Sides: Sleeves and Panels
Seam the sides of the sleeves and panels together.
Cuff Finishing
In the first round, decrease stitches by closing 2 stitches into 1 or alternating 2 into 1 and one free stitch, depending on how tight you want the cuff. Then, work :ch3* fpdc – bpdc *(2-6 rounds).
Bottom Edge of the Sweater
Work a round of ch1* sl st – hdc* on the wrong side. Then, turn the work to the right side and continue as for the cuffs. If desired, decrease stitches.
Pattern 4X
Foundation: 98ch (back panel) + 1ch (center) + 98ch (front panel)
R1: ch23, 8R dc st (8t), *8R mesh st (6t) – 8R dc st (12t) *- 7 times + 8R mesh st (6t) – 8R dc st (8t)
R2: ch1,* sl st-hdc* – sl st
R3: ch25, 8R mesh st (4t),* 8R dc st (12t) – 8R mesh st (6t)* – 7 times + 8R dc st (12t) – 8R mesh st (4t)
R4: ch1,* sl st-hdc* – sl st
R5: ch23, 8R dc st (8t) ,* 8R mesh st (6t) – 8R dc st (12t)* – 7 times + 8R mesh st (6t) – 8R dc st (8t)
R6: ch1,* sl st-hdc *- sl st
Divide the panel in two, place a stitch marker on stitch 99.
Continue working only on the back panel. Row 7 will end 5 stitches before the stitch marker.
R7 (back): ch25, 8R mesh st (4t) -* 8R dc st (12t) – 8R mesh st (6t)* – 3 times + 8R dc st (10t). Before closing the stitches on the last stitch, work: close 2 loops, work 2dc, close 4 loops, then close 2 at a time (see XL photo).
R8 (back): ch1, *sl st-hdc* – sl st
R9 (back): ch23, 8R dc st (8t) -* 8R mesh st (6t) – 8R dc st (12t) *- 3 times + 8R mesh st (5t)
R10 (back): ch1,* sl st-hdc* – sl st
R11 (back): ch25, 8R mesh st (4t) *- 8R dc st (12t) – 8R mesh st (6t) *+ 8R dc st (10t) + 2dc in the first 2 overlapping loops (see XL photo).
Leave this section on hold, proceed to work the rows for the front panel.
Skip 7 stitches from the stitch marker, in stitch 8:
R7 (front): ch3, 2dc, close together, ch21, 8R dc st (8t),* 8R mesh st (6t) – 8R dc st (12t)* – 3 times + 8R mesh st (4t)
R8 (front): ch1,* sl st-hdc *- sl st
R9 (front): ch25, 8R mesh st (4t),* 8R dc st (12t) – 8R mesh st (6t)* + 8R dc st (8t)
R10 (front): ch1, *sl st-hdc – sl st*
Return to the row left on hold:
R11 (back-front): ch13, yo 15 times (see XL photo), close 2 loops at a time, 2dc (in the second 2 overlapping loops) (see XL photo), 8R dc st (8t),* 8R mesh st (6t) – 8R dc st (12t)* – 3 times + 8R mesh st (4t)
R12: ch1, *sl st-hdc* – sl st
R13: ch23, 8R dc st (8t),* 8R mesh st (6t) – 8R dc st (12t)* – 7 times + 8R mesh st (6t) – 8R dc st (8t)
R14: ch1,* sl st-hdc* – sl st
R15: ch25, 8R mesh st (4t), *8R dc st (12t) – 8R mesh st (6t)* – 7 times + 8R dc st (12t) – 8R mesh st (4t)
R16: ch1, *sl st-hdc* – sl st
R17: ch23, 8R dc st (8t),* 8R mesh st (6t) – 8R dc st (12t)* – 7 times + 8R mesh st (6t) – 8R dc st (8t)
R18: ch1,* sl st-hdc* – sl st
Edging and Finishing
Return to the beginning of the work where you started the foundation chains and, on the wrong side of the panel, work a row of: ch1,* sl st – hdc* – sl st.
Change the hook size and start creating the neckline edging. Find the center stitch on the collar of the back panel and work a round of ch1, sl st – hdc. Turn to the right side and continue alternating ch3*fpdc, bpdc* (2-6 rounds).
Sleeves 4X
Place a stitch marker on stitch 99. On both sides of the panel, count 44 stitches to the right and 44 stitches to the left, then place the stitch markers.
Work from the right stitch marker to the left one.
R1: ch3, skip one stitch, dc, close together, ch20,* 8R dc st (12t) – 8R mesh st (6t)* – 3 times + 8R dc st (12t). Before closing the loops on the last stitch, work: close 2 loops, skip one stitch, dc, close 3 loops, then close 2 at a time.
R2: ch1,* sl st – hdc* – sl st
R3: ch25, *8R mesh st (6t) – 8R dc st (12t)* – 8R mesh st (6t)
R4: ch1, *sl st – hdc* – sl st
R5: ch23,* 8R dc st (12t) – 8R mesh st (6t)* – 8R dc st (12t)
R6: ch1,* sl st – hdc* – sl st
R7: ch25, *8R mesh st (6t) – 8R dc st (12t)* – 8R mesh st (6t)
R8: ch1,* sl st – hdc* – sl st
R9: ch23, *8R dc st (12t) – 8R mesh st (6t)* – 8R dc st (12t)
R10: ch1, *sl st – hdc* – sl st
R11: ch25,* 8R mesh st (6t) – 8R dc st (12t)* – 8R mesh st (6t)
R12: ch1, *sl st – hdc* – sl st
Assembly
Sew the sides: sleeves and panels.
Cuff Finishing:
In the first round, decrease stitches by closing 2 stitches into 1 or alternating 2 into 1 and leaving one free, depending on how tight you want the cuff to be. Then, work rounds alternating ch3* fpdc – bpdc *(2-6 rounds).
Bottom Edge of the Sweater:
Work a round of ch1*sl st – hdc* on the back side. Then, turn the work to the front and proceed as for the cuffs. If desired, you can decrease stitches.
Pattern 5X
Foundation: 102 ch (back panel) + 1 ch (center) + 102 ch (front panel)
Riga1: ch26, *9R dc st (12t) – 9R mesh st (6t)* – 8 times + 9R dc st (12t)
R2: ch1,* sl st – hdc* – sl st
R3: ch25,* 8R mesh st (6t) – 8R dc st (12t)* – 8 times + 8R mesh st (6t)
R4: ch1*, sl st – hdc* – sl st
R5: ch23,* 8R dc st (12t) – 8R mesh st (6t) *- 8R dc st (12t)
R6: ch1,* sl st – hdc* – sl st
Divide the Panel
Place a stitch marker on stitch 103. Continue working only on the back panel. Row 7 will end 5 stitches before the stitch marker.
R7 (Back): ch25, *8R mesh st (6t) – 8R dc st (12t)* – 3 times + 8R mesh st (6t) + 8R dc st (10t). Before closing the loops on the last stitch, work: close 2 loops, add 2 dc, close 4 loops, then close 2 at a time.
R8 (Back): ch1,* sl st – hdc *- sl st
R9 (Back): ch23*, 8R dc st (12t) – 8R mesh st (6t) *- 3 times + 8R dc st (12t) + 8R mesh st (5t)
R10 (Back): ch1,* sl st – hdc* – sl st
R11 (Back): ch25,* 8R mesh st (6t) – 8R dc st (12t)* – 3 times + 8R mesh st (6t) + 5R dc st (10t) + 2 dc in the first 2 overlapping loops.
Leave this section on hold and move to work on the front panel.
Front Panel
Skip 7 stitches from the stitch marker (stitch 103), in the 8th stitch:
R7 (Front): ch3, 2 dc, close together, ch21, 8R dc st (8t),* 8R mesh st (6t) – 8R dc st (12t)* – 3 times + 8R mesh st (6t)
R8 (Front): ch1,* sl st – hdc* – sl st
R9 (Front): ch25, 8R mesh st (4t)*, 8R dc st (12t) – 8R mesh st (6t) *- 3 times + 8R dc st (12t)
R10 (Front): ch1,* sl st – hdc* – sl st
Return to the Back Panel
Go back to the row left on hold:
R11 (Back-Front): ch13, yo15 times, close 2 loops at a time, 2 dc (in the second 2 overlapping loops), 8R dc st (8t), 8R mesh st (6t) – 8R dc st (12t) – 3 times + 8R mesh st (6t)
R12: ch1,* sl st – hdc *- sl st
R13: ch23,* 8R dc st (12t)* – 8R mesh st (6t) – 8R dc st (12t)
R14: ch1, *sl st – hdc* – sl st
R15: ch25,* 8R mesh st (6t) – 8R dc st (12t) *- 8R mesh st (7t)
R16: ch1,* sl st – hdc *- sl st
R17: ch26, *9R dc st (12t) – 9R mesh st (6t)* – 9R dc st (12t)
R18: ch1,* sl st – hdc* – sl st
Edging and Finishing
Return to the beginning of the work where you started the foundation chains and, on the wrong side of the panel, work a row of: ch1, *sl st – hd*c – sl st.
Change the hook size and begin working the neckline border. Find the center stitch on the collar of the back panel and work one round of ch1,* sl st – hdc*. Turn to the right side and continue alternating ch3* fpdc, bpdc*. (2-6 rounds)
Sleeves 5X
Place a stitch marker on stitch 103 on both sides of the panel.
Count 44 stitches to the right and 44 stitches to the left, then place the stitch markers.
Work from the right stitch marker towards the left.
R1: ch3, sk 1, dc close together, ch20, *8R dc st (12t) – 8R mesh st (6t)* – 3 times + 8R dc st (12t). Before closing the loops on the last stitch, work: close 2 loops, sk 1, dc, close 3 loops, then close 2 at a time.
R2: ch1*, sl st – hdc *- sl st
R3: ch25,* 8R mesh st (6t) – 8R dc st (12t) *- 3 times + 8R mesh st (6t)
R4: ch1,* sl st – hdc* – sl st
R5: ch23,* 8R dc st (12t) – 8R dc st (6t)* – 3 times – 8R dc st (12t)
R6: ch1, *sl st – hdc* – sl st
R7: ch25,* 8R mesh st (6t) – 8R dc st (12t)* – 3 times + 8R mesh st (6t)
R8: ch1, *sl st – hdc* – sl st
R9: ch23,* 8R dc st (12t) – 8R dc st (6t) *- 3 times – 8R dc st (12t)
R10: ch1,* sl st – hdc* – sl st
R11: ch25,* 8R mesh st (6t) – 8R dc st (12t) *- 3 times + 8R mesh st (6t)
R12: ch1, *sl st – hdc* – sl st
Closing the Sides
Sew the sides: sleeves and panels.
Cuff Finishing: On the first round, decrease stitches by closing 2 stitches together or alternating 2 together and 1 free, depending on how tight you want the cuff. Then, work rounds alternating ch3*fpdc – bpdc*. (2-6 rounds)
Bottom Hem of the Sweater: Work one round of ch1*sl st – hdc* on the back. Then, turn the work to the front and proceed as for the cuffs. You can decrease stitches if desired.
You’ve just completed your Wooden Harmony sweater – congratulations!
Share your creations with the world – your work deserves to be seen and celebrated.
