Blog

Melis Sweater
Introduction and Materials
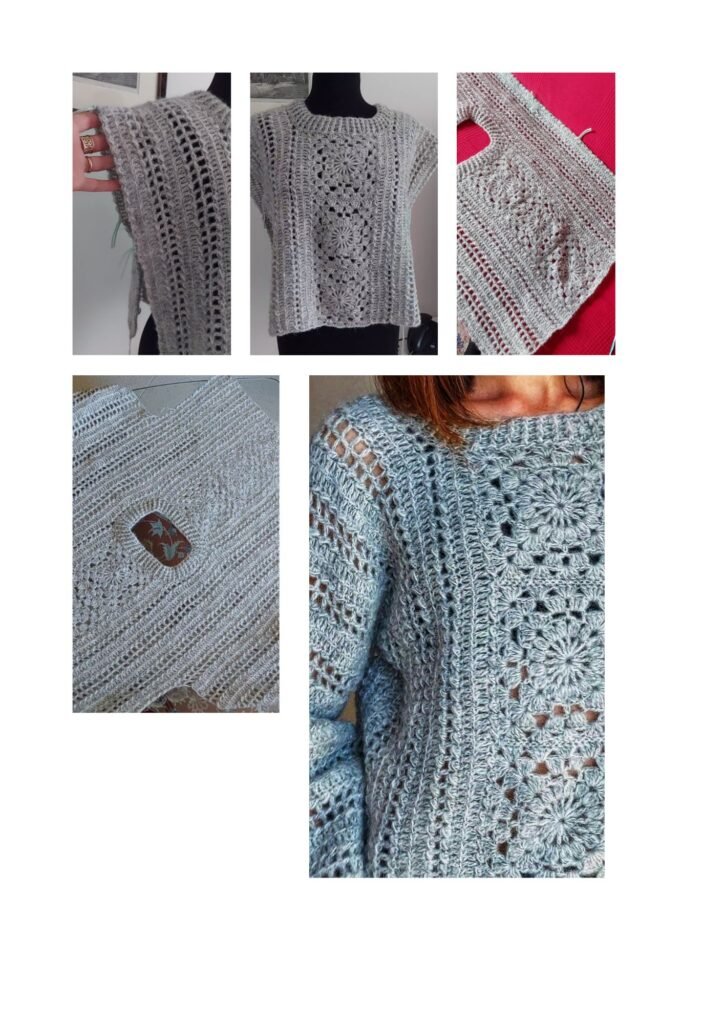
Melis sweater, a soft and lightweight garment.
A mix of simplicity and refined details.
The sweater is constructed with a simple structure but has an elegant effect. The base consists of two groups of three square motifs joined in a row, forming the body of the sweater.
🔹 Basic Structure
The square motif is worked for 5 rounds, but for larger sizes, the 6th and 7th rounds are added. Once the two groups of motifs are assembled, the side work begins, shaping the neckline with two rows. The second row will join the two groups with a series of chains, the number of which varies depending on the size.
🔹 Body Construction
After setting up the neckline, continue alternating two base rows:
✅ Double crochet
✅ Mesh stitch
Between these, we will work a row of* sl st-hdc*-sl st.
The pattern is repeated on both sides until reaching the desired width.
🔹 Neckline Finishing
Once the single panel is completed, the neckline is worked in two phases:
1️⃣ A first round of sl st-hdc on the wrong side.
2️⃣ From 2 to 7 rounds alternating fpdc-bpdc to create a structured border.
🔹 Sleeve Creation
The sleeves are worked directly from the sides of the panel. The number of stitches to be worked depends on the size and follows the alternating row pattern used for the body.
🔹 Seaming and Final Details
📌 Sewing the sides of the sweater.
📌 Cuffs: Start with a round of decreases (2 dc together or alternation of 2 dc together + 1 free dc) and finish with 2-7 rounds of fpdc-bpdc.
📌 Hem of the sweater:
1️⃣ First round (on the wrong side of the work)
• Work alternating sl st-hdc:
◦ sl st → in the joining point between the rows.
◦ hdc → on the horizontal bar formed between these points.
2️⃣ Second round
• Work double crochet (dc), making a decrease every 10 stitches.
3️⃣ Finishing
• Work from 2 to 6-7 rounds of fpdc-bpdc to create an elastic border.
💡 This sweater is perfect for those looking for a simple project with refined details. The mix of stitches gives it a unique touch. Grab your crochet hook, and let’s start together!
Sizes and Required Yarn Quantity
The Melis sweater was made in size L, but the pattern is also available in the following sizes: S, M, XL, 2X, 3X, 4X, 5X.
Here are the estimated meters of yarn needed for each size, including a 10% margin:
• S: 1250 m
• M: 1400 m
• L: 1500 m
• XL: 1700 m
• 2X: 1900 m
• 3X: 2200 m
• 4X: 2500 m
• 5X: 2800 m
Required Materials
• Yarn: Rowan Alpaca Classic (57% alpaca, 43% cotton) – 25 g (120 m)
Feel free to choose your favorite yarn, but try to keep similar characteristics for the best results!
• Crochet hook:
◦ 4 mm – for working the panels
◦ 3.5 mm – for finishing (cuffs, neckline, hem)
• Scissors
• Stitch markers
• Measuring tape
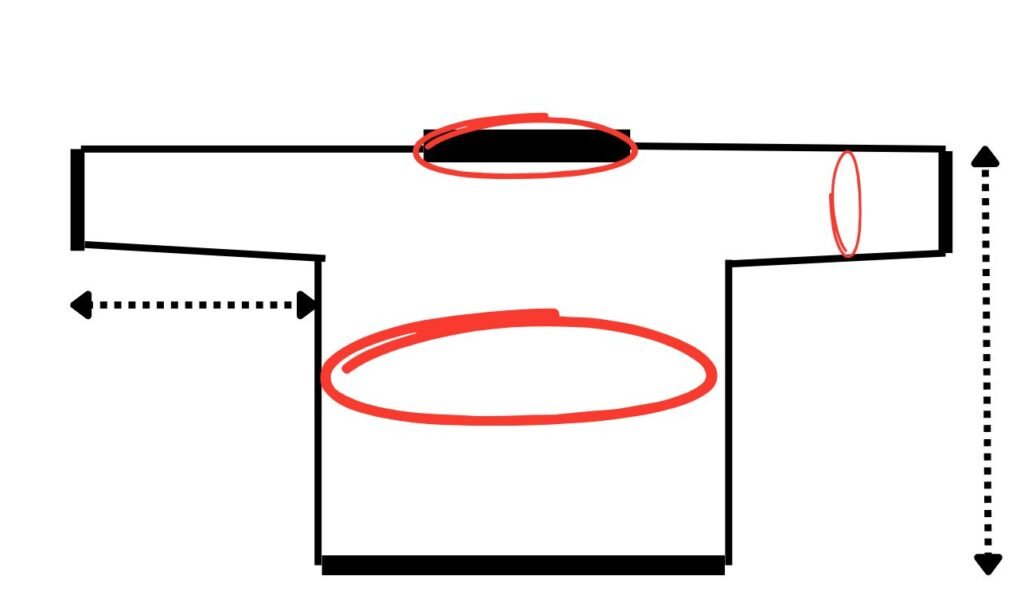
🧶 Final Measurements of the Sweater
S, M, L, XL, 2X, 3X, 4X, 5X
🔹 Neckline (cm): 58, 58, 60, 60, 62, 62, 62, 64
🔹 Bust circumference (cm): 96, 102, 116, 124, 132, 136, 146, 156
🔹 Sweater length (cm): 58, 59, 59, 64, 64, 64, 64, 68
🔹 Sleeve length (cm): 45, 51, 51, 54, 54, 57, 57, 57
🔹 Sleeve circumference (cm): 34, 36, 38, 40, 42, 44, 46, 48
📌 Tip: If you are between sizes, consider choosing the larger one for a more comfortable fit.
Sweater Stitches and Patterns
The Melis sweater consists of a combination of decorative squares and alternating rows, creating a dynamic effect in the design.
- Square motifs with a floral structure
- Alternating rows, repeated as follows:
- Row 1: Repeat ch1, sl st, hdc – sl st (always worked on the WS of the panel).
- Row 2: Repeat ch4, sk 1st, dc – ch1 or ch7, 2R mesh st.
- Row 3: Repeat ch1, sl st – hdc – sl st (always worked on the WS of the panel).
- Row 4: ch5, 2R dc st.
- Row 5: Repeat ch1, sl st, hdc – sl st (always worked on the WS of the panel).
- Row 6: ch7, 2R mesh st.
- Row 7: Repeat from Row 3 to Row 6.
Stitch Symbols (US)
- ch – chain
- sl st – slip stitch
- hdc – half double crochet
- dc – double crochet
- tr – treble crochet
- sts-stitches
- * * – repeat the sequence between asterisks
- 2R dc st – 2 consecutive rows of double crochet
- 2R mesh st – 2 consecutive rows of mesh stitch
- WS-the wrong side
- sk-skip
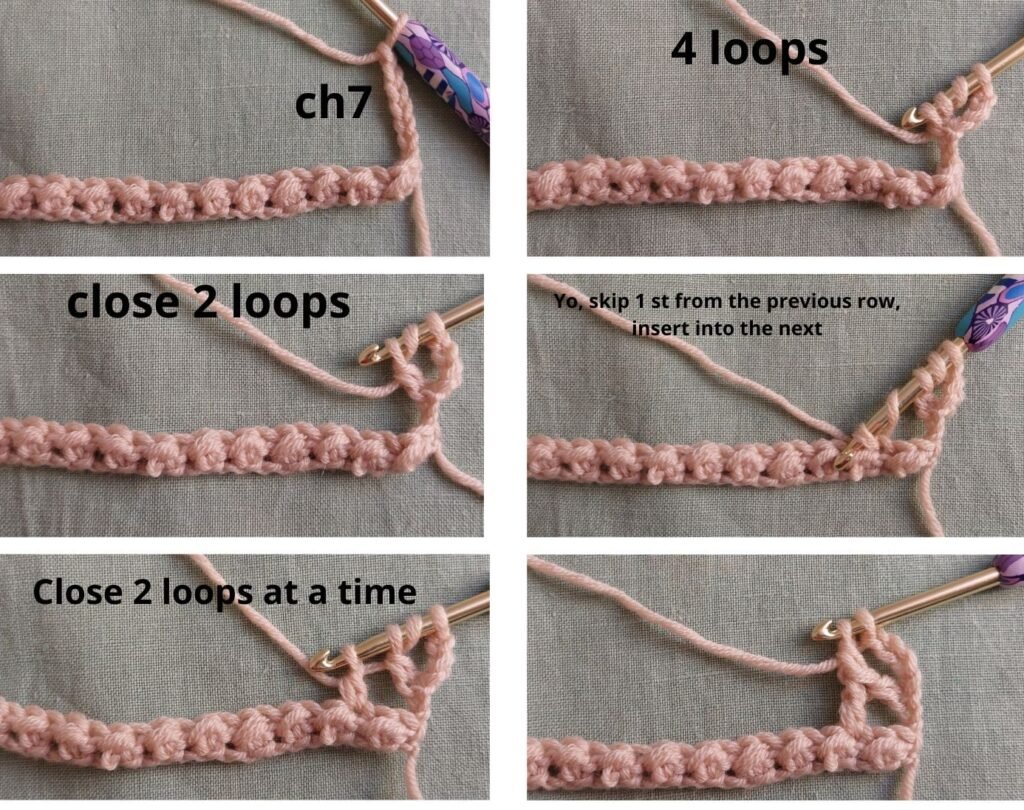
I’ll show you how to create the 2R mesh st and 2R dc st on a base I’ve prepared. I started with an odd number of chains and worked R1:ch1*sl st – hdc* – sl st,.
How to Work the 2R Mesh St:video guide:https:/youtu.be/pH2GotWWjzM?si=XZcKt5NmfBg_0drt
Start with ch 7 (this forms the mesh stitch base).
R2:Yo twice (twist).
Skip 4 ch and insert the hook into the 5th ch.
Pull up a loop – 4 loops on the hook.
Close 2 loops (yo, pull through 2).
Yo, skip 1 st from the previous row, insert the hook into the next st, and pull up a loop.
Close 2 loops at a time until only 1 loop remains on the hook.
🔄 Continue:
- ch1
- Yo twice (twist).
- Insert the hook into the two overlapping sts that divide the two mesh rows. Pull up a loop.
- Close 2 loops (yo, pull through 2).
- Yo, skip 1 st from the previous row, insert into the next, and pull up a loop.
- Close 2 loops at a time until 1 loop remains on the hook.
🔁 Repeat:
- ch1, yo twice, close 2, yo, skip 1, close 2 at a time.
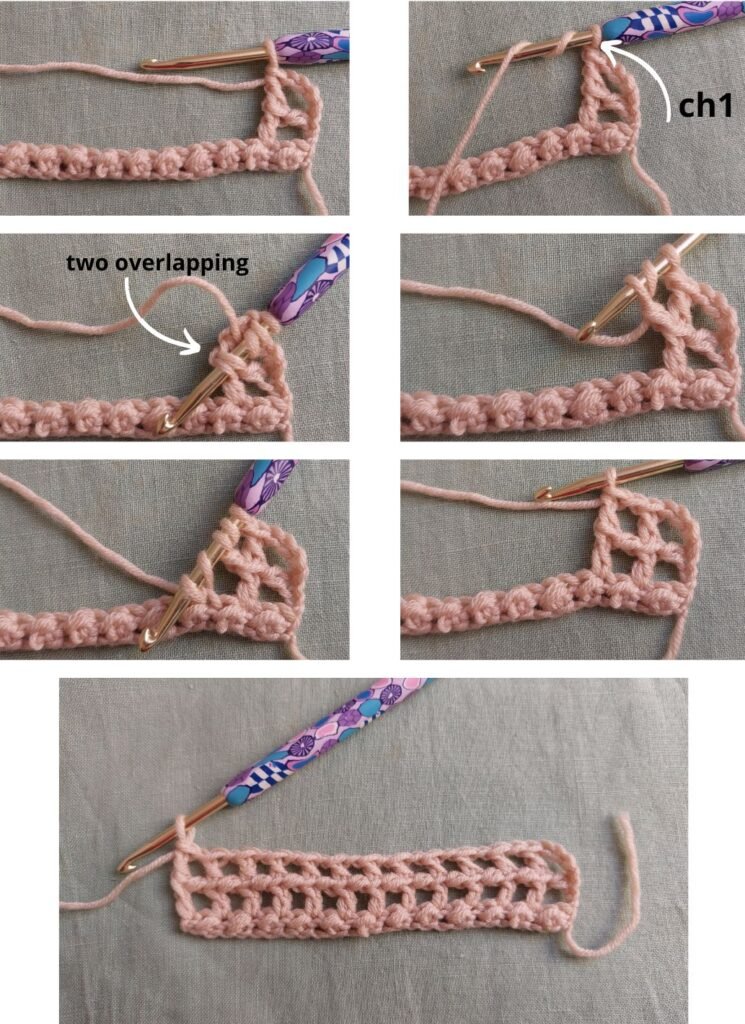
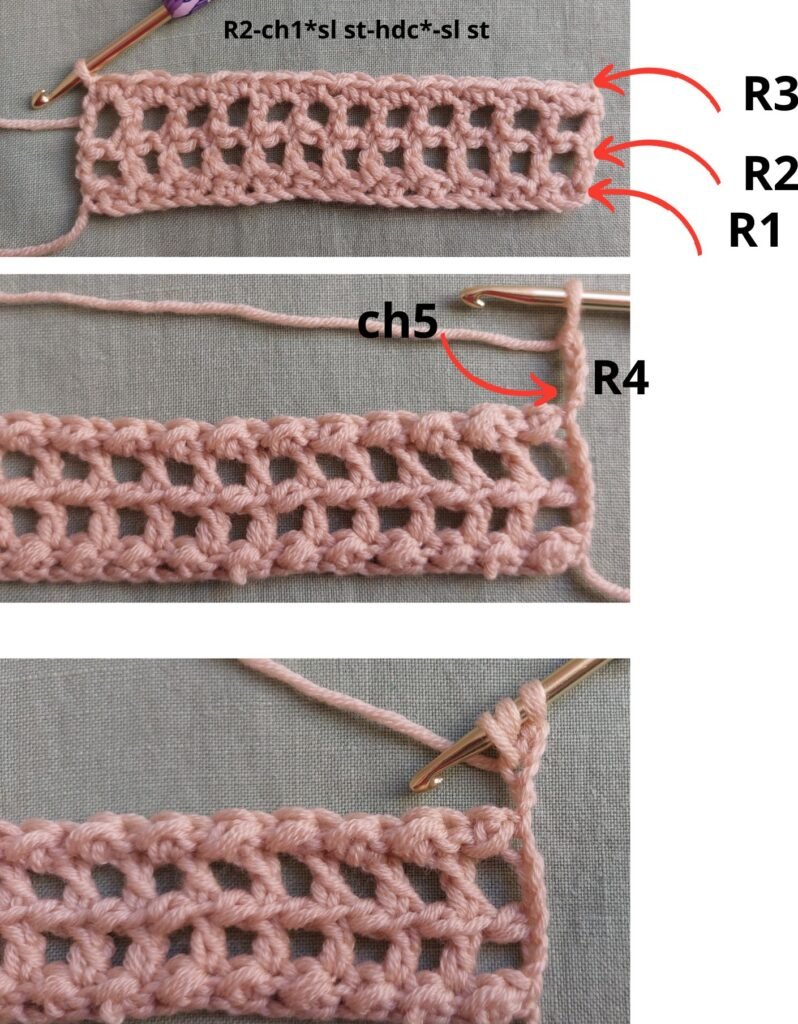
R3:ch1*sl st-hdc*-slst
How to Work the 2R dc st-video guide:https://youtu.be/pH2GotWWjzM?si=izFofeHr1Qc04hJd
R4:Start with ch 5 (this replaces the first tr).
Yo, skip 2 ch, insert the hook into the 3rd ch.
Pull up a loop – 3 loops on the hook.
Yo, insert the hook into the first st of the previous row.
Pull up a loop – 5 loops on the hook.
Close 2 loops at a time (yo, pull through 2 until 1 loop remains).
🔁 Repeat for each next st:
- Yo, insert the hook into the two overlapping sts that divide the two rows, pull up a loop.
- Yo, insert the hook into the corresponding st of the previous row, pull up a loop.
- Now you have 5 loops on the hook.
- Close 2 loops at a time until the stitch is complete.

Before You Start
I invite you to download the step-by-step photo guide for this sweater, available below.
The original design in the photo was made using cotton yarn, but you can easily adapt the pattern with alpaca, wool, or any fiber you love.
Start of work
Crochet Floral Pattern
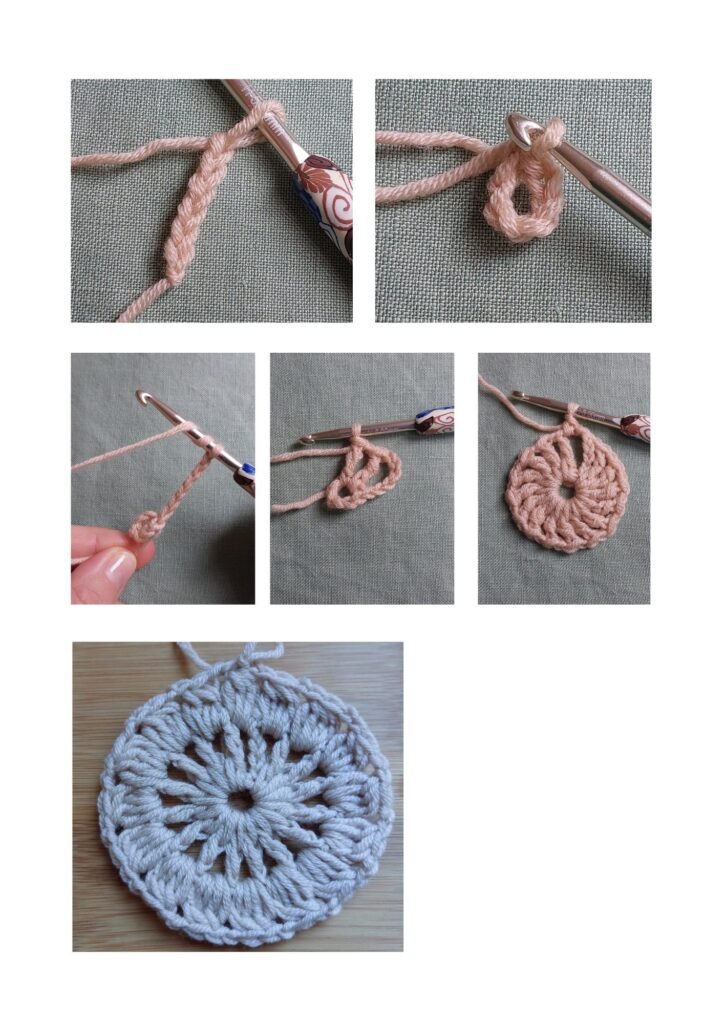
🔹 Cast on: 6 ch, close in circle with 1 sl st.
🔹R1: 5 ch (counts as 1 tr + 1 ch), 1 tr, 1 ch – repeat 15 times. Close with 1 sl st in the 4th ch of the initial 5 ch.
🔹 R2: Move with 1 sl st to the ch between the tr of the previous round. Work: 3 ch, 3dc closed together. Continue with * ch2, 4 dctog* over the next ch – repeat around the round. Close with ch 2 and 1 sl st over the first group of the round.
🔹 R3: Move with 1 sl st over the first ch 2 of the previous round. Work: ch1- 1 sc. In the next 2 ch work the first corner:* 4 dc, 2 ch, 4 dc.* Then work: 1 sc, ch 3, 1 sc, ch 3, 1 sc.
Now you are at the second corner, work again *4 dc, ch 2, 4 dc. Continue with sc, ch3, sc, ch3, sc* – repeat 2 more times. Close with 1 sl st on the initial sc.
🔹 R4: Move with * sl st* under the ch2 of the first corner. Work: ch 3, 3 dc, 2 ch, 4 dc (first corner). Then work:
• ch 1, 4 dc over the first 3 ch,
• ch 1, 4 dc over the second 3 ch,
• ch 1, second corner (4 dc, 2 ch, 4 dc).
Repeat sequence * ch 1, 4 dc, ch 1, 4 dc, ch 1, – 2 more times. Close with 1 sl st in ch 3 of the 3 initials.
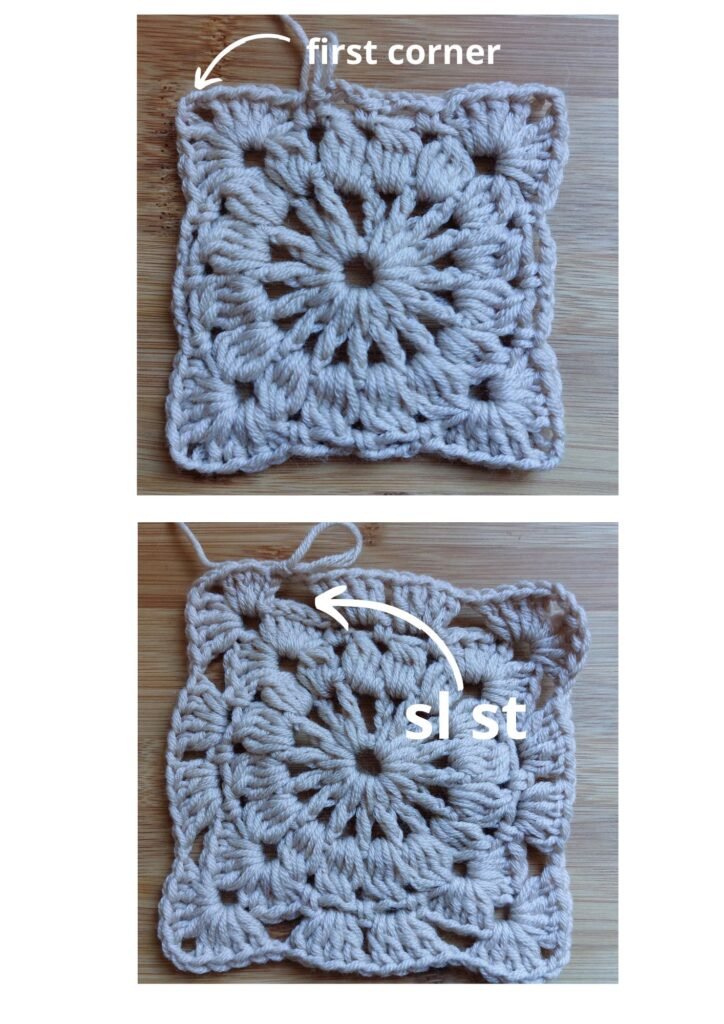
🔹 R5: Move with * sl st* under ch 2 of corner 1. Work: ch 3, 3 dc, ch 2, 4 dc (corner). Then work:
• 4 dc over the first ch1 of the previous round,
• 4 dc over the second,
• 4 dc over the third.
Repeat sequence corner 2:4dc-ch2-4dc, 4 dc, 4 dc, 4 dc *2 more times. Close with 1 sl st in ch3 of the 3 initials.
🔹 Sizes , S, M,L,XL: The pattern ends here.
🔹 Sizes 2X, 3X, 4X, 5X:
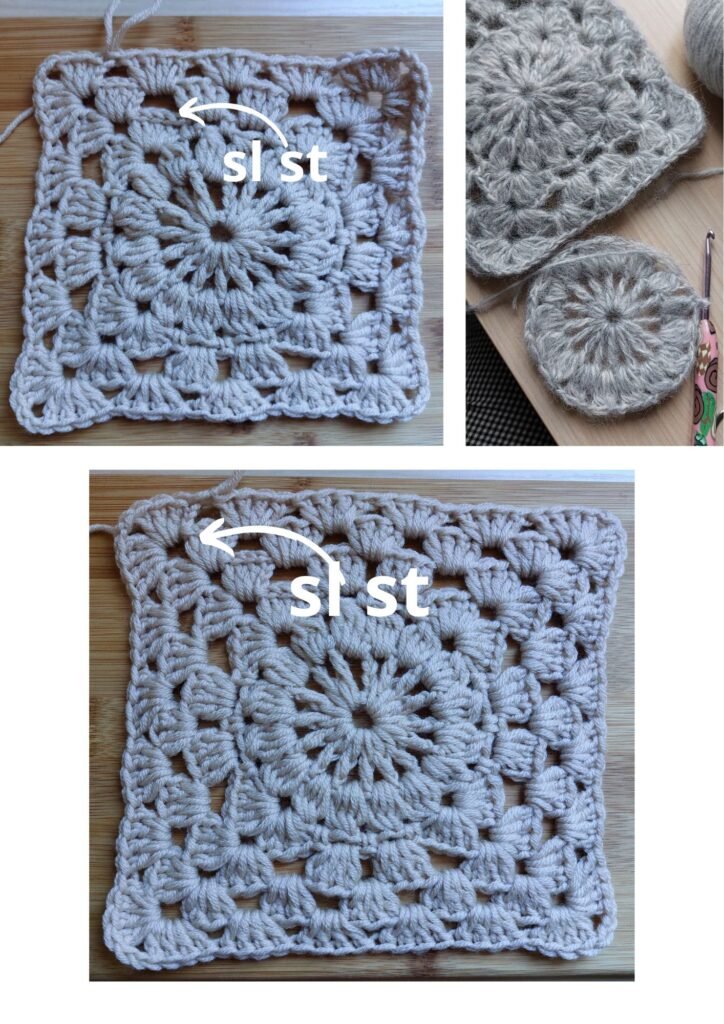
🔹 R6: Move with *sl st* under the ch2 of the corner. Work: ch3, 3 dc, ch2, 4 dc (corner). Continue with groups of 4 dc between those of the previous round, for a total of 4 groups of 4 dc per side.
Repeat the sequence corner 2: *4 dc-ch2-4dc, 4 dc, 4 dc, 4 dc ,4dc *3 more times. Close with 1 sl st in the ch3 of the 3 initials.
🔹 Sizes 5X:
🔹 R7: Move with * sl st *under the ch2 of the corner. Work: ch3, 3 dc, ch2, 4 dc (corner). Then work 5 groups of 4 dc between those of the previous round.photo
Repeat the sequence corner 2,:4 dc-ch2-4dc, 4 dc, 4 dc, 4 dc, 4 dc, 3 more times. Close with 1 slst in ch 3 of the 3 initial ones.
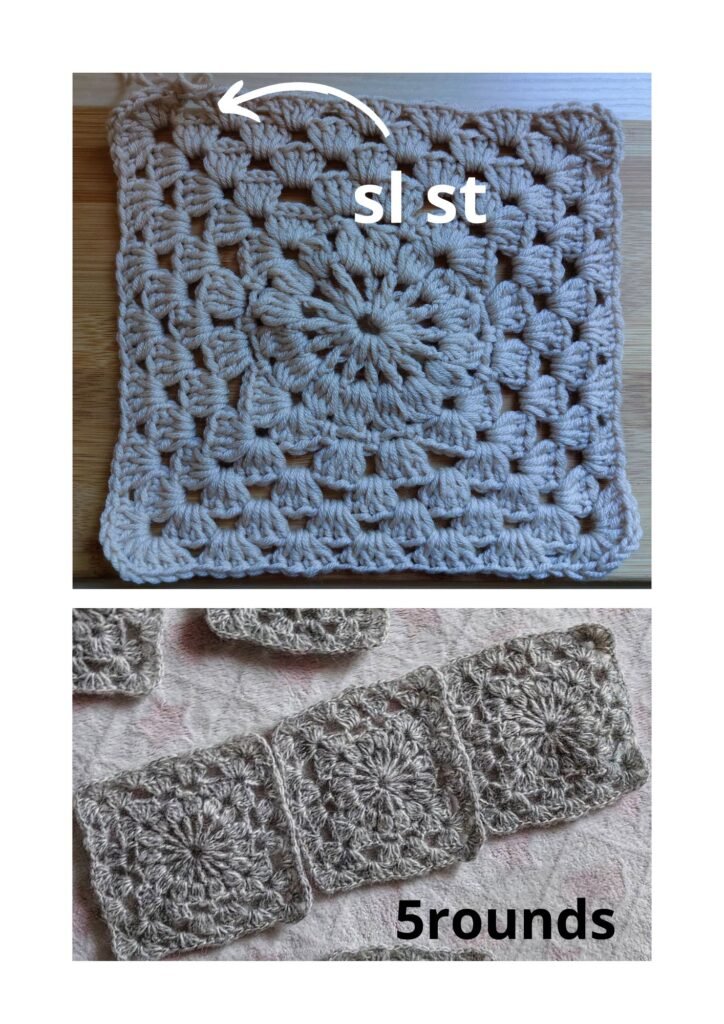
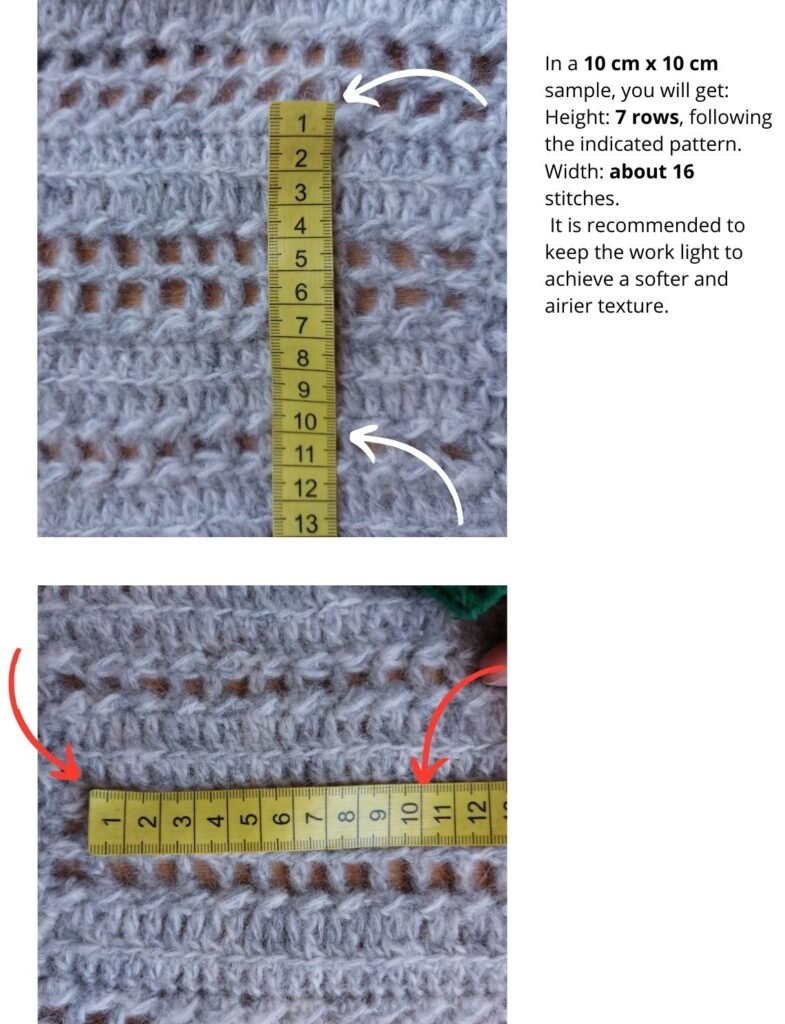
For a pattern worked in 5 rounds, the final dimensions will be 15 cm x 15 cm.
For a pattern worked in 6 rounds, the final dimensions will be 17 cm x 17 cm.
For a pattern worked in 7 rounds, the final dimensions will be 19 cm x 19 cm.
Size and arrangement of the motifs
We work the motifs as follows:
✅ S – 6 motifs of 5 rounds
✅ M – 6 motifs of 5 rounds
✅ L – 6 motifs of 5 rounds
✅ XL – 6 motifs of 5 rounds
✅ 2X – 6 motifs of 6 rounds
✅ 3X – 6 motifs of 6 rounds
✅ 4X – 6 motifs of 6 rounds
✅ 5X – 6 motifs of 7 rounds
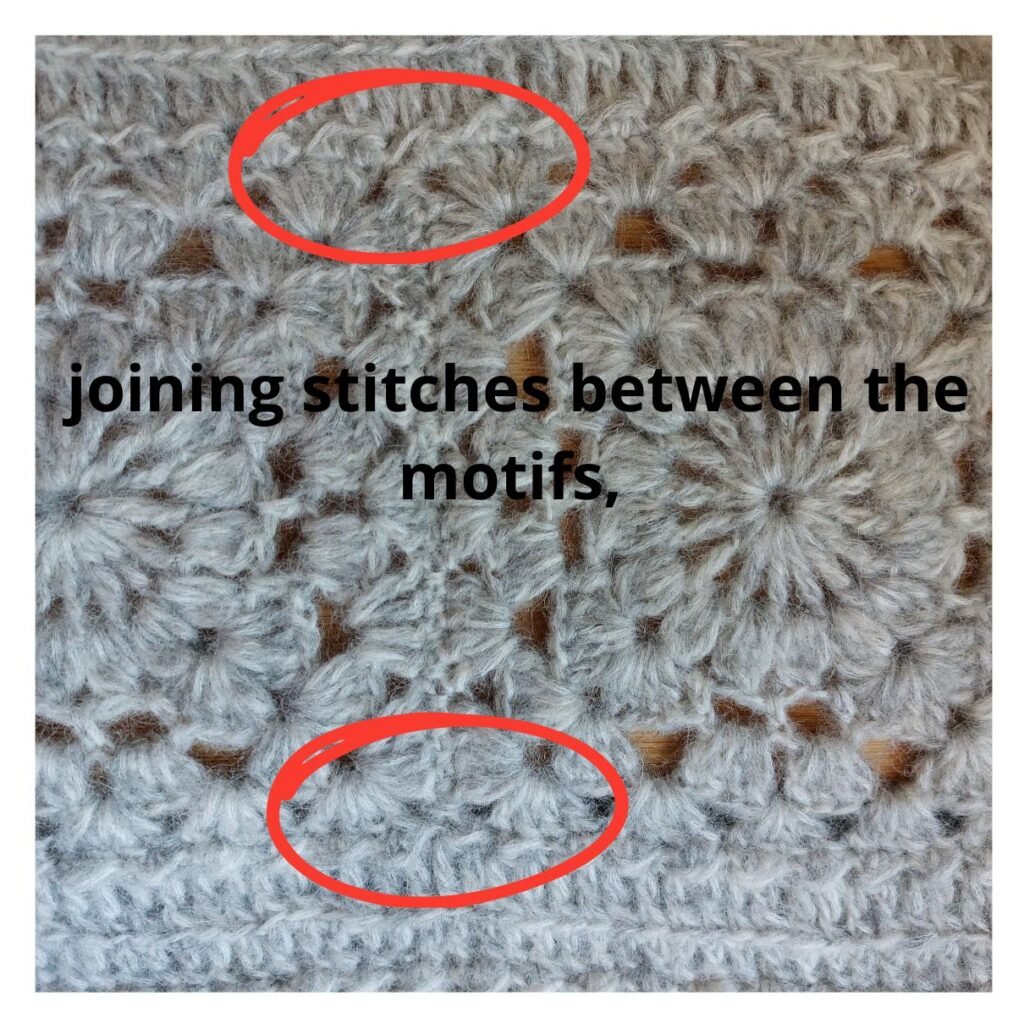
Once the 6 motifs have been made, we form 2 groups by arranging the motifs in rows of 3. We join the motifs together with single crochet, without tightening the thread too much.
📏 Length of the motif groups:
✅ 3 motifs of 5 rounds → approximately 45 cm
✅ 3 motifs of 6 rounds → approximately 51 cm
✅ 3 motifs of 7 rounds → approximately 57 cm
First row of work
First group of motifs:
Take the yarn and place the first group of motifs with the back facing us.
From the first right corner, cast on: ch1, sl st (in the first corner).
Work along the length of the three motifs alternating *hdc – sl st*, until reaching the last corner.
In the joining stitches between the motifs, follow this pattern:
◦ 1 stitch in the corner of the first motif
◦ 1 stitch in the joining stitches between the motifs
◦ 1 stitch in the corner of the next motif
Important: Mark the last stitch worked (sl st or hdc), since we will have to start with the same stitch in the second group of motifs.
Cut the yarn and leave this group hanging.
Second group of motifs:
We also place the second group with the back facing us.
We pick up the yarn and start from the first right corner, working towards the left with the same pattern as the first group.
Attention:The starting stitch must be the same as the one we used to finish the row of the first group. We close the row with sl st, just like we did in the first group at the beginning of the row.
We check that the number of stitches is identical in both groups, to ensure a uniform union.
3️⃣ Union of the groups of motifs
After completing the two groups of motifs, we will now join them to form the base of our sweater.
We turn the last group worked and prepare to work the union row.
🔹 Row 2 – Neck (R2-neck)
✅ For sizes S,L,2X,4X:
• We cast on ch3 (which counts as the first dc).
• Continue by working * dc *in each stitch of the previous row.
✅ For sizes M, XL, 3X, 5X:
• Cast on ch5 (which counts as the first double crochet).
• Continue by working 2R dc st in each stitch of the previous row.
Adding chains for the neck
◦ Once the row is completed along the length of the pattern group, add chains according to the size:
◦ S-21ch
◦ M – 23 ch
L, XL, 2X, 3X, 4X, 5X – 25 ch
◦ 📌 Note: The number of chains must be odd.
◦ Optional modification for a wider neckline or a longer sweater:
▪ Add 2, 4 or 6 extra chains to obtain a wider or longer effect.
Joining the first group of motifs
◦ Take the first group of motifs, turn it with the front facing you and start working again from where you cut the yarn.
Start the row on the first group of motifs
✅ For sizes S,L,2X,4X:
◦ Wrap the yarn once on the hook, insert the hook into the first stitch (where you cut the yarn), pull.
◦ Close two loops at a time until you are left with only one loop (this is the first dc).
◦ Continue working the row of double crochet stitches (dc).
✅ For sizes M, XL, 3X, 5X:
◦ Wrap the yarn three times on the hook, insert the hook into the first stitch (where you cut the yarn), pull.
◦ We close two loops at a time until we are left with only one loop.
◦ We will obtain a very high stitch, equivalent to the 5 initial chains, necessary for the 2R dc st row.
◦ We continue working the 2R dc st stitch, inserting the crochet hook into the two overlapping loops in the middle of the very high stitch just created, until the end of the row.
Now that we have joined the two groups of motifs, forming the structure “3 motifs – chains – 3 motifs”, we can continue with the next rows of our sweater.
📌 Important: Remember to count the stitches regularly to avoid losing any.
🔎 Now consult the description of your size and follow the number of rows needed!
Size S
R1:ch1*sl st-hdc*-sl st(last stitch worked)
R2:ch4,sk 1*dc-ch1*-dc(last stitch worked)
R3:ch1*sl st-hdc*-sl st
R4:ch5*2R dc st*
R5:ch1*sl st-hdc*-sl st
R6:ch7*2R mesh st*
R7:ch1*sl st-hdc*-sl st
R8:ch5*2R dc st*
R9:ch1*sl st-hdc*-sl st
R10:ch7*2R mesh st*
R11:ch1*sl st-hdc*-sl st
Repeat everything on the other side of the patterns, to create the other side.
Pay attention to the number of stitches worked in a row.
Size M
R1:ch1*sl st-hdc*-sl st(the last stitch worked)
R2:ch7*2R mesh st*
R3:ch1*sl st-hdc*-sl st
R4:ch5*2R dc st*
R5:ch1*sl st-hdc*-sl st
R6:ch7*2R mesh st*
R7:ch1*sl st-hdc*-sl st
R8:ch5*2R dc st*
R9:ch1*sl st-hdc*-sl st
R10:ch7*2R mesh st*
R11:ch1*sl st-hdc*-sl st
Repeat on the other side of the patterns as well, to create the other side.
Pay attention to the number of stitches worked in a row.
Size L
R1:ch1*sl st-hdc*-sl st(the last stitch worked)
R2:ch4,sk 1*dc-ch1*-dc(the last stitch worked)
R3:ch1*sl st-hdc*-sl st
R4:ch5*2R dc st*
R5:ch1*sl st-hdc*-sl st
R6:ch7*2R mesh st*
R7:ch1*sl st-hdc*-sl st
R8:ch5*2R dc st*
R9:ch1*sl st-hdc*-sl st
R10:ch7*2R mesh st*
R11:ch1*sl st-hdc*-sl st
R12:ch5*2R dc st*
R13:ch1*sl st-hdc*-sl st
Repeat everything on the other side of the patterns, to create the other side.
Pay attention to the number of stitches worked in a row.
Size XL
R1:ch1*sl st-hdc*-sl st(the last stitch worked)
R2:ch7*2R mesh st*
R3:ch1*sl st-hdc*-sl st
R4:ch5*2R dc st*
R5:ch1*sl st-hdc*-sl st
R6:ch7*2R mesh st*
R7:ch1*sl st-hdc*-sl st
R8:ch5*2R dc st*
R9:ch1*sl st-hdc*-sl st
R10:ch7*2R mesh st*
R11:ch1*sl st-hdc*-sl st
R12:ch5*2R dc st*
R13:ch1*sl st-hdc*-sl st
Repeat everything also on the other side of the motifs, to create the other side.
Pay attention to the number of stitches worked in a row.
Size 2X
R1:ch1*sl st-hdc*-sl st(the last stitch worked)
R2:ch4,sk 1*dc-ch1*-dc(the last stitch worked)
R3:ch1*sl st-hdc*-sl st
R4:ch5*2R dc st*
R5:ch1*sl st-hdc*-sl st
R6:ch7*2R mesh st*
R7:ch1*sl st-hdc*-sl st
R8:ch5*2R dc st*
R9:ch1*sl st-hdc*-sl st
R10:ch7*2R mesh st*
R11:ch1*sl st-hdc*-sl st
R12:ch5*2R dc st*
R13:ch1*sl st-hdc*-sl st
R14:ch7*2R mesh st*
R15:ch1*sl st-hdc*-sl st
Repeat everything on the other side of the patterns, to create the other side.
Pay attention to the number of stitches worked in a row.
Size 3X
R1:ch1*sl st-hdc*-sl st(the last stitch worked)
R2:ch7*2R mesh st*
R3:ch1*sl st-hdc*-sl st
R4:ch5*2R dc st*
R5:ch1*sl st-hdc*-sl st
R6:ch7*2R mesh st*
R7:ch1*sl st-hdc*-sl st
R8:ch5*2R dc st*
R9:ch1*sl st-hdc*-sl st
R10:ch7*2R mesh st*
R11:ch1*sl st-hdc*-sl st
R12:ch5*2R dc st*
R13:ch1*sl st-hdc*-sl st
R14:ch7*2R mesh st*
R15:ch1*sl st-hdc*-sl st
Repeat everything on the other side of the patterns, to create the other side.
Pay attention to the number of stitches worked in a row.
Size 4X
R1:ch1*sl st-hdc*-sl st(the last stitch worked)
R2:ch4,sk 1*dc-ch1*-dc (the last stitch worked)
R3:ch1*sl st-hdc*-sl st(the last stitch worked)
R4:ch5*2R dc st*
R5:ch1*sl st-hdc*-sl st
R6:ch7*2R mesh st*
R7:ch1*sl st-hdc*-sl st
R8:ch5*2R dc st*
R9:ch1*sl st-hdc*-sl st
R10:ch7*2R mesh st*
R11:ch1*sl st-hdc*-sl st
R12:ch5*2R dc st*
R13:ch1*sl st-hdc*-sl st
R14:ch7*2R mesh st*
R15:ch1*sl st-hdc*-sl st
R16:ch5*2R dc st*
R17:ch1*sl st-hdc*-sl st(last stitch worked)
Repeat everything on the other side of the patterns, to create the other side.
- Pay attention to the number of stitches worked in a row.
Size 5X
R1:ch1*sl st-hdc*-sl st(the last stitch worked)
R2:ch7*2R mesh st*
R3:ch1*sl st-hdc*-sl st
R4:ch5*2R dc st*
R5:ch1*sl st-hdc*-sl st
R6:ch7*2R mesh st*
R7:ch1*sl st-hdc*-sl st
R8:ch5*2R dc st*
R9:ch1*sl st-hdc*-sl st
R10:ch7*2R mesh st*
R11:ch1*sl st-hdc*-sl st
R12:ch5*2R dc st*
R13:ch1*sl st-hdc*-sl st
R14:ch7*2R mesh st*
R15:ch1*sl st-hdc*-sl st
R16:ch5*2R dc st*
R17:ch1*sl st-hdc*-sl st
Repeat everything on the other side of the patterns, to create the other side.
- Pay attention to the number of stitches worked in a row.
Repeat the entire procedure of the rows for the other side of the pattern, following the same steps and maintaining the same tension to achieve an even result on both sides. And don’t forget to always count the stitches in each row to avoid mistakes!
Finishing the Crewneck
Now that we have completed the central piece of the sweater, let’s proceed with finishing the crewneck.
1️⃣ Preparation
• Turn the panel on the wrong side.
• Choose which side will be the front of the sweater (since it is an equal piece, we can decide freely).
• Identify the central stitch of the crewneck on the back panel and start from there.
2️⃣ First round (on the wrong side)
• We alternate sl st – hdc along the entire neckline:
◦ sl st → in the stitch that connects the stitches.
◦ hdc → on the stitch itself.
3️⃣ Final finishing (on the front)
• We turn the work on the front and work 2 to 7 rounds alternating* fpdc – bpdc*, to create an elastic edge.
4️⃣ Important!
• Change the hook: use a half size smaller.
Working the Sleeves
At this point, we move on to making the sleeves.
1️⃣ Locating the center
• Count the stitches on the outer sides of the long panel.
• Find the central stitch that divides the panel into two parts and place a marker.
2️⃣ Calculating stitches for your size
• Starting from the center marker, count the number of stitches to the right and left, then place the markers as follows:
🔹 S → 33 right, 33 left → marker on st 33
🔹 M → 35 right, 35 left → marker on st 35
🔹 L → 37 right, 37 left → marker on st 37
🔹 XL → 39 right, 39 left → marker on st 39
🔹 2X → 41 right, 41left → marker on st 41
🔹 3X → 41 right, 41 left → marker on st 41
🔹 4X → 43 right, 43 left → score marker on st 43
🔹 5X → 43 right, 43 left → score marker on st 43
• Sleeves
1️⃣ Start working
• We start from the right stitch marker (stitch X) and work up to the left stitch marker (stitch X), following the pattern for your size.
🔹 For sizes L, XL, 4X, 5X
✅ R1: ch3, sk1, dc closes the 2 loops together, ch4, continue with the 2R mesh st pattern.
• Before closing the last stitch: close 2 loops, sk1, work 1 dc, close 3 loops, then 2 at a time.
✅ Repeat pattern:
• R2: ch1, *sl st – hdc* – sl st
• R3: ch5, 2R dc st
• R4: ch1,* sl st – hdc* – sl st
• R5: ch7, 2R mesh st
• R6: ch1, sl st – hdc – sl st
• R7: ch5, 2R dc st
• Continue alternating the same stitches
For L work: 28R
For XL work: 30R
For 4X work: 32R
For 5X work: 32R
🔹 For sizes S,M,2X,3X
✅ R1: ch3, 2 dc close the 3 loops together, ch2, continue with the pattern 2R dc st.
• Before closing the last stitch: close 2 loops, work 2 more dc, close 4 loops, then 2 at a time.
✅ Repeat pattern:
• R2: ch1, *sl st – hdc *- sl st
• R3: ch7, 2R mesh st
• R4: ch1, *sl st – hdc* – sl st
• R5: ch5, 2R dc st
• R6: ch1, *sl st – hdc – sl st
• R7: ch7, 2R mesh st
• Continue alternating the same stitches
• For S work: 26R
• For M work: 28R
• For 2X work: 30R
• For 3X work: 32R
🔹 Closing the sleeves and panels
• Once the length of the sleeve is complete, we close the sides by joining the two parts with the preferred method (sewing or crochet union).
🔹 Finishing the cuffs
.In the first round, decrease by casting off 2 dc stitches into one or alternating 2 into one and a free stitch, depending on how tight you want the cuff.
Continue with the next round alternating *fpdc (front post double crochet) and bpdc (back post double crochet) *to obtain a ribbed effect.
🔹 Bottom edge of the sweater
First round: work a round of * sl st – hdc *(work on the back of the panel.)
Work sl st in the joining points of the rows and hdc in the intermediate rows
Turn the work to the front and continue with the same pattern as for the cuffs (*fpdc – bpdc*).
If you want, you can decrease the stitches for a more snug fit.
Tips: Be sure to always check the number of stitches to maintain symmetry between the two sleeves!
You’ve just completed your Melis Crochet Sweater – a soft triumph of patience and creativity.
Want more heartfelt patterns and crochet inspiration? Join my newsletter and stay connected to the joy of making.

Loved making the Melis Sweater?
If you’d like to try your hand at another beautiful piece,why not crochet the Gipsy Chic Lace sweater next?
You can find the full guide right here: