Once you start crocheting or knitting your own garments, it becomes something you can’t stop. It grows on you, and soon your mind is constantly dreaming up your next handmade piece.
It doesn’t matter whether you’re making it for yourself, or maybe you’ve just become a mom or aunt and want to create something special for a little one. Or maybe you love crafting amigurumi, home decor, or meaningful gifts. Whatever it is, new ideas will keep blooming in your mind.
If you’re just beginning and feel unsure, let me encourage you – give it a try. The first steps can be hard, but with time, you’ll create beautiful, unique pieces.
Like today’s top I want to share with you: simple in design, quick to make, and full of handmade charm. It’s not perfect, but that’s the beauty of handmade. It wasn’t made by a machine, but by your hands.
With a little experience, this top will come together quickly. It was inspired by one of my most loved designs: theMelis Crochet Sweater.
Let’s dive into the guide!
You can personalize this top with your favorite colors. Mix tones, play with textures, and create beauty with your hands.
For this version, I used two shades: light blue and deep turquoise. The yarn is cotton with a tiny bit of elastane – natural fibers are always the best for you and for the planet.
Size M (relaxed fit): 300-350g DK yarn Hook: 3.5 mm
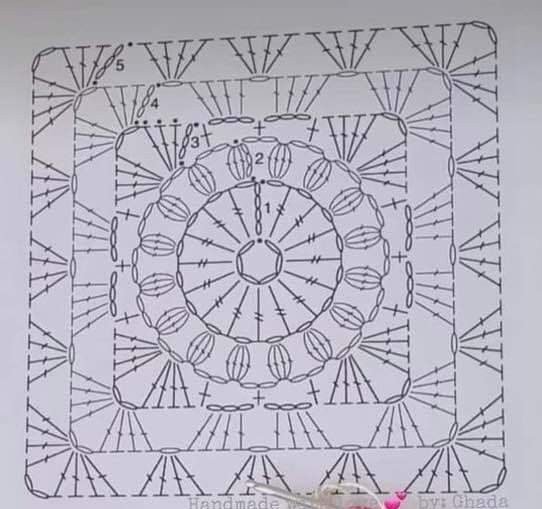
Let’s begin our top by creating 6 floral square motifs, following the diagram .
Once all 6 are done, divide them into 2 groups of 3 motifs. You’ll use 3 for the back panel, and 3 for the front panel.
Take one group of 3 motifs, place them in front of you. Start from the outer right corner and along the entire edge, work Row 1, which will connect Group 1 to Group 2. You will also chain between the two groups to link them.
❗ Important: Count your stitches. Make sure the total number of stitches you work along the motifs is the same for both groups.
Row 1 – Connecting Row
R1: ch8, work 3R dc st all across. When you reach the outer corner of the third motif, check that the number of stitches is odd.
Now chain the number needed to create the shoulder.
For a deeper neckline, chain more (must be an odd number). I chained 29.
Yarn over 5 times, insert hook into the outer right corner of the second group. Close the stitch by pulling through 2 loops at a time until only 1 loop remains. On this long stitch, work the 3R dc st, skipping one loop each time to build the 3 rows.
Continue to the outer edge of the third motif.
R2 (wrong side):ch7, work 2R mesh st across.
R3:Repeat Row 1
R4:Repeat Row 2
R5:Repeat Row 1
R6:Repeat Row 2
Now, divide the panel. Place a stitch marker on the center stitch, then measure how much space you need for the armhole: around 25–30 cm per side, starting from the center. Make sure the number of stitches on both sides is even.
From where you finished Row 6, continue:
R7:Same as Row 1, ending at the stitch marker.
R8:Go back, repeat Row 2.
Move to the other side of the panel. From the second stitch marker, join the yarn and work R7 and R8 again, toward the outer edge.
Now one shoulder is ready. Repeat the same process on the other side, making sure stitch and chain counts match.
Once both sides are done, join the sides of the top.
Finishing touches:
For the neckline and armholes, on the wrong side, work one round alternating: sl st – hdc
For the bottom edge: Work one round as above (on the wrong side), Then on the right side, work: 5 dc in one stitch (shell stitch), skip 2 stitches, 1 sc.
Now the top is ready to wear.
I always say this and I’ll say it again: Take the idea, and make it your own. Add your story, your color, your heart.
Handmade means made with love.
Looking for a lighter version?
If you enjoyed making the Serenity Square Top, you might love the Bloom Square Top — a breezier design made with more mesh stitch for a lighter, airier feel.